Monday, 31 August 2009

A girlie pink and gold christmas card


Don't you just love bank holidays? I do! Apologies to anyone out there who has to work today but for me it's a chance to do some crafting, after a busy weekend that didn't leave any time spare.

And being a bank holiday Monday ... I popped over to MojoMonday for this week's sketch:


I decided to go back to my Christmas card making ready for the craft market and went for a very girlie pink and gold concoction with a bit of bling thrown in.


Recipe
Stamp sets: Scandinavian Season, Best Yet
Cardstock: Pretty in Pink, Whisper White
Ink: Versamark, Markers (Pretty in Pink, Regal Rose)
Wide Grosgrain Ribbon: Regal Rose
Striped Grosgrain Ribbon: Pretty in Pink
Other: Gold brads, Fire Circle Rhinestone Brad, Gold EP, Dazzling Diamonds
Non-SU: Nesties, Cuttlebug embossing folder

I coloured with Pretty in Pink marker behind the Dazzling Diamonds. The glitter is fine enough to let the background colour shine through and yet still give the sparkly effect.

The sentiment is from Best Yet (a set of six sentiments), a level 1 hostess set that will only be available until the end of September. After that it will be gone, so if you'd like to get your hands on a set please contact me to book a workshop.

Enjoy what's left of the holiday.

Sara xx

Sunday, 30 August 2009

A man's birthday card using the SWU sketch challenge


Our Stamp With Us challenge this week is to use this sketch:


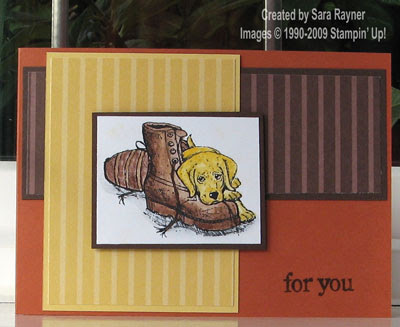
My DT sample was very quick and simple (is there any connection there with it being a man's card, LOL - ooh wash my mouth out). The watercolouring didn't even take very long to do because I wanted to keep to just a few colours to match my DSPs. The image is from the For Father set and I can't believe that it's taken me so long to get around to using it, it's just such a sweet expression on the dog's face.


Recipe
Stamp sets: For Father, One of a Kind
Cardstock: Really Rust, Chocolate Chip, So Saffron, Whisper White
DSP: Chocolate Chip, So Saffron
Ink: Black Stazon, Chocolate Chip, Watercolour Wonder Crayons

I used standard Whisper White cardstock for the watercolouring and used an aquapainter with the Watercolour Wonder Crayons. The key trick is to make sure that you don't get the card too wet, keep the water flow minimal and the card will stay smooth. 

I had intended to stamp the sentiment onto cardstock and put behind hodgepodge hardware but I had to run off and deal with an emergency so I simply stamped it direct to card. A shame about the hodgepodge (it's about time I used some of it) but it certainly helped keep the card quick.

Please check out the cards by the rest of the Design Team, as usual there's a huge variety even though we're all working from the same sketch. I look forward to viewing and commenting on all your challenge entries this week.

A big thank you for all the wonderful comments you keep leaving. I love reading them and really appreciate the personal messages. 

Hope you're enjoying your bank holiday weekend.

Sara xx


PS. Not sure whether anyone else is having technical problems? I can't get the Stamp With Us blog to load on my laptop this morning but it does load on my iPhone (strange). Hopefully it's just a glitch at my end and you don't have the same problem. I'll edit the post to show when I get it back. (Sunday 30 Aug, 10:18)

Think it's sorted. I cleared my cache and entered the blog address from scratch and that seems to have fixed it. (Sunday 30 Aug, 10:28)

Friday, 28 August 2009

A soft summer birthday card for my Mum


As I promised yesterday, here's a break from Christmas. This is the card I made for my Mum's birthday last weekend. We had a lovely girlie day out in Lincoln on the Friday with our traditional picnic breakfast of Bucks Fizz and croissants on the train, a meander around the shops and then lunch at the Pie Shop in Lincoln (very tasty). Sunday, my brother, SIL and DH went round to Mum and Dad's and we enjoyed an al fresco buffet lunch out in the sun. So it was a long, leisurely family weekend together - lovely!


Now to the card - I always aim to make my close family cards that bit more special and often a little bit larger too. This design is a tri-shutter card taken from the Splitcoaststampers Try a New Technique Forum. It needs 12" long card so I broke into my stash of textured 12" x 12" cardstock - very luxurious.


Recipe
Stamp sets: Soft Summer, Fresh Cuts
Textured Cardstock: So Saffron, Barely Banana
Plain Cardstock: Apricot Appeal, Very Vanilla
DSP: Tea Party
Ink: Mellow Moss, SU Markers
Punch: Boho Blossoms
Other: Dazzling Diamonds
Non-SU: Nesties, Cuttlebug folder, Diamonte letters, computer printed verse


The vine was stamped direct to the card with Mellow Moss and the blossoms were punched, shaped and attached with glue dots. All other elements were matted and layered as you can see from the photos. The small space to the left of the letter U was used to write a personal message to Mum.

Have a great bank holiday weekend everyone ... mmm, more crafting time!

Sara xx

Thursday, 27 August 2009

My mother-in-law's first results with stamping


My in-laws came over to visit at the weekend (they come to visit Bess I think, more than us LOL). My MIL is always very interested in what I've been crafting (or else sweet enough to pretend) and I suggested that she have a little go herself. I know she likes the 3d items and so started her off with a mini pizza box (design from Splitcoaststampers) as they're not too difficult to make and still have a little space for decoration.

Here's my MIL's version:


Isn't it great! And her first go at stamping too.

Recipe
Stamp sets: Season of Joy
Cardstock: Old Olive, Very Vanilla
DSP: Ski Slope
Ink: Old Olive
Punches: Corner Rounder, 1" Circle
Non-SU: Nesties

Here's my version:


Recipe
Stamp sets: Season of Joy
Cardstock: Old Olive, Very Vanilla, Real Red
DSP: Ski Slope
Ink: Old Olive
Punches: Corner Rounder, 1" Circle
Narrow Grosgrain Ribbon: Real Red
Non-SU: Nesties, Bells

My version is the same recipe with a little Real Red thrown in for a splash of colour.

If you'd like an introduction to stamping or the chance to learn more advanced techniques, then please contact me at sarastamper123@gmail.com to book a workshop or a class.

I promise a break from the Christmas projects over the next few days - a couple of birthday cards coming up!

Thanks for stopping by.

Sara xx


Tuesday, 25 August 2009

Christmas poinsettia for the Mojomonday sketch challenge


Bess is doing so much better now (fingers and toes crossed that I'm not tempting fate here). We have to keep her from rubbing her belly along the carpet or grass (she's a dog in case you're new to my blog, lol) but as long as we do there's no flare up of her rash. Anyway what that meant for me was that I got to play with the Mojomonday challenge, on a monday, for the first time in ages. This was the sketch:
This is the card I made for it:


Recipe
Stamp sets: Polka Dot Punches, Season of Joy
Cardstock: Old Olive, Certainly Celery, Real Red, Chocolate Chip
DSP: Ski Slope
Ink: Real Red, Old Olive, Chocolate Chip
Double Stitched Ribbon: Chocolate Chip
Punch: 5 petal flower
Other: Crafters toolkit, So Saffron brad
Non-SU: Bells

I made the poinsettia up using the polka dot punches stamp and the 5 petal punch. The bells were tied onto the ribbon using some silver elastic cord and the tails were stuck in place with glue dots. The sentiment from Season of Joy was stamped direct to the DSP with Chocolate Chip ink.

I'm busy making up Christmas sets as JJ and I are having a stand at the next Craft Market in Barnsley on Sunday 13 September. It's outdoors so wish us luck with the weather and if you're going to be in the area that day then please stop by and see us.

Thanks for looking.

Sara xx

Sunday, 23 August 2009

A tough recipe challenge for SWU


This week's challenge for Stamp With Us is a bit of a toughie. You're allowed:

1 x patterned paper
1 x coloured card
1 x flower
3 x brads

I really thought I was going to struggle with it but then once I'd chosen my paper, that pointed me to my coloured card. That combo sent me to the little bird stamp from Fun and Fast Notes (because I'd be using chocolate and saffron to colour it). When I'd done that it looked a little bit like a window and so I decided to add the scallop along the top like a little curtain. So in actual fact it came together quite quickly just from choosing the DSP.


Recipe
Stamp Sets: Fun & Fast Notes, Fresh Cuts
Cardstock: Chocolate Chip, Whisper White
Ink: Chocolate Chip, Always Artichoke, Regal Rose
DSP: Tea & Crumpets
Brads: So Saffron, Rhinestone yellow
Punch: Scallop Edge
Pretties Kit: Small flower

The bird was coloured with markers direct to stamp (leaving out the flower). I then used my matching SU watercolours to paint the bird and leaf. The small flower from the Pretties Kit was "coloured in" using a Regal Rose marker and left to dry a little while before adding to the stamped image with a Rhinestone brad.

Good luck with your own entries to the challenge. I look forward to seeing what you can create with such a limited recipe. Please stop by the rest of the DT blogs to see their versions. Some of them have added a little to the recipe (where is ribbon mentioned?) which I think is cheating LOL, but has made for some great cards.

Enjoy the rest of your weekend.

Sara xx

Friday, 21 August 2009

A matching set of purple christmas goodies


Here's the matching gift packaging and Post-it Holder I made to go with the card I made a few days ago here.


And I've given the recipes for each item individually (in case you don't want to make the full set).

Recipe (Post-it holder)
Stamp set: Scandinavian Season
Cardstock: Almost Amethyst, Lovely Lilac, Whisper White
DSP: Tea Party
Ink: Versamark
Other: Silver EP, Dazzling Diam
onds
Narrow Grosgrain Ribbon: Elegant Eggplant
Punches: Scallop Edge
Non-SU: Chipboard, Bind-it-all, Post-it pad

My Post-it note holder is made with two pieces of chipboard, 9cm x 8.5cm covered with DSP and cardstock and corner rounded.


Recipe (Mini Pizza Box)
Stamp set: Scandinavian Season
Cardstock: Almost Amethyst, Whisper White
DSP: Tea Party
Ink: Versamark, Markers
Other: Silver EP, Dazzling Diamonds
Punches: 1" Circle
Non-SU: Nesties, adhesive rhinestone

The instructions for the mini pizza box are from Splitcoaststampers here. I covered the box with DSP, stamped the tree with Versamark and heat embossed with silver EP and decorated with Markers, Dazzling Diamonds and and adhesive rhinestone from my stash.


Recipe (Box in a Bag)
Stamp set: Scandinavian Season
Cardstock: Lovely Lilac, Whisper White
DSP: Tea Party
Ink: Versamark
Other: Silver EP, Dazzling Diamonds, Silver Elastic Cord, Silver Eyelets
Narrow Grosgrain Ribbon: Elegant Eggplant
Punches: Scallop Edge, Round Tab
Non-SU: Silver gel pen

The box in a bag is also from Splitcoaststampers here. Faux stitching on the base and the closure were done with the silver gel pen (from stash). Snowflake decorations and the star tag were made with Versamark ink and silver EP heat embossed. These were embellished with Dazzling Diamonds and the silver gel pen.

Have a great weekend.

Sara xx

Thursday, 20 August 2009

I'm dreaming of a purple Christmas


I'm doing my best to make sure that Christmas doesn't creep up on me this year and that I get a few xmas cards made each month. Although I enjoy the traditional colours for some of my cards I really love using blues and purples as well.


Recipe
Stamp sets: Scandinavian Season, Best Yet
Cardstock: Almost Amethyst, Lovely Lilac, Whisper White
Ink: Versamark
Embossing Powders: Silver, White
Rhinestone Brads: Lilac
Stampin' Write Markers: Almost Amethyst
Punches: Scallop Oval, Large Oval
Other: Dazzling Diamonds
Non-SU: Nesties


The card blank was stamped with snowflakes and heat embossed with white powder for the background. The sentiment and tree were heat embossed with silver EP and a section of the tree picked out with markers. A separate section was picked out with Tombow adhesive and sprinkled with Dazzling Diamonds. I'm not sure that you can see the bling factor too well but I've tried to show different angles to pick it up.

I'm working on a few boxes and bags now to go with the card.

Sara xx

Tuesday, 18 August 2009

Some blog awards

My lovely friend Alex has just finished making a wonderful boxed set of Christmas cards as a raffle prize for Macmillan (stop by her blog for a peek and the story behind the winner, heehee). She also recently nominated me for a trio of awards. Thank you Alex for thinking of me, for all your lovely comments and for your friendship.

As I already had one of them (and had already passed it on to others) I think it's probably fair only to pass on the two new ones (it also stops me getting too confused and sending an award to the same person, lol).


The awards didn't seem to come with any instructions so I'm passing them on to the following fantastic crafters with my thanks for all their inspiration:


And now I'm off to steal designs from them, that's a fair trade isn't it? Lol.

Sara xx

Sunday, 16 August 2009

A colour challenge based on bright gerbera's


Today's challenge on Stamp With Us is a colour theme using this image:


How gorgeous and vibrant are these flowers - just the perfect excuse to use some of my Bold Brights colour range. As is often the case with these colour challenges, I also found the elements of my card suggested by the photo as well and decided to stick with the flower theme.

Here's my DT sample:


Recipe:
Stamp sets: Leaves a la Carte, Sincere Salutations
Cardstock: Old Olive, Certainly Celery, Real Red, Ruby Red, Only Orange, Pumpkin Pie, Pixie Pink, Pink Passion, Whisper White
Ink: Old Olive, Real Red
Brads: Apricot Appeal
Punches: Scallop Circle, Boho Blossoms, Scallop Oval, Large Oval
Other: Crafters Toolkit

For each flower, I punched the main colour using the Scallop Circle and the centre, muted colour flower using the smallest of the Boho Blossoms. The large flower was shaped by snipping every two petals and then in between. (I find that if you go straight to snip each petal then they don't come out so even). The petals were creased along the centre of each (using the blunt end of my needle from the toolkit) and folded slightly. The centre flowers were also snipped slightly for shaping. All snips need to stop clear of the centre or the flower will fall apart when you add the brad. The flowers were added to a layer of Certainly Celery stamped with Leaves a la Carte so that the brads wouldn't show on the inside of the card. Some paper piercing was added to the top left corner to provide a little balance with the sentiment over on the right.

As it's such a bright and cheery card I though it would be ideal as a Get Well but of course it also works well for birthdays.

Enjoy the rest of your weekend and don't forget to check out the rest of the DT creations.

Sara xx


Friday, 14 August 2009

A happy birthday to one of my Stampettes


Yesterday was JJ's birthday and this is the card I sent (I didn't want to put it on the blog until I knew she'd received it). Please drop by and see the lovely card she's posted today - it's gorgeous.

Jan - Glad you had a good birthday and hope the celebration continues over the next few days.

The layout I used was from Mojo Monday ... last week. How behind am I getting?

Recipe
Stamp sets: Bloomin' with Beauty, Sincere Salutations
Cardstock: Almost Amethyst, Pretty in Pink, Whisper White
DSP: Tea Party
Ink: Black Stazon, Regal Rose, Stampin' Write Markers
Taffeta Ribbon: Pretty in Pink
Punch: Corner Rounder
Other: Cuttlebug labels, Nesties

The bowl of hydrangeas was stamped with Stazon, coloured with markers and matted and layered. Taffeta ribbon was threaded through the sentiment label and then a smaller, separate  piece of ribbon was tied around in a bow just above the sentiment.

Have a great weekend.

Sara xx

Sunday, 9 August 2009

Scandinavian tree and snowflakes in cool blues for Christmas


Thanks to everyone for the good wishes for Bess. She hasn't recovered yet, the rash/allergy keeps coming and going but I've decided to just make the best of her good days and grab some crafting time when I can. The blogs may not be as regular as previous but I'll do my best and I hope that you'll still stop by.

This set is my Design Team sample for the Stamp With Us challenge for this week to meet the theme of Christmas.


Recipe (for card and bag)
Stamps sets: Scandinavian Season, Season of Joy
Cardstock: Bashful Blue, Not Quite Navy, Whisper White
DSP: Ski Slope
Ink: Versamark, White Signo Gel Pen
Narrow Grosgrain Ribbon: Whisper White
Punches: Scallop Edge, Round Tab
Other: White EP, Silver Elastic Cord

The tree, snowflakes and sentiment are stamped with Versamark and heat embossed with white powder. Snowflakes are hand cut.


I didn't want to use the same sentiment on the inside of the card so I selectively inked one of the stamps from Season of Joy and used that.

The gift bag uses the box in a bag tutorial from Splitcoaststampers.

Thanks for stopping by.

Sara xx

Monday, 3 August 2009

August Ribbon Offer


Stampin' Up! have another great offer for August. To qualify for a free ribbon bundle all you need to do is:

Spend £45 on any Stampin' Up products 

or 

Host a £300 workshop

The ribbon bundle includes:
  • 9.1m of Certainly Celery 5/8" twill ribbon
  • 9.1m of So Saffron 5/8" grosgrain ribbon
Contact me at sarastamper123@gmail.com to place an order or book a workshop.

Sara xx