Thursday 30 June 2011

Happy Birthday card using Timeless Type alphabet die set


Well I got a chance to use my new Timeless Type alphabet dies for a clean and simple birthday card this week.

Bright, cheery colours and an equally cheery sentiment - hopefully it will be enough to brighten anyone's birthday, no matter the weather.


Recipe
Stamp sets: Curly Cute, On a Pedestal
Cardstock: Pretty in Pink, Melon Mambo, Daffodil Delight, Whisper White
Ink: Melon Mambo, Crumb Cake, Pretty in Pink
DSP: Subtles Patterns Stack
Punches: Fancy Flower, Modern Label, 2" x 1-3/8" Oval, 1-3/4" x 7/8" Oval, 1-3/4" Circle, 1-3/8" Circle
Medium Sizzlits Die: Timeless Type Junior Alphabet
Other: Basic Rhinestones
Tools: Big Shot

The card base is an A6 landscape of Pretty in Pink, matted with Melon Mambo card and Pretty in Pink DSP. "Happy" letters were die cut from Melon Mambo card and adhered direct to the card front. The smaller Oval was used to punch more Pretty in Pink DSP which was then matted onto a larger Oval punched from Melon Mambo card and the layers popped op ont the card front. Using the Melon Mambo marker direct to the Curly Cute Birthday stamp, it was stamped onto Whisper White card and punched with the Modern Label before adding Basic Rhinestones and popping up on dimensionals onto the Ovals. Crumb Cake and Pretty in Pink markers were used direct to the cake stamp from the On a Pedestal set and stamped out onto Whisper White card. The cherry on top was stamped using Melon Mambo ink and the complete image punched with the 1-3/8" Circle. This was matted direct to a 1-3/4" Circle punched from Melon Mambo then popped up on dimensionals onto two Fancy Flowers punched from Daffodil Delight and offset slightly. The whole flower was then popped up on dimensionals onto the card front.

Loving this Timeless Type alpha and I can see it's going to be great for personalising cards.

Please stop by again tomorrow for our Colour Coach blog hop. We'll have lots of fantastic colour inspiration for you.

Sara xx

Tuesday 28 June 2011

A rising star on my team and my card for her


I made this card last week but didn't want to share it until I knew that it had been received. My super talented downline Jan recently added another member to her Stampin' Up! team and I wanted to congratulate her on her success.

I'm showing customers the inlaid embossing technique at my workshops at the moment and so decided to use the same technique for this card. And as Jan's favourite colour is orange, I also incorporated that into her card ... just a little, heehee.


Recipe
Stamp sets: Business Basics
Cardstock: Pumpkin Pie, Peach Parfait, Tangerine Tango, Very Vanilla
Ink: Pumpkin Pie
Punches: Star, 1" Circle, 1-1/4" Circle, 1-3/8" Circle, Corner Rounder
Embossing Folder: Perfect Polka Dots

The card base is an A6 portrait of Pumpkin Pie, matted with a layer of Very Vanilla. Panels of Peach Parfait, Pumpkin Pie and Tangerine Tango were punched with the Corner Rounder on all corners and lined up on grid paper. Stars punched from Very Vanilla card were adhered onto the panels, covering the joins and once dry the panels were cut apart again and then run through the Perfect Polka Dots embossing folder to get the inlaid embossed effect. To keep the layers down (for sending through the mail) the panels were adhered direct to the front of the card, keeping them evenly spaced. The sentiment was stamped in Pumpkin Pie ink onto Very Vanilla card and punched with the 1" Circle. It was matted onto a 1-1/4" Circle of Pumpkin Pie and then a 1-3/8" Circle of Very Vanilla before popping it up on dimensionals on the card front.


Recipe
Stamp set: Perfect Punches
Cardstock: Very Vanilla
Ink: Pumpkin Pie

For the inside the sentiment was simply stamped onto a Very Vanilla card insert with Pumpkin Pie ink.

If you'd like to join my team and have your successes celebrated or if you'd like to hostess a workshop and see the inlaid embossing in real life, then please get in touch.

Thanks for stopping by.

Sara xx

Monday 27 June 2011

July Technique class - bookings close on Saturday


Just a quick reminder that bookings for this class close on Saturday.

At the next technique class on Saturday 9 July we'll be covering:
  • the glitter window technique; and
  • the faux metal technique
to make these Christmas cards ...


... and a couple of other projects besides.

If you'd like to join us for this class which will take place at St Saviour's Church Hall, High Green, then please book your place(s) using the Paypal button on the right, no later than Saturday 2 July.

You can find more details here or you can email me if you have any queries.

Hope to see you there.

Sara xx

Sunday 26 June 2011

Faux leather technique for some girlie bags


Well MIL and I had a great afternoon crafting yesterday. She came along to my last technique class where we covered the faux leather technique to make a man's wallet gift card holder. Yesterday we applied the same technique to a more girlie creation.

I'd seen a few pictures of this little bag out here in blogland and worked out some dimensions for my own version:


Recipe
Cardstock: Rich Razzleberry
Ink: Versamark
6mm Grosgrain Ribbon: Rich Razzleberry
Bigz Die: Top Note
Other: Filigree Brad, Circle Fire Brad
Tools: Heat Tool, Bone Folder, Crop-a-dile
Non-SU: Velcro spot

The base for the bag is an open top box and three top note die cuts. The faux leather technique is applied to all the top notes. Two of the top notes are then trimmed along the long edge and adhered to the front and back of the box. The third top note is scored and folded and the narrow edge adhered to the back of the bag. Brads and a velcro dot are attached for the closure and some ribbon threaded for the wristlet/handle.

Here's another one done in Real Red:


And my MIL's version in Tempting Turquoise:


Enjoy the rest of the weekend.

Sara xx

Saturday 25 June 2011

Blog hop on Friday 1st July


Hi folks, hope you're having a good weekend. I've been busy crafting but I'm not sure that the recipient will have got the card yet, so I don't want to spoil any surprise.

My MIL's coming over this afternoon though, so we'll be doing some more crafting, that I should be able to share tomorrow!

Meanwhile, I just thought I'd give a bit of advance notice that I'm joining some of the other In Love With Stamping forum members this coming Friday, for one of our mammoth blog hops. We've got 25 blogs participating, split into two groups. This hop is built around the colour coach.


This is a fantastic tool for coming up with colour combos that work. The coach gives a Dynamic Duo, (for a stunning monochromatic look eg. Old Olive and Certainly Celery) and then gives a couple of Colour Combos for every single SU colour. In addition to that, you can just swivel the cards around to test out your own combinations. Please email me if you'd like to order one.

For the blog hop we'll each be picking a colour combo from the coach, to use for our project(s).

So please make a note in your diary to pop by on Friday for some colour combo inspiration (of course I'd love to have your company in between as well, lol).

Sara xx

Friday 24 June 2011

New toys to play with


Err, I mean new tools to work with ... lol!

I just had to share what Mr UPS man brought me today. This was my birthday present to myself, aided and abetted by SU!

You can find this die set on page 8 of the Mini Catalogue but the product info doesn't do it justice IMHO:

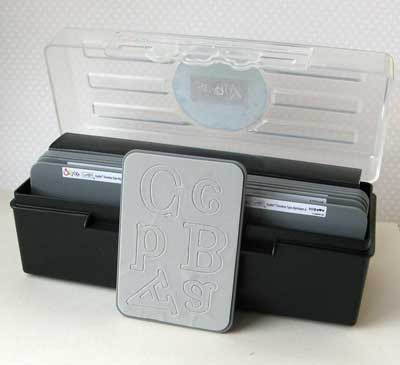
What you don't get from the catalogue (though it is there in brackets under he price), is that the set of dies come housed in their own little box so that you can keep them together and make sure that none of the letters get lost. And at the back of the box is a cardboard insert:


Remove that and you can pop your other sizzlit dies in for safekeeping (even though they're not long enough to fill the space entirely).


Now I've got all the letters in upper and lower case, all the numbers and a few extra shapes too. Can't wait to play with these now!

BTW although this is one of our most expensive items, I got £'s discount off (in addition to my normal demo discount) as a birthday present from Stampin' Up! How fabulous a company is this to work with - love it!

If you'd like to know more about the birthday discount offer and other ways that you can save on big ticket items by becoming a demo, then please get in touch.

Back soon.

Sara xx

Thursday 23 June 2011

How to use the Baby Blossoms for larger pieces of art


The Baby Blossoms set is ideal for small single flowers to adorn a topper, but it's also fantastic for creating a major piece of background paper artwork.

I'm always in need of little gift boxes for my hostess treats and door prizes and this is one that I made recently when my MIL asked for a recap of this little box design. The random pattern of small flowers easily fills this larger space.


Recipe
Stamp sets: Baby Blossoms, Afterthoughts (sentiment)
Cardstock: Confetti White, Marina Mist
Ink: Marina Mist, Bashful Blue, Pear Pizzazz, Pretty in Pink, Regal Rose, So Saffron, Daffodil Delight
Punches: Scallop Trim Border, 2" x 1-3/8" Oval
6mm Grosgrain Ribbon: Marina Mist
Tools: Crop-a-dile, Stamp-a-ma-jig

The box is the 2-5-7-10 box from the tutorial over on Splitcoaststampers here. I wanted a pale colour to use as the base for the box for the flowers but wanted a more substantial card weight than Whisper White or Very Vanilla and so opted for Confetti White which is quite a thick card. After cutting and scoring the box base from the Confetti White, I stamped it all over with a mixture of the small flowers and leaves. I used Pretty in Pink, Bashful Blue and So Saffron inks with the most "filled in/complete" flowers (which are the base images). Leaves were added in between these using Pear Pizzazz ink. Then, using a stamp-a-ma-jig I went over the original flowers and added the "detail" images with Regal Rose (stamped off once to get a paler shade), Marina Mist and Daffodil Delight inks. The box lid was punched with the Scallop Trim Border and a further Scallop Trim Border of Marina Mist was added behind it before the box was assembled. Marina Mist was threaded into the box lid closure holes made by the Crop-a-dile. The frame from the Baby Blossoms set was stamped onto Marina Mist and Confetti White card using Marina Mist ink. The sentiment and the flower were added to the inside of the Confetti White frame using the Stamp-a-ma-jig for placement. After hand-cutting the Marina Mist frame and popping up on the box front with dimensionals, the sentiment was punched out with the 2" x 1-3/8" Oval and also popped up on dimensionals.

Here you can see a little more of the flowers:


Thanks for stopping by.

Sara xx

Tuesday 21 June 2011

Three top tips for finding time to stamp over the busy summer period

As today is the first day of summer and our longest day I thought it would be a good time to share a few tips for fitting in more crafting time over the busy summer period. Many of my friends and customers find it difficult to find time to craft over summer. I notice that class size often dips and so I asked a few of them what the main reasons were. These were the top ones:
  • The kids (or grandkids) are around for much longer and need to be entertained;
  • We're going away on holiday;
  • It's too nice to be indoors and (often as an add-on), I want to get together with friends
So how can we turn these around to get more crafting time?

Why not try out these ideas:

Top tip 1

Involve the kids in your crafting - get them creating with you.
Younger ones can punch shapes out for you and even scrunch up your flowers for that distressed look. Older ones can design their own cards and projects. Whilst older boys may not be very interested in making flowery cards, you may be able to tempt them to try "engineered" cards (eg. spinner and slider cards) or boxes.

Cold, wet days are perfect for making a start on Christmas cards and gifts (have you started yet, it'll be here before you know it!). Add to the wintery feel by having hot chocolate and toasting marshmallows. When the sun comes back out, you'll appreciate it all the more.

Top tip 2

Pack a small craft kit into your holiday luggage - you don't need
to take everything you own, honest. Stamp some images out beforehand using Black Stazon on either Whisper White/Very Vanilla card or Watercolour Paper, depending on what you prefer to colour with (leaving a bit of space around each image). Then pack a selection of markers (in your go-to colours) and maybe an aquapainter (no mess and if you travel with it empty, no problem with airport security). A small pair of scissors can go in the hold luggage if you're flying. When you're all walked out from sightseeing, you can rest up and do a bit of colouring and cutting out. Then when you get back home you can mat and layer your masterpieces onto full size cards.

Top tip 3

Craft outdoors! Who says you have to stay inside? Make sure that your card and paper are weighted down so that they don't blow away in a sudden gust of wind. I find my crop-a-dile makes a great paperweight :-) Make the most of the sun and have the bonus of great light for your crafting. Better still - invite your friends over and make a morning (or an afternoon or an evening) of it. Best of all - book a workshop with me, I'll come over and entertain you and your friends with some crafting projects and you get the chance to earn free hostess goodies. Email me to book your summer workshop.

If you have your own favourite tips to add, then please leave me a comment.

Now I'm off to do some crafting in the garden while the light is good ;-)

Sara xx

Sunday 19 June 2011

His n hers Fathers Day cards


How do these high days and holidays still manage to sneak up on me? I don't know how it happens, lol. Even though I was all set for Father's Day in my classes weeks ago, it wasn't until yesterday that I actually made my Dad's card and DH joined me to make one for his Dad too.

Here's mine:


Recipe
Stamp set: Plane and Simple
Cardstock: Chocolate Chip, Very Vanilla
Ink: Chocolate Chip, Crumb Cake
Embossing Folder: Square Lattice
Other: Neutrals Brads, Crystal Effects, Linen Thread
Tools: Big Shot, Brayer

The card blank is Chocolate Chip cut and folded to create a side stair step card. A panel of Very Vanilla was put through the Square Lattice embossing folder after one side of it had been brayered with Chocolate Chip ink. This was adhered to the main side panel on the front of the card. A thin panel of Very Vanilla was stamped with the sentiment in Chocolate Chip ink and Soft Suede Brads added at either end before popping up on dimensionals on the bottom "step". A medium Panel of Very Vanilla was stamped with the border design in Chocolate Chip ink and then adhered direct to the middle "step". The plane was stamped at the top of a large panel of Very Vanilla and then the border design was stamped again, the other way up beneath it. The top of the fold was marked in pencil on the panel and then the area around the plane, up to that mark was cut away, before adhering the bottom of the panel to the top "step". The compass was stamped three times in Chocolate Chip ink onto Very Vanilla card. The "glass" area was covered with Crystal Effects and left to dry before cutting out the compasses. After colouring the rings with a Soft Suede marker they were threaded with Linen Thread and popped up on the card front with dimensionals.

DH wanted a clean and simple card for his design:


Recipe
Stamp sets: Sail Away, Plane and Simple (sentiment)
Cardstock: Concord Crush, Marina Mist
Ink: Concord Crush
Tools: Stamp-a-ma-jig

The card base is an A6 portrait of Concord Crush. The sailboat and sentiment were stamped onto Marina Mist card with Concord Crush ink using a Stamp-a-ma-jig for placement. This layer was adhered direct to the card front.

Hope you have a lovely Father's Day. We're off now to a family reunion. Who knows, I may even get some material for scrapbooking today :-)

Sara xx

Saturday 18 June 2011

Learn new techniques for standout christmas cards


At our next technique class on Saturday 9 July we'll be covering:
  • the glitter window technique; and
  • the faux metal technique
to make these Christmas cards ...


... and a couple of other projects besides.

If you'd like to join us for this class which will take place at St Saviour's Church Hall, High Green, then please book your place(s) using the Paypal button on the right, no later than Saturday 2 July.

You can find more details here or you can email me if you have any queries.

Hope to see you there.

Sara xx

Friday 17 June 2011

A gift certificate wallet and my belated birthday cards


At last night's workshop, my hostess used the gift certificate that a thoughtful family member bought from me, for her and it reminded me that I hadn't shared with you, the gift wallet I made to present it in.

I usually mention these gift certificates on my blog on the lead up to Christmas but they're available from me all year round if you want to drop a hint to friends and family. All they need to do is email me and let me know how much they want the certificate to be for and I'll arrange the rest.


Recipe
Stamp sets: Vintage Vogue, Something to Celebrate
Cardstock: Cajun Craze, Pumpkin Pie, Early Espresso, Very Vanilla
Ink: Cajun Craze, Pumpkin Pie, Early Espresso, Old Olive
Punches: Scallop Edge Border, 3/4" Circle, 1/2" Circle
3mm Taffeta Ribbon: Pumpkin Pie
Other: Neutrals Brads, Filigree Designer Brad
Non-SU: Velcro spot

The wallet base is Cajun Craze card. Using the Scallop Edge Border, a strip of Early Espresso was punched, folded and adhered behind the edge of the wallet flap. A shaped mat of Very Vanilla card was stamped with the leafy frond from the Vintage Vogue set in Old Olive ink and then matted onto Pumpkin Pie card, before adhering to the wallet flap. The large flower from the same set was stamped using the rock 'n' roll technique with Pumpkin Pie and Cajun Craze inks. This was then cut out and a 1/2" Circle punched from Cajun Craze card was secured to the centre with a Very Vanilla Brad before it was popped up on a dimensional on the wallet flap. A large Filigree Designer Brad was backed with a 3/4" Circle punched from Early Espresso card and a small piece of Pumpkin Pie 3mm Taffeta Ribbon was trapped in place behind it before securing the brad through the wallet flap. A velcro spot provided the closure and covered the back of the brad on the inside. Finally the sentiment from the Something to Celebrate set was stamped on the right lower corner of the wallet in Early Espresso ink.

And now a quick thank you to a couple for friends for their lovely belated birthday cards.

From Dawn ...


And from Emma! ...
(edited because I'd credited the wrong person - so sorry Emma I'm suffering from a bad head cold this week and my brain's obviously fried)


Thanks so much ladies, what a lovely surprise from each of you.

Have a great weekend all.

Sara xx


Wednesday 15 June 2011

June batch of thank yous for my customers


And back to my usual style of post, complete with recipe. This is my thank you card for all my customers this month and it's a slight variation on a card I first shared a few months ago here, but a bit brighter and snazzier. As for all my monthly thank you's, this is an easy one to make up quite quickly as a batch.


Recipe
Stamp set: Elegant Thank You
Cardstock: Tempting Turquoise, So Saffron, Whisper White, Chocolate Chip
Ink: Tempting Turquoise
DSP: Play Date
Punches: Two-step Owl, Designer Label
Other: Basic Rhinestones

The card blank is a 10cm square of Tempting Turquoise, matted with a square of So Saffron card with opposite corners further matted with Play Date DSP. The owl body and the middle size eyes were punched from Chocolate Chip card, the large eyes from Whisper White card and the little waistcoat from more Play Date DSP. The smallest eyes weren't punched at all but added as Basic Rhinestones. After adhering all the layers of the owl together it was popped up on dimensionals on the card front. The sentiment was stamped with Tempting Turquoise ink onto Whisper White card and punched with the Designer Label. Another Designer Label of Tempting Turquoise card was cut in two horizontally and adhered behind the sentiment top and bottom before popping up on dimensionals also.

And here's the batch. Just working on another lot now, ready for tomorrow night's customers.


Thanks for stopping by.

Sara xx

Monday 13 June 2011

More pix from Saturday's technique class


Saturday was our technique class and we were using the faux leather technique and the waterspot stamping technique. My previous post here shows the Father's Day wallet and the notelet card that we made.

And these are the other two cards that we squeezed in. Another male card using strips of faux leather (you can see the effect better in the pic at the top of the post) to frame the main image ...


And a more feminine card using more "shabby chic" butterflies (or are they moths) ...


Actually by the time we did the class I'd swapped out the Marina Mist for More Mustard which gives a much warmer feel to the finished card.

Everyone got great results. The waterspot stamping is never the same twice but we got some stunning butterflies. Just loved how they were all different.

Our next technique class on Saturday 9 July will be using the:
  • faux metal technique; and
  • the glitter window technique
More information about it soon (or email me if you can't wait).

Now that my exams are over I'm busy with a major overhaul of my blog. You'll see the results in a few weeks time hopefully but for now it's the same old, same old and it'll be back to the full card recipes and instructions for my next post.

Thanks for stopping by.

Sara xx

Sunday 12 June 2011

Card share celebrating my birthday

Hope you're having as good a weekend as I am.

It was my birthday on Friday and the celebrations are running through the weekend, heehee.

Just taking a few minutes today to share with you some of the handcrafted cards I've received:

From my DH ...


From my MIL and FIL (the little box is attached to the card and had a cheque inside - fab idea) ...


From my downline Jan (full details are on her blog here), this card is beautifully textured too, you just have to touch ...


And she made a little bagalope so that the card wouldn't be crushed ...


And from my upline Joanne, it's difficult to pick up but there's a beautiful shimmer to this in the sunlight ...


And the choccies came in matching packaging. Hmm maybe I should have taken the pic before I ripped into them, lol.


Off now to enjoy more of my birthday weekend.

I'll pop back tomorrow with more pix from yesterday's technique class.

Sara xx


Wednesday 8 June 2011

Bess is scrapbooked again


Now this is a photo of Bess that I've used before when scrapbooking, but it's a favourite, so I don't apologise for using it again. This was a page that I prepared as a gift for my MIL when she visited at the weekend. She adores Bess (we know that she visits more to see Bess than us, lol) so I was sure that it would be appreciated and it was.


Recipe
Stamp sets: Cottage Garden, P is for Paw
Textured Cardstock: Tempting Turquoise
Plain Cardstock: Tempting Turquoise, Whisper White, Old Olive
Ink: Chocolate Chip, Crumb Cake, Tempting Turquoise, So Saffron
DSP: Playdate
Punches: Scallop Edge Border
Bigz Dies: Beautiful Butterflies, Top Note
Embossing Folder: Vintage Wallpaper
Other: Designer Buttons (Brights), Basic Pearls
Tools: Big Shot, Color Spritzer

The layout was a challenge from the SUDSOL demo forum that I'm a member of and I trimmed the 12 x 12 textured cardstock to fit the A4 (approx) layout that they were after. A large mat of Whisper White was wheeled with the P is for Paw stamp in Crumb Cake and then Chocolate Chip and Crumb Cake inks were spritzed over the top and also onto a Top Note cut from Whisper White card. A Scallop Edge Border trim was added behind the top and bottom of the White mat before adhering it to the page. The photo of Bess was matted onto Old Olive card and adhered next to the pawprints. Using Chocolate Chip ink the Cottage Garden sentiment was stamped onto the Top Note die cut. A butterfly was added in Tempting Turquoise (stamped off once to tone down the intensity of colour) and flowers in So Saffron ink. So Saffron was also used to sponge the edges of the die cut to define it before adhering to the page. Strips of Play Date DSP in differing lengths and widths were added above and below the photo. Small strips of Tempting Turquoise card were journalled and secured to the top of the photo with a small button, using glue dots. Large buttons were added to either end of the Play Date paper strip, also using glue dots. Using the Beautiful Butterflies die, a medium and a small butterfly were cut from Temting Turquoise card and Play Date DSP respectively and the larger one was embossed before joining them and adding them both the the page. The page was finished by adding Basic Pearls to the butterfly bodies and the flower centres.

Thanks for stopping by.

Sara xx

Monday 6 June 2011

Casing myself with a classy colour combo


Hope you had a good weekend. MIL and FIL came over to visit on Saturday and so I took a break from studying so that MIL and I could have a good crafting session. My MIL wanted to have a go at making this card from a few weeks back and so we decided to keep the stamps and the layout the same but alter the colour combo. So today I'm mainly casing myself, lol.


Recipe
Stamp sets: Baby Blossoms, Something to Celebrate
Cardstock: Crumb Cake, Basic Black, Whisper White
Ink: Craft Whisper White, Versamark
DSP: Neutrals Patterns
Seam Binding Ribbon: Crumb Cake
Embossing Folder: Perfect Polka Dots
Other: Beveled Windowpanes, Brads (Neutrals), Gold EP, Black EP

The instructions are as for the other other card here, with the exception of the image behind the pane. I wanted to stamp onto Black but knew that the only thing that would really show up would be the Craft Whisper White, so I stamped the base rose in that ink and left it to dry. After a quick blast with the Heat Tool to ensure that it was truly dry, I then stamped the rose detail with Versamark (using the Stamp-a-ma-jig for position) and heat embossed with Gold EP. The sentiment was also stamped in Versamark and heat embossed with Black EP.

Here's the detail:


And this is my MIL's version using Basic Black, Whisper White and Melon Mambo. She used Silver EP for the detail on her flowers.


Back to the books again now for tomorrow's exam!

Sara xx