Showing posts with label Cottage Garden. Show all posts

Wednesday, 8 June 2011

Bess is scrapbooked again


Now this is a photo of Bess that I've used before when scrapbooking, but it's a favourite, so I don't apologise for using it again. This was a page that I prepared as a gift for my MIL when she visited at the weekend. She adores Bess (we know that she visits more to see Bess than us, lol) so I was sure that it would be appreciated and it was.


Recipe
Stamp sets: Cottage Garden, P is for Paw
Textured Cardstock: Tempting Turquoise
Plain Cardstock: Tempting Turquoise, Whisper White, Old Olive
Ink: Chocolate Chip, Crumb Cake, Tempting Turquoise, So Saffron
DSP: Playdate
Punches: Scallop Edge Border
Bigz Dies: Beautiful Butterflies, Top Note
Embossing Folder: Vintage Wallpaper
Other: Designer Buttons (Brights), Basic Pearls
Tools: Big Shot, Color Spritzer

The layout was a challenge from the SUDSOL demo forum that I'm a member of and I trimmed the 12 x 12 textured cardstock to fit the A4 (approx) layout that they were after. A large mat of Whisper White was wheeled with the P is for Paw stamp in Crumb Cake and then Chocolate Chip and Crumb Cake inks were spritzed over the top and also onto a Top Note cut from Whisper White card. A Scallop Edge Border trim was added behind the top and bottom of the White mat before adhering it to the page. The photo of Bess was matted onto Old Olive card and adhered next to the pawprints. Using Chocolate Chip ink the Cottage Garden sentiment was stamped onto the Top Note die cut. A butterfly was added in Tempting Turquoise (stamped off once to tone down the intensity of colour) and flowers in So Saffron ink. So Saffron was also used to sponge the edges of the die cut to define it before adhering to the page. Strips of Play Date DSP in differing lengths and widths were added above and below the photo. Small strips of Tempting Turquoise card were journalled and secured to the top of the photo with a small button, using glue dots. Large buttons were added to either end of the Play Date paper strip, also using glue dots. Using the Beautiful Butterflies die, a medium and a small butterfly were cut from Temting Turquoise card and Play Date DSP respectively and the larger one was embossed before joining them and adding them both the the page. The page was finished by adding Basic Pearls to the butterfly bodies and the flower centres.

Thanks for stopping by.

Sara xx

Tuesday, 5 April 2011

Matching glitzy gift packaging for jewellery


For Mother's Day I bought my Mum another charm for her bracelet. Here's the gift packaging that I made to match the Mother's Day card I shared with you yesterday.

I used the new pillow box die:
And followed my previous colour scheme and theme:


Recipe
Stamp sets: Cottage Garden, Occasional Greetings (sentiment)
Cardstock: Pumpkin Pie, Very Vanilla Tangerine Tango
Ink: Cajun Craze, Pumpkin Pie, Tangerine Tango
DSP: Sunny Garden
3mm Taffeta Ribbon: Pumpkin Pie
Punches: Eyelet Border, Curly Label, Crop-a-dile
Bigz Dies: Pillow Box, Flower Daisies 2
Other: Champagne Glass Glitter
Non-SU: Charm

I cut the Pillow Box from Pumpkin Pie cardstock and assembled it using Sticky Strip. A strip of Sunny Garden DSP was punched along both long edges with the Eyelet Border and then those edges were sponged with Pumpkin Pie ink before adhering to the box. The sentiment was stamped in Cajun Craze ink onto Very Vanilla card and then punched with the Curly Label. Using Pumpkin Pie ink the little trio of flowers from the Cottage Garden set was stamped off the label around the sentiment. The label was popped up on dimensionals on the front of the box. Three of the smallest Daisies were die cut from Tangerine Tango, adhered together and sponged at the edges of the petals with matching ink. A large Daisy centre was adhered to the middle of the flower and covered with Champagne Glass Glitter. Once dry the flower was added to the label. A card of Pumpkin Pie was cut to fit inside the Pillow Box and punched each end with the Crop-a-dile. Pumpkin Pie ribbon was threaded through the holes and charm and tied at the back.

Much more personal don't you think?

Sara xx

Monday, 4 April 2011

Glitzy gerberas for my Mum


I just loved being able to play with my new Big Shot and dies when I was creating this card for my Mum. Now I know that it's a bit late for you to use this for your own Mother's Day cards (at least for this year) but this would be just as suitable for a birthday card or get well card etc if you just change out the sentiment.

It was inspired by a great video for creating gerbera daisies by Noel.


Recipe
Stamp set: Cottage Garden, Occasional Greetings (sentiment)
Cardstock: Pear Pizzazz, Pumpkin Pie, Tangerine Tango, Peach Parfait, Very Vanilla
Ink: Pear Pizzazz, Pumpkin Pie, Tangerine Tango, Peach Parfait, Cajun Craze
DSP: Sunny Garden
Punch: Decorative Label
Bigz Die: Flower Daisies 2
Originals Die: Leaves 2
Other: Champagne Glass Glitter

This is a larger card for me than normal, it's an A5 portrait of Pear Pizzazz. This was matted with a layer of Pumpkin Pie card and a layer of Sunny Garden, sponged with Pumpkin Pie ink. The gerberas were made with Peach Parfait, Pumpkin Pie and Tangerine Tango card using the Daisies 2 die. Each flower has three layers of the largest petals and three layers of the smallest petals. All the petals were sponged with the corresponding ink before assembling. Champagne Glass Glitter was sprinkled into Tombow glue for the flower centres. The leaves were cut from Pear Pizzazz card with the Leaves 2 die and the veins were scored into the leaves before sponging the edges with Pear Pizzazz ink. Flowers were popped up on dimensionals and the leaves were adhered direct to the card front. For the sentiment, a Cajun Craze marker was used to selectively ink the words without the swirls, stamped onto Very Vanilla card and punched with the Decorative Label. This was overstamped with the trio of flowers from Cottage Garden in Peach Parfait ink. Two more Decorative Labels were punched from Tangerine Tango, cut in half and adhered behind the Vanilla label before popping up on dimensionals.

I'll definitely be making more of these pretty flowers in the future. Here's a close up:


To order these dies just email me or you can get the Daisies die in one of my bundle offers here (and if you need the leaves too you can tailor make a bundle by substituting).

Tomorrow I'll share the gift packaging I made to match.

Thanks for stopping by.

Sara xx

Tuesday, 4 January 2011

A tricky sketch challenge


Back to the daily grindstone today for me :-(

It's so good to get back home in the evening and create :-)

Our sketch challenge over at In Love With Stamping this month is this:


I stayed as close to the design elements as I could and used the colour scheme from the DSP I chose, to create this:


Recipe
Stamp sets: Circle Circus, Cottage Garden, Sincere Salutations (sentiment)
Cardstock: Peach Parfait, Pear Pizzazz, Whisper White
Ink: Peach Parfait, Poppy Parade, Versamark
DSP: Sunny Garden
Punches: Scallop Circle, Two-step Bird
Other: White EP, Crimper

The card blank is an A6 landscape in Peach Parfait, matted with a layer of Pear Pizzazz. Using two patterns from the Sunny Garden pack of paper, that create almost a positive and negative, I adhered them direct to the Pear Pizzazz layer. The sentiment was stamped in the lower right corner with Versamark and then heat embossed with White EP. A strip of Pear Pizzazz was put through the Crimper and then adhered over the join in the papers. The large scallop circle from Circle Circus was stamped in Peach Parfait ink on Whisper White card and punched with the Scallop Circle. Another Scallop Circle was punched from Peach Parfait card and they were adhered together, offsetting the petals centrally. Using the Two-step Bird, the leaves were punched from Pear Pizzazz card and adhered behind the Circles. These were then popped up on dimensionals in the middle of the card. The solid flower from the Cottage Garden set was stamped in Poppy Parade on Whisper White card, then cut out and shaped before popping up on another dimensional.

Just need another couple of thank yous and I think I'll be done.

Sara xx

Wednesday, 10 November 2010

Card candy swaps


Warning! Today's post is pic heavy.

I just lurve card candy, they're like regular crafting, squeezed into a concentrate, lol. And if I could only bear to part with them they make great presents for crafting friends too!

I took part in one of the ILWS organised swaps at Convention and made 10 lots of this candy:


Recipe

Stamp set: Serene Snowflakes, Four the Holidays (sentiment set)

Cardstock: Baja Breeze, Not Quite Navy, Whisper White, Medium Window Sheet, Vellum Paper

Ink: Not Quite Navy, Stazon White, Baja Breeze, Versamark

DSP: Elegant Soiree

Punches: Scallop Trim Border, Ornament, Butterfly, Scallop Square, 1-3/4” Circle, 1-3/8” Circle, 1” Circle, Star, Tag, Small Tag

Narrow Grosgrain Ribbon: Whisper White

Other: Silver Elastic Cord, Basic Rhinestones, Clear Rhinestone Brads, Dazzling Diamonds, Silver EP, White EP, Silver Brads, Large Silver Brad (Hodge Podge)


And these are all the lovely swaps that I got in return from the super talented ladies in my group (Group 3) (and I got to keep one of my own if you're wondering what happened to the 10th - it's not going spare, heehee).


From Emma using Cottage Garden


From Margaret using For Everything


From Michelle using Artisitic Etchings


From Kirsteen using Tiny Tags


From Rachel using Vintage Vogue


From Val using Growing Green


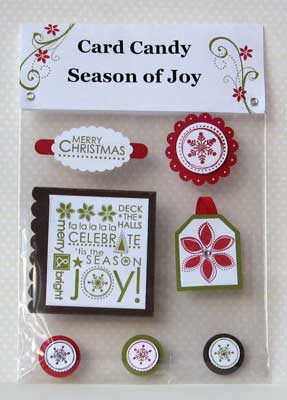
From Marisa using Season of Joy


From Jo using Cottage Garden


From Nicci using Contempo Christmas


And because Joanne and Jan (my upline and downline, together with me at Convention) were so jealous of my candy we've decide to have a little candy swap of our own so please pop back soon to see what we create for that.

Want your own card candy? Book a workshop with me and you and your friends can have a go at making your own. Just email me to find out how.

See you soon.

Sara xx