Showing posts with label Designer series paper. Show all posts

Thursday, 2 December 2010

An origami ornament for the tree


My upline Joanne showed me how to make this cute little origami wreath. It was one of her swaps at our recent Stampin' Up Convention and I've used it for this month's In Love With Stamping challenge to create an ornament.

Here's a video showing how I made it:


And a slightly different colour combo:


Recipe
DSP: Paper Pack - In Color (hostess level 1)
Narrow Taffeta Ribbon: Rich Razzleberry
Other: Gold Brad, Gold Elastic Cord

Thanks for stopping by.

Sara xx

Friday, 10 July 2009

Here is one I made earlier to cover for the mistakes I made today


I'm having to resort in true Blue Peter fashion to "one I made earlier". My mojo has well and truly deserted me. My Dad fell off a ladder on Wednesday and is in hospital with broken ribs and a few other complications and worrying about him is definitely affecting my crafting. I've made two cards this evening and given up on them both. Hopefully I'll be able to salvage something from them when I'm feeling more with it - perhaps after visiting tonight. 

I made this a few days ago and wasn't fully happy with this either (but it's better than the cards and so I thought I'd share it anyway).

It may actually look like a card at first sight but in fact it's a little Post-it folder. It's based on Angie Kennedy's Post it Note Organiser but I've adapted the size and contents just a little.


Recipe
Stamp set: Summer by the Sea
Cardstock: Bashful Blue, Barely Banana, Night of Navy, Whisper White
DSP: Bashful Blue
Striped Grosgrain Ribbon: Bashful Blue
Ink: Versamark
Punches: Corner Rounder, Large Oval
Other: White EP
Non-SU: Pen, Large Post-its


I cut the folder blank to be 21.5cm x 16cm and scored 10cm from either edge to create a 1.5cm spine to wrap around the note block and pen. The wallet for receipts/coupons and the front of the card were just trimmed to fit within the main wallet measurements. DSP was wrapped around the inside of the pen to give it a matching look.

Although I like the look and layout of this wallet, I find the card folder to be a little flimsy for the weight of the note block. I'll probably try it again using chipboard and my Bind-it-all machine for a sturdier result. I'll post it here of course when I've made it.

Have a great weekend.

Sara xx

Tuesday, 30 June 2009

A post it note holder in girlie pink


I may have admitted already (several months ago) that I had a Bind-it-all machine that I'd never used. Well - ta-da! I've finally got around to trying it (just as well it works, don't think I could return it after all this time). This little post-it note holder design came from Angie over at Chic' n scratch. 
 

Recipe
Stamp set: True Friend
Cardstock: So Saffron, Pretty in Pink, Whisper White
DSP: Tea & Crumpets
Ink: Regal Rose
Punches: Scallop Circle, 1-3/8" Circle, 1-1/4" Circle
Striped Grosgrain Ribbon: Pretty in Pink
Other: Crafter's toolkit
Non-SU: BIA machine and wire, Post-its, chipboard


I used chipboard instead of coasters and cut it a little larger than the post-it notes. Everything else is as Angie's instructions.

Thanks for stopping by.

Sara xx

Sunday, 21 June 2009

Matching card and origami box


Our challenge on Stamp with Us this morning is a recipe one. The recipe is 4 x patterned papers and 2 x coloured card ONLY (no other embellishments of any kind). I decided if embellishments were out, then I'd best use my paper and card to make my own embellishments. I opted to make an origami box (instructions on Splitcoaststampers) and embellish it with a Dahlia fold flower (also on Splitcoaststampers).


Recipe
Stamp set: Sincere Salutations
Cardstock: Pretty in Pink, Certainly Celery
DSP: Tea Party
Ink: Always Artichoke
Punches: Boho Blossoms, 1-3/8" Circle, 1-1/4" Circle
Other: Nesties

I made up the origami box using the measurements on the SCS instructions, which gives a 4" square box. The trick to any origami is crisp folds and so I used the groove in my Paper Cutter and my Bone Folder to get these. If you haven't made one before then it helps to practice on a piece of ordinary copy paper. There's no gluing (unless you want to), just scoring and folding. This is what the inside looks like (you could line it with another square of paper if you don't want to see the loose flaps).
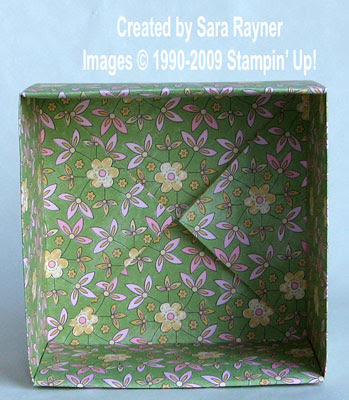

To decorate the outside (within the rules of the challenge) I cut three narrow strips of paper all of the same width and stuck them two of them around the centre of the lid, keeping the joins at opposite sides. Using the third strip I made a paper bow. I folded the strip back on itself to create a loop and trimmed it to size. Using the offcut I then folded another piece of paper around the join in the loop and stuck the bow over one of the joins in the centre strip around the lid. I created the dahlia for the box using the 1-3/8 Circle punch and stuck these flat to a circle of Certainly Celery card then onto a larger circle of Pretty in Pink card raised on dimensionals. The Best Wishes sentiment was stamped onto a strip of Certainly Celery card which was trimmed to the depth of the sentiment. One end of the strip was fed into the 1-1/2" Circle punch from the top of the punch to round the edge. The sentiment and the leaves were attached to the box lid before adding the dahlia circle over the top with dimensionals.

Having enjoyed making the box I then figured I'd make a card to match.


Recipe
Stamp Set: Sincere Salutations
Cardstock: Pretty in Pink, Certainly Celery
DSP: Tea Party
Ink: Rose Red
Punches: Boho Blossoms, 1-1/4" Circle, Corner Rounder
Other: Crafter's Toolkit, Nesties

I used Pretty in Pink as my base card and use the corner rounder punch on all corners. I cut a piece of DSP to fit the front of the card, corner rounded and then cut in half and stuck on the front to show both sides of the DSP. To cover the join in the paper I cut a strip of Pretty in Pink card and paper pierced the edges using the Crafter's Toolkit. The sentiment was stamped directly onto the DSP. Having said that the key to origami is crisp folds I didn't follow my own advice when making the first dahlia and I folded by hand, using my fingers to make the creases. This time around I was using a smaller circle (the 1-1/4" Circle punch) and used my Paper Cutter and Bone Folder for the creases - I found it much easier.


I used the smallest flower from the Boho Blossoms punch for the centre of each dahlia, raised on a dimensional. To create the leaves I punched Certainly Celery card with the 1-1/4" Circle punch. I reinserted the circle into the punch and moved it to one side, punching to create a leaf shape and an offcut crescent moon shape. The eraser end of a pencil held through the punch aperture can help hold the circle in the right place while you punch it. After folding the leaf down the centre I then added veins by scoring with a ball tool (or bone folder) with the leaf on my soft Crafter's mat (from the toolkit)


I do hope that you'll have a go at the challenge this week. I think it's a fun one and challenging without being too difficult. 

Please also take a look at the other creations by my fellow members on the Design Team. They're such a talented bunch.

Sara xx

Sunday, 17 May 2009

A scrapbook page featuring the Designer Series Papers


This week's Stamp With Us challenge is a colour one using the photo below as inspiration.


I can hardly believe that I've been blogging for nearly 6 months now and haven't posted a scrapbook page yet. When I saw the image we were going to use, it brought this layout to mind. I opted not to have all the "towels" facing the same way because it unbalanced the page.


Recipe
Cardstock: Old Olive, Bashful Blue, Ruby Red, Apricot Appeal, Certainly Celery
DSP: Haiku, Washington Apple, Holiday Treasures, Rainbow Sherbet, Certainly Celery Prints (retired)
Other: Printed Captions, Octagon Nestabilities

The photos are from our trip to Peru last year. The top one is the oasis we stopped at after flying over the Nazca lines (you can just see the huge sand dunes in the background). The bottom one is my hubby and his Dad at the same oasis. It was a fantastic trip and making this page brought a lot of it back to me - I really must do more scrapbooking.

Don't forget that the Designer Series Papers are on offer this month. Buy any three packs and get another one free. More details are here. Please email me at sarastamper123@gmail.com to place your order.

Sara xx

Friday, 17 April 2009

Boxes and bags class with new Washington Apple papers


These are the items that we made at last night's Boxes and Bags class. It was another craft packed evening that went on a little past scheduled time but then it may have been a stretch on my part to think that we'd complete all these in just two hours, lol. 

Not taking them in any particular order, I'll just give "recipe" details for each.


Stamp set: A Tree for all Seasons
Cardstock: Whisper White, Pretty in Pink, Rose Red
Ink: Basic Gray, Markers
Punches: Scallop Edge, 1" circle


Stamp set: Summer by the Sea
Cardstock: Whisper White, Bashful Blue, Not Quite Navy, Certainly Celery
Ink: Not Quite Navy
Punches: Scallop Edge, Corner Rounder
Ribbon: Narrow grosgrain Certainly Celery


Cardstock: Ruby Red, Pumpkin Pie, So Saffron
DSP: Washington Apple
Ink: White Signo gel pen
Punches: Scallop Edge, Round Tab, Boho Blossoms
Ribbon: Narrow grosgrain Pumpkin Pie

All templates were taken from Splitcoaststampers.

Thanks for stopping by. Hope you have a great weekend.

Sara xx
Wednesday, 11 February 2009

Single sheet paper tote bag with jewelled handles

This tote bag is large enough to carry standard size cards (A6 UK size). I got the design for the bag from the fantastic Chic n' Scratch blog by Angie. 

I used Spiced Cider Designer Series Paper for the main bag. The handles are two strips of Rose Red card with thinner strips of matching Spiced Cider paper matted onto them. The Boho Blossoms flowers from the One of a Kind set were stamped in Rose Red ink onto Whisper White card and then punched out with the Boho Blossoms punch. I used the larger flowers on the outside and the small ones on the inside to reinforce the handles. Circle Fire rhinestone brads go through all layers to attach the handles to the bag.

The birthday sentiment from the Circle of Friendship stamp set was stamped in Rose Red ink onto Whisper White card and was punched out with the 1" circle punch. This was layered onto Regal Rose card punched with the 1-1/4" circle punch and then Rose Red card punched with the Scallop Circle punch. The embellishment was stuck onto the bag with a few dimensionals for depth.

Hope you like it.

Sara xx

Wednesday, 4 February 2009

A pink gift bag to match the 60th birthday card

Today I thought I'd show you the gift bag that I made to go with the 60th birthday card. I love to make cards and gift bags or boxes that match and as Stampin' Up! groups its products by colour families that's just so easy to do. 

I used the box in a bag template again from over on Splitcoaststampers. Click here to see their tutorial.

I used the Rose Red cardstock for the box, the trim and the handles. The main paper is the same one from the Sweet Always collection that I used for matting and paper ribboning on the card. The White Signo gel pen provided the faux stitching on the trim and handles.

I punched three of the largest Boho Blossoms from Rose Red card and three of the smallest from Regal Rose.  The Ruby Red brads from the Earth Elements collection were used on the centre of each 
flower and they were attached to the bag with dimensionals. The tag was stamped with the flower from True Friend in the same way as for the front of the card and I hand trimmed it to a tag shape and coloured all the edges lightly with Rose Red ink. I filled the bag with choccies (not SU! - wish they did make 'em) and tied it shut with Whisper White ribbon. 


Here's a pic of the full set including the envelope that I also stamped in Regal Rose ink using the round flower from the True Friend stamp set. You see how well the colours fit together?

By the way we still have plenty of snow around here. If it's still the same tomorrow I'll show you the pretty view out of the back window...

Keep warm.

Sara xx

Monday, 26 January 2009

A sweet little gift bag using Spiced Cider paper

Hi folks. Certainly hope that you feel better than me at the moment. I've got a rotten cold that may even be flu (it feels like I've been kicked all over). So today I'm blogging about one I made earlier (in true Blue Peter fashion) as at least I can keep my laptop with me in bed.

Hope that this makes sense as I don't feel completely with it. This gift bag is from the box in a bag tutorial over on Splitcoaststampers. You can access it by clicking here. I'd wanted to make this ever since I saw it on their site as I think it's just so darned cute. By the way it's about 5 1/2" high - I think it tends to look bigger in the photos.

I used Really Rust cardstock for the box, trim and tabs. The paper is Spiced Cider. I decorated the trim and tabs with faux stitching using my White Gel Pen. Using my Boho Blossoms punch I punched the largest and smallest of the flowers in Chocolate and Really Rust respectively, decorated again with the gel pen and used dimensionals to add them to the outside of the gift bag. The bag is tied with some Chocolate Chip narrow ribbon. 

Keep well.

Sara xx

Monday, 8 December 2008

Thank you gifts

Thought I'd have a change from cards today and so I made a couple of little thank you gifts. These little triangular packages are quite easy to make and look really special. They can be dressed up with any embellishments you have to hand. They could easily be made in Christmas colour papers to go on the tree. If names are added to the tags they would work well as place settings for your Christmas lunch.

I made a couple of different sizes so that I could fit different size treats inside them.

The smaller treat is made from Old Olive Pattern Designer Series Paper and the larger one uses a paper from the Sweet Always design set.

Thanks for looking.

Sara xx
