Tuesday 30 June 2009

A post it note holder in girlie pink


I may have admitted already (several months ago) that I had a Bind-it-all machine that I'd never used. Well - ta-da! I've finally got around to trying it (just as well it works, don't think I could return it after all this time). This little post-it note holder design came from Angie over at Chic' n scratch
 

Recipe
Stamp set: True Friend
Cardstock: So Saffron, Pretty in Pink, Whisper White
DSP: Tea & Crumpets
Ink: Regal Rose
Punches: Scallop Circle, 1-3/8" Circle, 1-1/4" Circle
Striped Grosgrain Ribbon: Pretty in Pink
Other: Crafter's toolkit
Non-SU: BIA machine and wire, Post-its, chipboard


I used chipboard instead of coasters and cut it a little larger than the post-it notes. Everything else is as Angie's instructions.

Thanks for stopping by.

Sara xx

Sunday 28 June 2009

SWU sketch challenge in coffee and cream


Morning everyone. I hope that you're having a good weekend and that you're ready for today's challenge over at Stamp With Us. This week's challenge is this sketch.For me, this design started with the left hand background strip. I had in mind to use one of my Stampin' Around wheels with versamark and gold embossing powder and opted for the Whimsy to echo the large circle in the sketch design.  I figured that coffee and cream colours always work well with gold and then I just had a look through my stamps to see what would work well size wise. 
 
Recipe
Stamp sets: Cause for Celebration, Whimsy, Crazy for Cupcakes
Cardstock: Very Vanilla, Close to Cocoa, Chocolate Chip
Ink: Versamark
Taffeta Ribbon: Very Vanilla
Punches: Large Oval, Scallop Oval
Other: Gold EP
Non-SU: Nesties

All the stamps are inked with Versamark and heat embossed with gold powder. For such a small piece as the background strip here, you can easily ink your wheel direct from the Versamark pad. I love heat embossing, so instead I bought an uninked jumbo cartridge and a versamark refill and made my own Versamark cartridge. This lets me roll the wheel as long as I want - perfect for scrapbook pages and boxes. 

All other elements on the card are simple matting and layering.

Enjoy the rest of your weekend and please head on over and check out the rest of the Design Team offerings - there's such a lovely mix as always.

Sara xx

Edited to add P.S.
Just found out there's an extra reason to enter the challenge each week from now through July. One lucky challenge entrant will be picked at random each week to win free entry to the on-line classes starting in August. These are great fun and brilliant inspiration, so what are you waiting for - go craft and enter!
 

Friday 26 June 2009

Chocolate roses with a pink bow


Well that's been another busy and fun few days. I went with my Mum and a friend to see Brief Encounter at the theatre on Wednesday. Not at all what I expected but so enjoyable. There were some musical numbers, some comedy and a brilliant mix of cinema and theatre, with actors walking through the projection screen "into" the film. Then last night was a barbecue and demonstration of belly dancing. And no, I didn't get up and have a go - I'm a complete wuss.

Bess is continuing to settle in. She likes strawberries, lol. She saw me picking some from our garden so she dived in and ate one straight off the plant - she figures she likes it. Not sure how many we'll get now between Bess, the birds and the slugs. Oh well, back to the supermarket.

Today's card is a fairly quick one to make. I really enjoy the challenge of very involved cards, those requiring a lot of colouring or engineering but sometimes you need something a little more straightforward - especially if a birthday creeps up on you. Anyone else have that happen? I check my diary and know at least a fortnight ahead that I need a card. The next thing I know it needs to be posted tomorrow or even today!! How does that happen?


Recipe
Stamp sets: A Rose is a Rose, Oval All
Cardstock: Chocolate Chip, Regal Rose, Whisper White
DSP: Chocolate Chip
Ink: Versamark, Basic Black
SU Markers: Regal Rose, Pretty in Pink, Yoyo Yellow
Wide Grosgrain Ribbon: Regal Rose
Punches: Large Oval, Scallop Oval
Other: Clear EP

I stamped the large outline rose from the set in Versamark on the card blank and heat embossed with clear embossing powder. A strip of stripey DSP was added across the bottom of the card and the join was covered over with the ribbon. The sentiment was stamped, coloured, matted and popped on with a dimensional.

Wishing you all a restful and sunny weekend.

Sara xx

Tuesday 23 June 2009

This sweet little box didn't make the cut this time round


A bit shorter post today. Sunday's origami box was a bit of a mammoth blog but I hope you liked it.

Due to popular demand I've added a short notice Boxes and Bags class to my schedule on the 1 July (places still available - email me to book or for more information). I've been testing out a few new designs for the class and this one didn't make the cut.

I got the design from over at Splitcoaststampers and believe me, it is a sweet little box, nothing major wrong with it - but I think it's too fiddly for whoever you give it to (who may not be a patient crafter) to get the ribboned lid on and off. I'm going to try it again with eyelets and taffeta ribbon and hopefully it should slide easier then. Failing that then I may have to rethink the lid design altogether.


Recipe
Stamp set: Best Yet
Cardstock: Pumpkin Pie, Bashful Blue, Whisper White
DSP: Washington Apple
Ink: Ruby Red
Narrow Grosgrain Ribbon: Pumpkin Pie
Punches: Scallop Edge, Scallop Circle, 1-3/8" Circle, 1-1/4" Circle
Non-SU: Acetate

Thanks for stopping by.

Sara xx

Sunday 21 June 2009

Matching card and origami box


Our challenge on Stamp with Us this morning is a recipe one. The recipe is 4 x patterned papers and 2 x coloured card ONLY (no other embellishments of any kind). I decided if embellishments were out, then I'd best use my paper and card to make my own embellishments. I opted to make an origami box (instructions on Splitcoaststampers) and embellish it with a Dahlia fold flower (also on Splitcoaststampers).


Recipe
Stamp set: Sincere Salutations
Cardstock: Pretty in Pink, Certainly Celery
DSP: Tea Party
Ink: Always Artichoke
Punches: Boho Blossoms, 1-3/8" Circle, 1-1/4" Circle
Other: Nesties

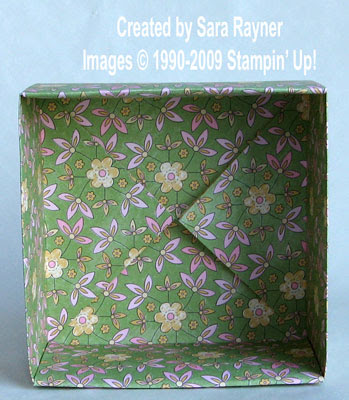
I made up the origami box using the measurements on the SCS instructions, which gives a 4" square box. The trick to any origami is crisp folds and so I used the groove in my Paper Cutter and my Bone Folder to get these. If you haven't made one before then it helps to practice on a piece of ordinary copy paper. There's no gluing (unless you want to), just scoring and folding. This is what the inside looks like (you could line it with another square of paper if you don't want to see the loose flaps).


To decorate the outside (within the rules of the challenge) I cut three narrow strips of paper all of the same width and stuck them two of them around the centre of the lid, keeping the joins at opposite sides. Using the third strip I made a paper bow. I folded the strip back on itself to create a loop and trimmed it to size. Using the offcut I then folded another piece of paper around the join in the loop and stuck the bow over one of the joins in the centre strip around the lid. I created the dahlia for the box using the 1-3/8 Circle punch and stuck these flat to a circle of Certainly Celery card then onto a larger circle of Pretty in Pink card raised on dimensionals. The Best Wishes sentiment was stamped onto a strip of Certainly Celery card which was trimmed to the depth of the sentiment. One end of the strip was fed into the 1-1/2" Circle punch from the top of the punch to round the edge. The sentiment and the leaves were attached to the box lid before adding the dahlia circle over the top with dimensionals.

Having enjoyed making the box I then figured I'd make a card to match.


Recipe
Stamp Set: Sincere Salutations
Cardstock: Pretty in Pink, Certainly Celery
DSP: Tea Party
Ink: Rose Red
Punches: Boho Blossoms, 1-1/4" Circle, Corner Rounder
Other: Crafter's Toolkit, Nesties

I used Pretty in Pink as my base card and use the corner rounder punch on all corners. I cut a piece of DSP to fit the front of the card, corner rounded and then cut in half and stuck on the front to show both sides of the DSP. To cover the join in the paper I cut a strip of Pretty in Pink card and paper pierced the edges using the Crafter's Toolkit. The sentiment was stamped directly onto the DSP. Having said that the key to origami is crisp folds I didn't follow my own advice when making the first dahlia and I folded by hand, using my fingers to make the creases. This time around I was using a smaller circle (the 1-1/4" Circle punch) and used my Paper Cutter and Bone Folder for the creases - I found it much easier.


I used the smallest flower from the Boho Blossoms punch for the centre of each dahlia, raised on a dimensional. To create the leaves I punched Certainly Celery card with the 1-1/4" Circle punch. I reinserted the circle into the punch and moved it to one side, punching to create a leaf shape and an offcut crescent moon shape. The eraser end of a pencil held through the punch aperture can help hold the circle in the right place while you punch it. After folding the leaf down the centre I then added veins by scoring with a ball tool (or bone folder) with the leaf on my soft Crafter's mat (from the toolkit)


I do hope that you'll have a go at the challenge this week. I think it's a fun one and challenging without being too difficult. 

Please also take a look at the other creations by my fellow members on the Design Team. They're such a talented bunch.

Sara xx

Saturday 20 June 2009

Birthday surprise slider card in turquoise


Last night we had another cyberstamping night over at Stamp With Us. This was an additional bonus night following the run of projects we did in May. Stamp with Us Summer will be 1-15th August and I can really recommend it - projects, tutorials, tips, on-line chat, and lots more.

Last night the project was to make a surprise slider card. (If you were a member of the first SWU class then you'll still be able to log on to download the instructions).


Recipe
Stamp Sets: Crazy for Cupcakes, Cause for Celebration, Sincere Salutations
Cardstock: Tempting Turquoise, Brilliant Blue, So Saffron, Whisper White
DSP: Rainbow Sherbet
Ink: Versamark, Tempting Turquoise, Basic Black
Stampin' Write Markers: So Saffron, Pumpkin Pie, Regal Rose, Creamy Caramel, Close to Cocoa
Other: Brads
Non-SU: Nesties


I can't give the instructions to make the slider card (you'd need to join the class for those) but I can cover the elements that are mine. I used the markers to shade the large cupcake in the centre, stamped the background using the small cupcake from Cause for Celebration in Versamark and paper pieced the balloons.

Have a fab weekend.

Sara xx

Thursday 18 June 2009

A trio of thank you cards using Fresh Cuts


I'm very briefly back to thank you cards today. I needed three of them so rather than designing three different ones I've applied the same design using three different colourways. This also had the advantage of making the crafting quicker as you get into a flow with the different elements.


Recipe
Stamp set: Fresh Cuts
Cardstock: Real Red/Yoyo Yellow/Pink Passion, Basic Black, Whisper White
Ink: Versamark, Basic Black
Stampin' Write Markers: Real Red/Yoyo Yellow/Pink Passion
Other: Black EP, Clear EP
Punches: Large Oval, Scallop Oval

The large square image was stamped with Versamark and heat embossed with black powder. After colouring the flowers with a matching marker I matted the stamped image onto Basic Black card. The vine was stamped direct to the base card with Versamark and heat embossed with clear powder. Thank you was simply stamped, punched and matted.

Sara xx

Tuesday 16 June 2009

Fathers day card in a plain waterfall style


OK - I'm happy with my mojo again now and just hope that you feel the same.

I wanted to have a go at something a little special for a Father's Day card but still wanted to keep the colours and embellishments fairly understated. I figured that an "engineered" card might appeal to the men and so chose to make a waterfall card with a plain, repeated, sentiment as decoration.


Recipe:
Stamp set: Occasional Greetings
Cardstock: Old Olive, Bashful Blue, Rose Red, Whisper White, Basic Black
Stampin' Write Markers: Old Olive, Bashful Blue, Rose Red, Basic Black
Ribbon: Bashful Blue Taffeta
Other: Metallic Eyelets 
Non SU: Cuttlebug embossing folder


The details for the waterfall card were taken from Splitcoaststampers. Instead of cutting the squares and the central strip to their dimensions, I cut close to the sentiment and matted with a very narrow frame all around. The width of the central strip was cut to match my matted sentiments. Other cutting and scoring measurements are as the original instructions. I stamped the sentiment four times using markers direct to stamp and picking out each line in a different colour each time until the fourth one where I used all the colours (hopefully you'll see what I mean from the photos).


After trimming close to the sentiment I matted each on the corresponding colour (with all the colours matted onto black). Ribbon was threaded through the central eyelet to provide an easy pulling mechanism for the waterfall effect.


I also made an insert both to make any writing more visible and to add a little weight to the back of the card to counterbalance the front. The DSP used inside also gave me my colour scheme for the front of the card.


Recipe (inside)
Stamp set: Loads of Love
Cardstock: Whisper White
Ink: Basic Black
DSP: Junior Varsity
Punch: Corner Rounder

Thanks for stopping by.

Sara xx

Sunday 14 June 2009

Paper pierced frame for the Stamp With Us colour challenge


Hope that you're all enjoying a sunny weekend. I'm having a bit of a catch-up time after a frantic week of running here and there.

I'd like to thank Kate for the lovely birthday card she sent me on Wednesday. I've waited until now, as you should be able to see it on her blog today and it's her sample for the Stamp With Us challenge this week.

I'd also like to thank Debbi for nominating me for a couple of awards. I already have them so I'm not going to pass them on again but I would encourage you to visit Debbi's blog over at Taylor-Made Cards to see some of the lovely cards she makes.

OK, so the mojo still isn't quite back but I think I'm getting there. Our challenge this week on Stamp With Us is a colour one using this photo as inspiration:

Now in the end I think I went a little too heavy on the bold colours, I should have kept them as more patterns against the white, but overall I'm quite happy with the frame and I think that I'll have another go at doing one in future.


Recipe
Stamp sets: Summer by the Sea, Polka Dot Punches, Occasional Greetings
Cardstock: Pink Passion, Real Red, Whisper White
Ink: Taken with Teal, Not Quite Navy
Brads: Not Quite Navy
Other: Crafter's Toolkit


To make the frame, I first cut it to size and then used my Polka Dot Punches stamp with Versamark to provide a template for piercing.


Using the tool and mat from the Crafter's Toolkit I pricked out the design varying the pressure I used on the needle tool to get larger or smaller pinpricks as I wanted. The paper piercing template that comes with the toolkit was used for the straight lines of piercing around the edge. I used the groove of my paper cutter to get the embossed lines around the frame and then cut the aperture with a craft knife.

Don't forget that next Sunday (21st June) is Father's Day!

Sara xx

Saturday 13 June 2009

Flowery friend card in plum and sage


Isn't the return of the sunny weather a real blessing. Wednesday was my birthday and whilst I had a fantastic, relaxing, late afternoon treat of a massage at the spa, it was undone a bit by having to then fight the floods to get home. I got caught up in the major flood in Sheffield that we had a couple of years ago, so I was rather stressed on the long drive home. Anyway, bright and sunny again today so no complaints.
 
Bess is settling in well but seems to have sapped my mojo a little. Just hope that I get it back soon. 

This card isn't quite what I was after. I wanted to use my Stampin' Pastels (chalks) and realised that I hadn't used white as a base in ages so they were my starting point here. I think there's just too much white space though.


Recipe
Stamp sets: Botanical Blooms, Oval All
Cardstock: Whisper White, Pale Plum, Sage Shadow
Ink: Versamark, Black Stazon
Stampin Markers: Pale Plum, Perfect Plum, Sage Shadow
Other: Silver EP, Stampin Pastels, Nesties
Punches: Large Oval, Scallop Oval

I stamped the inner blooms and leaves with Versamark around the edges of the card and used my Sponge Daubers to apply the chalk. The central flower is the outline bloom and leaf stamped in Versamark, and heat embossed with silver powder before being coloured with markers.

Thanks for stopping by.

Sara xx
 

Tuesday 9 June 2009

A few cocktails to welcome back the summer weather (hopefully)


A late post tonight. I did manage to get a little crafting done tonight but Bess is taking a fair bit of my spare time just now. Even when I was crafting she was sticking her head in my craft boxes. I had to get to the Elizabeth Shaw mints pretty sharpish when I realised she might find them! Thanks for all the good wishes and comments from everyone.

Today's (tonight's?) card is a summery birthday card today in hopes that it will bring some of the good weather back.


Recipe
Stamp set: Cheers to You
Cardstock: Gable Green, Barely Banana, Whisper White
DSP: Rainbow Sherbet
Ink: Pink Passion, Only Orange, Black Stazon, SU Markers
Punches: Scallop Square, Scallop Edge
Ribbon: So Saffron Striped Grosgrain, Pumpkin Pie Narrow Grosgrain

The cocktails and sentiment were stamped and coloured. They were punched with the Scallop Square as squares and diamonds, both to fit more of the larger images in and for added interest. DSP and cardstock was matted and wrapped with the ribbons, also layered one on the other. The squares/diamonds were then swiped along the edges with Only Orange ink before adding to the card front with dimensionals.

I haven't yet figured out the rum runner recipe - it was too cold at the weekend for frozen cocktails. Come back summer.

Sara xx

Sunday 7 June 2009

Congratulations for an engagement for the Stamp With Us challenge


Our challenge this week on Stamp With Us is the theme Congratulations. I've made this card as an engagement card.


Recipe
Stamp sets: Cheers to You, Circle of Friendship
Cardstock: Very Vanilla, Blush Blossom
Ink: Versamark
SU Markers: Blush Blossom
Other: Gold EP, Dazzling Diamonds, Very Vanilla Taffeta Ribbon
Punches: 1", 1-1/4", 1-3/8" circle


The champagne glasses from the Cheers to You were stamped onto Very Vanilla card in Versamark and heat embossed with gold embossing powder. I then coloured the "champagne" with Blush Blossom marker to add a bit of shade to the liquid. Because I didn't want a full on layer of glitter I spread a little Tombow onto some acetate, then used a brush to dilute it with a little water and paint the mixture onto the glasses. Dazzling Diamonds was sprinkled over and allowed to dry. The circles were punched and lined up. The centre circle frame was made by punching the 1-1/4" circle from Blush Blossom card then centred the aperture and punched with the 1-3/8" circle. 

Now I'd like to introduce you to the new addition to our family - Bess.


She's a rescue dog found on the streets of Leeds. She's about 3 years old, a small Staffordshire Bull Terrier and likes a lot of fussing and loving. Perfect for us.


Thanks for stopping by.

Sara xx


Thursday 4 June 2009

Saying cheers to Dad for Fathers Day


I'm back! If my blog seemed a bit quiet over the last week or so it's because we went away on holiday. We had a lovely chill out week in Jamaica. It was a very, very lazy holiday for us - no sightseeing, no photography, no snorkelling. In fact we did very little apart from sit on the beach reading and drinking rum runners (if you've never had one, just imagine an alcoholic slush puppy). I feel very guilty at doing so little but tooootally chilled.

I didn't altogether forget about you of course. In true Blue Peter fashion I prepared and photographed a few cards ahead of time and on a couple of the days I tore myself away from the beach to suffer the air conditioned cool *bliss actually* of the hotel's internet cafe to add them to the blog.

We got back on Monday and had to pay the price by way of jetlag (still coming round from that). Now I'm back at work and settling into my new job (quite exciting). Last night my Mum and I went to the theatre to see West Side Story (excellent show, otherwise I'd have been asleep).

After all the thank you cards I made recently, I did promise a change and not only have I changed the type of card, I've also opened a new stamp set (woohoo, new stamps). This card uses two of the stamps from Cheers to You, a very versatile set that I'll be showcasing over the next week or so. This is another of those good all rounders, excellent for male and female birthdays, party invitations, wedding and anniversary cards and lots, lots more. Keep checking back for more examples.


Recipe
Stamp sets: Cheers to You, Short Order Alphabet
Cardstock: Old Olive, Not Quite Navy, Summer Sun, Whisper White
Ink: Not Quite Navy, Old Olive, Black Stazon
SU Markers: Barely Banana, Summer Sun, Pumpkin Pie
Punches: Scallop Circle

I stamped the beer onto white card with the Black Stazon and watercoloured with the markers, building the colour around the edges and leaving an uncoloured highlight each time. These were cut out, (I used a craft knife for inside the handles) and raised on dimensionals. The Cheers sentiments and the Dad lettering were positioned using the stamp-a-ma-jig (though I still managed to get Dad a little wonky, not saying that he is ... or am I?).

This one would work for Father's Day, Dad's birthday or just leave the lettering off for a great year round male card.

Off now to catch up on what you've all been making.

Sara xx

Monday 1 June 2009

Get a free background stamp during June or July


Hold a £250 workshop during June or July and get a free background stamp in addition to your other hostess benefits.

Contact me at sarastamper123@gmail.com to book your workshop.