Saturday 31 July 2010

Simply Stunning Summer Share

This post will remain at the top while I have shares available. Please scroll down to read my regular blog posts.

My regular ladies just lurve the Pretties Kit (they ooh and aah over them and like to stroke them, lol) but they usually put off buying it because there are always stamps, ink etc that they want more urgently. So I've decided to put together a Summer Share for them and I'm opening the offer up to my blog readers too.


The cost of the share is £8 including postage and it includes six 6" x 6" sheets of Bride DSP (3 of each design), plus 1m of Whisper White taffeta ribbon, plus 1/5 of the contents of the Pretties Kit (excluding the tin) as follows:

White flowers (10: 2 ea. in 5 sizes)
White halfback pearls (6 small, 4 medium, 2 large)
Cream halfback pearls (6 small, 4 medium, 2 large)
White round pearls w/holes (6 small, 3 large)
Cream round pearls w/holes (6 small, 3 large)
Clear round beads w/centre hole (2)
Clear round beads w/side hole (2)
Clear teardrops (4)
Clear round Rhinestone brads (4 small, 3 medium, 3 large)
Hat pins w/clutches (2)
Spacer beads (6)

This little bundle is perfect for creating wedding cards but most of the items can also be coloured with markers, ink pads or reinkers to match any project you have in mind. Please email me to order yours.

A quick snowflake card ideal for batch making


My last card was just a little time consuming with the heat embossing, painting and cutting out but here's a quick and simple (and very low cost) version that I'll be demonstrating to the ladies over at St Saviours today. It's ideal for Stamp-a-stack cardmaking - making batches of the same card, (or a set using the same design in different colourways) for giving or for selling at craft fairs etc.


Recipe
Stamp set: Serene Snowflakes
Cardstock: Very Vanilla, Not Quite Navy
Ink: Not Quite Navy
Other: Dazzling Diamonds

I started with a 4-1/4" square blank that I stamped with the small snowflake and the trio of snowflakes in Not Quite Navy ink. I stamped the large snowflake with Not Quite Navy ink onto a 2-3/4" square of Very Vanilla card and matted it onto Not Quite Navy card. This topper was popped up on dimensionals in the centre. Finally I added a little Tombow to the centres of the snowflakes on the base card (no wasting it on those covered by the centre panel this way) and to the large snowflake in the centre and sprinkled Dazzling Diamonds over the top. Stamp a sentiment inside and you're all done. Quick, easy and cheap.

Have a great weekend.

Sara xx

Wednesday 28 July 2010

Shimmering snowflakes in shades of purple


I have my friend Alex to thank for today's card. She was asking on the ILWS forum which of the shimmer paints she should go for. Now my first thought was the champagne mist because I love the delicate golden sheen it gives but then I also use Platinum a lot because it's opaque and gives a great solid image with stamps ... but then I also like Frost White because I can blend it with my reinkers and create all sorts of new colours. So I really use all three but for different effects. Helpful, huh?

But I haven't really used Frost White on its own and so I figured I ought to give it a go and what better than with some shimmery winter snowflakes ... in July! Lol.


Recipe
Stamp set: Serene Snowflakes
Cardstock: Elegant Eggplant, Lovely Lilac
Ink: Elegant Eggplant, Versamark, Frost White Shimmer Paint
Other: White EP, Clear Rhinestone Brads

The largest snowflake from the Serene Snowflakes set was stamped in Elegant Eggplant ink in the centre of the Lovely Lilac square. Using the stamp-a-ma-jig for positioning I then used the next largest snowflake and stamped off in each corner, using Elegant Eggplant again. I painted the centre swirls of each flake with Frost White Shimmer Paint using an aqaupainter. If you catch the light in one direction you can see the swirls in dark ink below and then if you turn the card slightly, you just see solid white - a gorgeous effect. I stamped the large snowflake again in Versamark onto Elegant Eggplant card and heat embossed with White EP. This flake was cut out leaving a narrow margin and trimming off the corner arrows completely. The large centre cross was painted with the Shimmer Paint (as for the corner flakes) and left to dry. Medium clear rhinestone brads were added to the centres of each corner snowflake. This Lilac layer was popped up on dimensionals in the centre of the card front. A large clear rhinestone brad was added to the centre of the Elegant Eggplant large snowflake and then this layer was popped up on dimensionals, lined up over the top of the centre snowflake.

I think Frost White might just be my favourite ...

... (at least for today, lol).

Which is your favourite Shimmer Paint and why?

Sara xx

Tuesday 27 July 2010

A summer flower for the Mojo Monday challenge


Well I hope that those of you that have broken up for the summer holidays are having a relaxing time. I'm still at work unfortunately, so please spare me a thought when you're enjoying a little extra crafting time. At least I get a few weeks free of study, to squeeze in a little extra crafting of my own.

Today's card is for the Mojo Monday challenge. As it's the last Monday of the month we have a choice of round or square:

I opted for the square version:


Recipe
Stamp sets: A Flower for all Seasons, Occasional Greetings (sentiment)
Cardstock: Real Red, Cameo Coral, Summer Sun, Whisper White
Ink: Black Stazon, Real Red, Watercolor Wonder Crayons
DSP: Pink Flamingo
Wide Grosgrain Ribbon: Old Olive

I stamped the main image with Black Stazon and then used an aquapainter with the watercolor wonder crayons to paint it. The background and ribbons were adhered direct and the coloured image was popped up on dimensionals. I applied dimensionals to each end of the back of the sentiment and pushed the ends in a little when adhering it to the front of the card so that it bows out a little.

Thanks for stopping by.

Sara xx

More pix from our Stamptacular

Jan's got her pix from our Summer Stamptacular up on her blog now. Please pop on over to see the lovely little altered notebooks she made for all the attendees.

Here are pix from her afternoon project - a scrapbook in a box:


Closed


And opened out

Isn't it sweet! I didn't get time to make it on the day but I've got the instructions and materials and I'm going to put it together for my Mum for her birthday next month.

Back in a jiffy.

Sara xx

Sunday 25 July 2010

A spectacular Stamptacular

Finally catching up again. I took Bess to her socialisation class this morning, then went visiting my parents and then DH and I have been to the cinema to see Inception (fantastic film, lots of layers to it, if you enjoyed Memento (same Director) then I think you'll enjoy this one too though there's more action and special effects in it). The film was my little treat after all the preparation for yesterday's big event.

My amazing downline Jan and I held our full day Summer Stamptacular and it really was a fantastic day with such a lovely bunch of ladies.

We set everything out in advance for them with little nameplates and bottled water with choccie in the hanger. Then when they came in we gave them each a goodie bag that included the Tree for All Seasons stamp set and a decorated notebook.

Our first project was a boxed set of all occasion cards, with one for each season:


The boxed set


Spring


Summer


Autumn


Winter

After lunch they worked on Jan's project of a scrapbook in a box. I don't have pix of the finished project so I'll steal them from Jan's blog just as soon as she's posted them. Here are the ladies though, don't let the big smiles fool you - we worked them all very hard.


Our final project for the day was a matching card and gift bag


The bag's big enough to take a set of A6 cards and envelopes.

There was also a bonus waterfall card project that I'd prepared just in case we ran out of things to do, lol. We didn't get time to make it, but they all took the instructions and materials home to finish as homework ;-)


Jan and I so enjoyed the day that we're already talking about organising another, though I think we'll catch our breath first, lol. I'll post details when we decide on a date.

Sara xx

Thursday 22 July 2010

A wedding card using the Bride papers and Pretties


Not much chat from me today as I'm still getting prepared for Saturday, so it's a quick post and then back to cutting card :-)

I figure the wedding season is into full swing now and so I thought I'd share a plain and simple wedding card that makes the most of the Bride DSP (there are still shares available that include the DSP, Pretties and ribbon if you'd like to order yours).

Recipe
Stamp Set: Mr & Mrs
Cardstock: Blush Blossom, Whisper White
Ink: Blush Blossom, Versamark
DSP: Bride
Punches: Full Heart, Scallop Oval, Large Oval
Ribbon: Whisper White Taffeta
Other: Halfback Pearls (Pretties Kit), Gold EP

The striped Bride DSP was matted onto a Blush Blossom card blank. I then punched the hearts from the other Bride paper with the Full Heart punch and sponged them with Blush Blossom ink. Three small halfback pearls were added to one heart with glue dots and a dinky ribbon to the other. The sentiment was stamped in Versamark and heat embossed with Gold EP. The hearts and sentiment were popped up on dimensionals.

Back soon.

Sara xx

Tuesday 20 July 2010

A bit of sparkle


Wow, my internet is still working, can you believe it? For anyone who hasn't been following along - my broadband connection has been on again, off again (mainly off) for nearly a month and so I've been grabbing internet time here and there in coffee shops. So ... what have I missed sharing with you?

I went to see Laughter in the Rain at the Lyceum last week. It's the Neil Sedaka story and was absolutely excellent. I love musicals anyway but I was most impressed at the energy of the performers, especially the male lead, on what was a really hot and muggy night. Less impressive was the service at the restaurant we went to before the show. We tried Ego, next to the Winter Gardens. Despite having made reservations and explaining that we were going to the theatre, it took an hour to get served, then we waited ages for our puds and nearly missed the beginning of the show. The desserts were delicious but the main courses were rather bland. Won't be going there again.

Friday I had a stand at a local School Fayre and it was also DH's birthday. My mojo has been missing and so he got a Blue Peter card (here's one I made earlier), poor thing. In the evening we went to the Blanc Brasserie in Leeds. It's a Raymond Blanc chain of restaurants and not too badly priced ... until you have starter, main course, dessert, wine and after dinner drinks (and a bottle of french cider to take home for DH as well) and then it adds up a little bit. On the other hand the service couldn't have been better and the food was excellent. They even put a birthday candle on DH's Tarte au Citron, lol. This one we will be going back to again ... when we've saved up.

Well I think that's the fun things caught up now, so on to the cardmaking.

I started this card last night but had to wait for some elements to dry and so couldn't finish it and post until this evening.
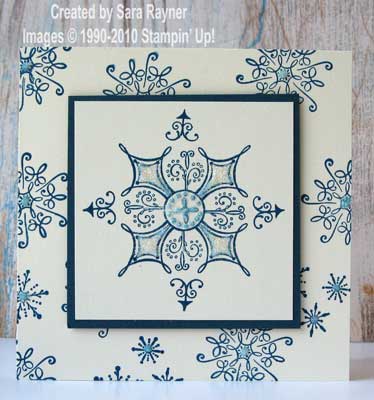

Recipe
Stamp sets: Touch of Nature, All a Flutter
Textured Cardstock: Sage Shadow
Plain Cardstock: Whisper White
Ink: Sage Shadow, Regal Rose, Black Stazon
Punch: Boho Blossoms
Other: Flower and Rhinestone Brad (both Pretties Kit), Champagne Mist Shimmer Paint, Crystal Effects, Fine Galaxy Glitter, Medium Window Sheet


I started by dragging my Regal Rose ink pad across the large flower to colour it and then used an aquapainter dipped in Champagne Mist Shimmer Paint to paint it all over. This gives a lovely golden shimmer to the flower and it also changes the shade of pink quite considerably to a more orangey shade. The flower was then left to dry. I stamped the All a Flutter butterfly in Black Stazon onto Medium Window Sheet. (You could use the butterfly from the Touch of Nature set instead but at this stage I hadn't decided on my background and I think I prefer this size butterfly with the flower anyway). This was "coloured in" on the reverse of the stamped window sheet by adding Crystal Effects and Fine Galaxy Glitter in sections, letting each colour dry before adding the next. I used Black for the body and Champagne and Silver for the wings. Once completely dry, I cut out the butterfly leaving a margin all around and a strip at the top for the "dangle". To complete the card this evening I created a 4x4 card blank from textured Sage Shadow. A mat and a scrap of Whisper White were both stamped with the fern from the Touch of Nature set in Sage Shadow. I then punched a large flower from stamped scrap using the Boho Blossoms punch to create the flower centre. A large Rhinestone Brad completed it. The dangle strip for the butterfly was adhered behind the mat before popping up on dimensionals on the card front.

Thanks for stopping by.

Sara xx

Sunday 18 July 2010

Last day for guaranteed bookings for our Summer Stamptacular

Yes, just a quick reminder that today is the last day for guaranteed bookings for our Summer Stamptacular event. This is a full day's crafting with all materials provided, together with full demonstrations and printed instructions to take away with you. On top of that there will be refreshments, a light lunch, free prize draws and a few surprises along the way - all of that for just £30 (£27 each when you bring a friend). It takes place next Saturday 24th July at Tankersley Welfare Hall (just a short way from J36, off the M1).

Not booked your place yet? Then pop over here and use the book now buttons to pay securely through Paypal or email me for additional payment options.

Here's a sneak peek at one of the projects we'll be doing (and if you're not a girlie pink person, don't worry, we do have a couple of alternate colourways).


Off now to finish cutting card and making up packs ready.

Hopefully now my internet's back up (I really shouldn't tempt fate by saying that should I?) I'll be able to get back to my regular crafting and blogging tomorrow.

Sara xx

Tuesday 13 July 2010

Handbags and pearls for a girlie birthday card


Todays card is made using a new stamp set that I've bought specially for the Summer Stamptacular on 24 July. We still have a few places left if you'd like to book (click here and use the Buy Now button(s) or email me for alternate payment options) but we'll need to close the guaranteed bookings no later than next Sunday, 18th July to ensure that we can get all materials delivered and prepared in time. (After the 18th you'll be counting on cancellations to get a spot).

I decided to have a play with the set to test it out, lol. I remembered seeing some little handbags like these over at ILWS and have to thank Maggie and Joanne for their inspiration.


Recipe
Stamp sets: Totally Tabs, Vintage Labels (sentiment)
Cardstock: Bashful Blue, Not Quite Navy
Ink: Not Quite Navy, Versamark
DSP: Bashful Blue Patterns, Bride
Punches: Round Tab, 1-3/4" Circle, 1" Circle, 3/4" Circle, Word Window, Full Heart, Scallop Edge
Other: Small Halfback Pearls (Pretties Kit), White EP

The card blank is Bashful Blue and the handbags were made by stamping with Not Quite Navy ink (centre bag is Verasmark and heat embossed with White EP) onto Bashful Blue Patterns DSP, then punching out with the Round Tab. This was folded in half and a handle added by punching Not Quite Navy card first with the 3/4" Circle then centring and punching with the 1" Circle. A different "flap" was added to each bag using the Word Window, Full Heart (pointed base) and 1" Circle trimmed to size and finished with small halfback Pearls as "clasps". The aperture was made by punching a Scallop Edge to one long edge of Not Quite Navy, then using the 1-3/4" Circle punch pushed all the way against the Scallop Edge and a fraction in from each side and then in the centre. Bride DSP was added direct to a Scallop Edged mat of Bashful Blue Patterns and then the aperture was popped up on dimensionals. The handbags were placed through the centre of each aperture.

The sentiment was stamped to one side along the bottom and then the offcut from a Not Quite Navy Scallop Edge was trimmed to size and Tombowed in place around the sentiment. Strips of Bride were cut to a similar size and added to the aperture.

A fun card for any handbag loving girlie that can be personalised by choosing their favourite colour.

Thanks for stopping by.

Sara xx

Sunday 11 July 2010

A colouring class and a thank you card


Well I don't want to bore you (I'm plenty bored with it for both of us) but my broadband has gone again. Something obviously happens on a Saturday night/Sunday morning that sets our broadband profile back to something around dial up speed. If anyone else has had this problem and knows a fix then pleeease let me know and we'll try and explain it to the BT engineers when they next call around (they'll be going on my xmas card list soon, we're seeing that much of them). This is driving DH and me just crazy. I can't manage these days without an internet connection. I really think that BT should be funding all these extra trips to coffee houses that I'm having to make.

Enough of that now though.

Last weekend I attended a craft class. I love delivering classes and sharing tips and techniques with others but it was also great to sit back and soak up the knowledge of someone else for a couple of hours. This was a colouring class using alcohol based markers (Copics and Promarkers) given by the lovely Jo. I turned one of the images I made on the night into a thank you card for her and used the MojoMonday sketch as my layout:

Jo should have received the card by now so I think I'm safe to post it. We used a variety of stamps in the class that were all non-SU but I've still been able to combine with my SU stash to create the rest of the card:


Recipe
Stamp set: Circle of Friendship
Textured Cardstock: Green Galore, Real Red, Orchid Opulence
DSP: Kaleidoscope
Ink: Basic Grey, Orchid Opulence
Punches: 1" Circle, 1-1/4" Circle
Non-SU: White card, Nestabilities, Copics, Sugar Nellie stamp

I coloured the image with Copics and then the rest is matting and layering.

Well I hope your weekend is going better than mine. Enjoy the rest of it.

Sara xx

Friday 9 July 2010

Back again with an all purpose congratulations card


My broadband is back up and working again ... hopefully for longer than just a few days this time (fingers crossed).

DH and I went to see Alice at the Crucible on Wednesday - a somewhat strange mix, some parts (set design and the back story) were really clever and original and some bits were just ... a little bit odd. Glad we went to see it though - an interesting experience.

Today's card for you is a Congratulations card to have on hand to respond to any special announcement eg. wedding, engagement, baby. I've kept the colour scheme fairly neutral for that reason.


Recipe
Stamp sets: Say it with Scallops
Cardstock: Apricot Appeal, Very Vanilla
Ink: Apricot Appeal, Versamark, Stampin' Pastels (Apricot Appeal)
DSP: Bride
Punch: Scallop Square
Other: Gold EP, Paper Cutter, Bone Folder

Did you think I'd made a typo and that I'd used Bridesmaid DSP for this card? The patterned paper has quite a vanilla look to it, but this was actually achieved by dusting Bride DSP (available in my Summer Share) with Apricot Appeal chalk. The Bride DSP is fab and can made to match any of your existing card or papers simply by adding chalks or ink to it. I punched four Scallop Squares from the chalked DSP and sponged lightly around the edges with Apricot Appeal ink. These squares were adhered direct to a plain square of Very Vanilla card. I created the embossed edge around the Apricot Appeal square card blank, by laying it face down over the groove of the paper cutter and scoring with the bone folder along the groove, stopping short at either end. Then simply rotate 90º and score again, repeating until you complete the square. Finally the Congrats sentiment was stamped with Versamark on Apricot Appeal card, heat embossed with Gold EP, punched out with the Scallop Square and popped up on dimensionals in the centre.

Please email me if you'd like to order your own share of Bride DSP, Pretties Kit and taffeta ribbon.

Have a great weekend.

Sara xx

Tuesday 6 July 2010

July technique challenge at In Love With Stamping - take 2


Well, I spoke too soon. The broadband connection is once again grinding to a halt and dropping out, despite the fix last week. I'm not able to do much blog-surfing at the moment and I'm back to using coffee-houses for their wifi. I think I must be jinxed. My usual lunchtime haunt is also have problems with their broadband, so I'm having to walk to the next nearest, which is another 10min of my lunchtime gone :-(

Thankfully I can at least check my emails with my iphone. It's only an Edge connection at home but better than nothing.

Enough of my sob stories now and back to the crafting. For my second take at the technique challenge I set over at ILWS I created an origami box to match the card I made here.


Recipe
Stamp set: Circle Circus
Textured Cardstock: Cameo Coral
Plain Cardstock: Whisper White
Ink: Cameo Coral, Summer Sun
DSP: Pink Flamingo
Punches: Scallop Circle, 1-1/4" Circle, 1" Circle
Other: Halfback Pearls (Pretties Kit), Medium Window Sheet

The box was made following the instructions here but using an 8" x 8" piece of DSP to create a box that would just fit 4 chocs in it. For the lid I used a 4" x 4" piece of Medium Window sheet and scored it at 1/2" on all sides. I snipped along one of the short score lines at each corner to create a tab, folded in and adhered with sticky strip. Four 1-1/4" Circles were punched from Textured Cameo Coral card and scored into quarters. Each Circle was snipped from the outside edge to the centre along just one of the score lines. Sticky Strip was added to each quarter, one was folded on top of another to create a pyramid and then one was stuck to each corner of the lid. See here for a more visual explanation. Halfback pearls were added to each decorated corner. Different size circles were stamped in Summer Sun and Cameo Coral onto Whisper White card and punched with appropriate size punches. They were then stacked with dimensionals in between, added to the centre of the lid and topped with a large vanilla halfback pearl adhered with a glue dot.


And here it is with the card:


Please email me if you'd like to order the Pretties Share. As I mentioned, I am getting my emails OK, so there won't be any delay in getting them out to you :-)

Sara xx

Monday 5 July 2010

July colour combo challenge at In Love With Stamping


This is my second take on the colour challenge I set over at ILWS which was to use Lovely Lilac, Almost Amethyst and Chocolate Chip (with optional Whisper White or Very Vanilla).


Recipe
Stamp sets: En Francais, Tiny Tags
Cardstock: Almost Amethyst, Chocolate Chip, Lovely Lilac, Whisper White
Ink: Lovely Lilac
Punches: Boho Blossoms, Medium Jewelry Tag
Narrow Grosgrain Ribbon: Chocolate Chip
Other: Large Flower, Halfback Pearls (Pretties Kit)

My card blank is a 4-1/2" square in Almost Amethyst. This was matted with Chocolate Chip, popped up on dimensionals. A 4" square of Almost Amethyst was wrapped with two parallel strands of Chocolate Chip grosgrain ribbon, interwoven at the corner. Using Lovely Lilac ink, I stamped En Francais onto the largest flower from the Pretties Kit. The largest flower from the Boho Blossoms punch was added in Lovely Lilac card for the centre, topped off with a large white halfback pearl. This was adhered into the empty frame created by the ribbon. Finally, the tag shape and the sentiment were stamped onto Whisper White card (using the stamp-a-ma-jig to get the positioning right) and punched out with the Medium Jewelry Tag. A small white halfback pearl was added with a glue dot and the tag popped up on half a dimensional onto a Lovely Lilac tag also popped up. This mat was popped up on dimensionals onto the card front.

I love the touch of elegance that the Pretties Kit gives, don't you?

Sara xx

Sunday 4 July 2010

July inspiration challenge at In Love With Stamping


This is our inspirational challenge for July over at In Love With Stamping:


Certainly a challenge! The wallpaper reminded me a little of Bella Toile and so I took that for my starting point and created this:

Recipe
Stamp sets: Bella Toile, Oval All
Cardstock: Pink Passion, Close to Cocoa, Very Vanilla
Ink: Pink Passion, Close to Cocoa
Punches: Scallop Oval, Large Oval
Taffeta Ribbon: Chocolate Chip, Very Vanilla
Other: Hat Pin, Beads, Halfback Pearl (Pretties Kit)

With the lush hatpin and beads from the Pretties Kit and the taffeta ribbon as my focus, I decided to keep the layout of the card fairly simple. I stamped Bella Toile onto Very Vanilla card with Close to Cocoa and matted this flat onto Close to Cocoa card and then a Pink Passion card blank. The Best Wishes sentiment was stamped onto Very Vanilla card with Pink Passion ink and punched with the Large Oval. This was matted direct onto Pink Passion card punched with the Scallop Oval. The hatpin was made up with Pearl and Clear beads (and spacer beads in between) and tied with Chocolate Chip and Very Vanilla taffeta ribbon. I rolled glue dots around the stem of the hatpin to keep the beads in place. The sentiment was popped up on a double layer of dimensionals and adhered over the hatpin to keep it in place. A halfback pearl was added to the sentiment to complete it and tie in with the hatpin.

Enjoy the rest of your weekend.

Sara xx

Saturday 3 July 2010

July sketch challenge at In Love With Stamping


Our sketch challenge this month over at In Love With Stamping is this one:


I decided to create an image that I then split into segments and then because I'd placed my focus in the upped right corner I just flipped the sketch to put my square on the opposite side for balance:


Recipe
Stamp sets: Touch of Nature, Sincere Salutations (sentiment)
Cardstock: Certainly Celery, Old Olive, Whisper White, Summer Sun, Basic Black
Ink: Black Stazon, Old Olive, More Mustard, Pumpkin Pie
SU Markers: Summer Sun
Stampin'Pastels: Certainly Celery, Old Olive
Other: Flowers, Rhinestone Brads (Pretties Kit)

I started by stamping the butterfly in Black Stazon and coloured it with Summer Sun marker and then shaded with More Mustard and pumpkin Pie picked up with a blender pen. This allows you to control the intensity of the colour so that it isn't too strong if that's the effect you're after. I masked the butterfly by stamping it again onto a post-it, cutting it out and placing over the original. The fern was stamped around in Old Olive. This image was then cut into segments and each segment was chalked around the edges with Certainly Celery (towards the inner) and Old Olive (at the outside edge). A little Old Olive ink was then sponged around the edges and the segments were adhered direct to an Old Olive mat. Flowers from the Pretties Kit were secured to the mat with Rhinestone Brads, cutting them up to fit the segments and layout. The mat was then adhered to the Certainly Celery card blank. A sentiment was stamped onto Summer Sun card with Black Stazon and matted onto Basic Black card. This was popped up on dimensionals on the card front.

Thanks for stopping by.

Sara xx

Friday 2 July 2010

June Mini Draw

And the winner of my June Mini Draw is ... *drumroll* ...

Barbara

from my June Tart & Tangy class. I'll get your winnings out to you as soon as possible Barb.

If you'd like to be in with a chance of winning the July Mini Draw or the August Grand Draw then take a look here for details.

Paper folding for the ILWS challenge


Yay - I think I've finally got my home broadband back, just in time for the weekend. It started to grind to a halt last Sunday and then wouldn't work at all for the last few days but the engineer's been out and I think it's been fixed. Thank goodness. I've spent the last week extending my lunch breaks and going straight to Meadowhall after work just to be able to hop onto the free wifi offered by certain shops. I'm so wired from all the caffeine, it's no wonder I've not been sleeping properly, lol. Fingers crossed it will be smooth sailing again from now.

Anyhow, my second challenge for In Love With Stamping this month is a technique challenge - this could be anything from simple paper pleating through to origami. As long as there are three or more folded edges, it counts!

I went with this fan fold which then ended up as a set of circles:


Recipe
Stamp set: Circle Circus
Textured Cardstock: Cameo Coral, Creamy Caramel
Plain Cardstock: Whisper White
Ink: Cameo Coral, Summer Sun
DSP: Pink Flamingo
Punches: Scallop Circle, 1-3/4" Circle, 1-1/4" Circle, 1" Circle, Large Oval, Corner Rounder
Other: Cream Half-back Pearls (Pretties Kit)

I started with 5" square card blank in Cameo Coral textured cardstock and matted Creamy Caramel textured cardstock direct to it. Following Karin's Folded Medallion Flower Tutorial here and I created my large flower with Pink Flamingo DSP cut to 6cm x 8cm. Four "fans" created the full circle. I stuck them together using tape and then added them to the card front using glue dots. A large vanilla halfback pearl finished this largest circle. Next I stamped and punched the various Circles and arranged a layout before punching out segments so that they fit together. As I don't have a punch that really fits my fan-fold circle I used the Large Oval to trim my punched shapes. The Summer Sun circles were adhered flat to the card front and then I added the Cameo Coral circles popped up on dimensionals. To create a further theme to the Cameo Coral circles, I added smaller vanilla halfback pearls to them with glue dots.

Am I tempting you to join my Summer Share yet? Details are at the top of the page.

Have a great weekend.

Sara xx


Thursday 1 July 2010

My colour combo challenge for you over at In Love With Stamping


Well it's a new month and so a new set of challenges over at In Love With Stamping. It was my turn to propose two of the challenges and this was the colour combo I set:

Almost Amethyst, Lovely Lilac, Chocolate Chip with optional Whisper White or Very Vanilla

And this is how I've used them:


Recipe
Stamp set: Oval All
Cardstock: Lovely Lilac, Almost Amethyst
Ink: Lovely Lilac, Almost Amethyst, Chocolate Chip
Punches: Scallop Oval, Large Oval
Taffeta Ribbon: Chocolate Chip
Rub-ons: Hidden Garden Blossoms
Other: Pretties Kit, Rhinestone Brad (Circle Ice)
Non-SU: Scallop and Circle die cuts

Two large scallop circles were die cut from Lovely Lilac and the back layer was scored in a straight line with seven scallops on one side of the scoreline. This seven scallop portion was adhered to the front layer with sticky strip, creating a stand for the card. The large Chocolate Chip rub-on from the Hidden Garden Blossoms was applied to a large circle, die cut from Almost Amethyst. Using the Lilac and Amethyst markers I coloured a small flower from the Pretties Kit and secured it to the centre of the rub-on with a rhinestone brad. Chocolate Chip taffeta ribbon was wrapped around the lower portion of the circle. This layer was popped up on dimensionals on the front of the card. Fabulous Friend was stamped in Chocolate Chip on Almost Amethyst and punched with the Large Oval. The flowers were coloured using the blender pen and Chocolate Chip ink. The sentiment was popped up on dimensionals on a Scallop Oval punched from Lovely Lilac. Both layers were then popped up on dimensionals on top of the ribbon.

Hope to see your creations with these colours in the gallery soon.

Sara xx