Tuesday 30 November 2010

A quick and easy christmas card using your paper scraps


Is it really December tomorrow? Where has the year gone, it just seems to have flown.

If you've left your christmas cardmaking to the last minute for any reason or suddenly get asked by nearest and dearest to make a set of cards for them (that happen to you too lol?), then today's card is a great one for quick and easy mass production. It's also great for children to help you with and for using up those scraps of designer paper that may be cluttering up your craft cupboard.


Recipe
Stamp set: Perfect Punches
Cardstock: Cherry Cobbler, Crumb Cake, Very Vanilla
Ink: Old Olive, Cherry Cobbler
DSP: Jolly Holiday
Punches: Scallop Circle, 1-3/8" Circle, 1-1/4" Square

The card blank is a 5" square of Cherry Cobbler that's been matted with a 4-1/2" square of Crumb Cake. 8 squares were punched out of Jolly Holiday DSP with the 1-1/4" Square punch and adhered direct around the edges of the Crumb Cake layer. The Perfect Punches sentiment was stamped twice onto Very Vanilla card, once with Old Olive ink and again with Cherry Cobbler ink. The Cherry Cobbler version was punched out with the Scallop Circle and the Old Olive version was punched out with the 1-3/8" Circle. Each layer was popped up on dimensionals in the centre of the card.

Simples!

Sara xx

Sunday 28 November 2010

A crafty gift for Christmas and year round


I created this mug and one like it for myself and my downline Jan to use at the recent convention we attended. I forgot to photograph Jan's before I gave it to her but it was identical except that the letters spelled out Jan's Java instead. The mugs were bought from Starbucks and are specially designed for you to add your own decoration (note - the mugs are handwash only, you can't pop them in the dishwasher). Although these are currently trimmed up for the Winter season we'll easily be able to ring the changes throughout the year.


Recipe
Stamp sets: Varsity Alphabet, Serene Snowflakes
Cardstock: Whisper White
Ink: Soft Suede, Baja Breeze

The mug comes with Starbuck's own instruction sheet inside and I simply unscrewed the base and used their instruction sheet as a template to cut my own cardstock insert. I stamped the letters in Soft Suede ink using the Varsity Alphabet set, angling then so that they'd fit. If you need to spell out longer names/words then you'll need a smaller alphabet (eg. Just Perfect). The Serene Snowflakes were added in Soft Suede and Baja Breeze inks.


You then roll your template around the inner core and slide it into the mug sleeve from the base, before screwing the base on again. The inner sleeve is a very tight fit and so you won't be able to add any embellishments. The Whisper White cardstock just about fits but it is a squeeze and I suggest trying thinner paper/card if you have difficulties.

I think these make a great personalised gift and there's no fear of mixing up people's drinks this way!

Enjoy the rest of your weekend.

Sara xx

Friday 26 November 2010

A winter wedding or silver anniversary card


A colleague at work is getting married in a few weeks time and so of course a card is called for. My usual pastels just didn't feel right for a winter wedding and so I decided to go with this black, frosty white and silver colour combo instead and after completing it I figured it would probably work equally well for a silver anniversary card.

As I don't have the oh so elegant Wedding Sweet set yet (it's on my wish list) I opted to use a stamp from the Artistic Etchings set for my sentiment.


Recipe
Stamp sets: Growing Green, Artistic Etchings (sentiment)
Cardstock: Shimmery White, Basic Black
Ink: Versamark, Platinum Shimmer Paint
Punches: Scallop Edge Border, Scallop Trim Border, Small Oval, Large Oval
Satin Ribbon: Whisper White
Other: White EP
Non-SU: Brushed metallic silver card

The base card is an A6 portrait of Shimmery White and although you can't see it too well from the photo, this has a beautifully subtle pearlescent sheen to it. The right edge of the card front was punched with the Scallop Edge Border and a strip of metallic silver card adhered direct to the back right edge of the card to set off the scallop border. A mat of metallic silver card was adhered direct to the card front. I stamped the fern leaf in Versamark onto Basic Black card, added White EP, embossed with the heat tool and then painted the leaf with the Platinum Shimmer Paint. The flower was created in the same way on a scrap of Basic Black card and then cut out. Sticky Strip was laid about 1" up from the bottom of the leafy layer and the Whisper White Satin Ribbon ruffled up across it and secured around the back of the layer. This was matted direct onto more Shimmery White card that had been punched top and bottom with the Scallop Trim Border and the layers popped up on dimensionals on the card front. The sentiment was stamped in Versamark onto Basic Black card and heat embossed with White EP before punching out with the smallest Oval punch. It was matted onto a Large Oval punched from the silver card and popped up on dimensionals on the card front. The cut out flower was added last, also popped up on dimensionals and overlapping the ribbon a little.

Have a great weekend.

Sara xx

Tuesday 23 November 2010

A naturally Contempo Christmas with a bit of bling


Apologies to anyone who saw this earlier and then wondered where it disappeared to. I had a minor technical issue. I started writing this post and accidentally scheduled it instead of just saving it until I'd finished adding all the information - doh! Confuddled and confused after my exam yesterday, obviously.

... and if you're seeing it for the first time, then welcome and just pretend you didn't read the last bit, lol.

I've been meaning to use my new Crimper for something other than the little "sour cream styled" gift packages for a while and finally managed it with this card:


Recipe
Stamp set: Contempo Christmas
Cardstock: Cherry Cobbler, Naturals Ivory, Crumb Cake
Ink: Cherry Cobbler, Versamark
Punch: Ornament
Other: Heat & Stick Powder, Fine Galaxy Glitter, Gold Elastic Cord
Tools: Heat Tool, Crimper

I started with a 5" square card of Cherry Cobbler and matted it with a layer of Naturals Ivory card that had the edges sponged with Cherry Cobbler ink. A 4-1/2" square of Crumb Cake card had the centre marked (in pencil, by drawing from corner to corner) and all four corners folded into the centre. This diamond was then fed through the crimper, point first and then unfolded and the edges just trimmed to a square again (the crimping makes them bow out a little). This was adhered direct to the front of the card. Squares/diamonds of Cherry Cobbler and Naturals Ivory card (sponged again) were matted in the centre. The bauble was stamped in Versamark onto Cherry Cobbler card, covered in Heat and Stick Powder and heat embossed, covered in Gold Glitter and then gently heated again to set. This was punched out with the ornament punch. A loop of Gold Elastic Cord was added to the top and then the ornament was popped up on dimensionals on the card front. Finally, the sentiment was stamped in Cherry Cobbler ink onto a strip of Naturals Ivory card and the edges sponged in the same ink again. The strip was inserted into the crimper just as far as the text and the crimped a couple of turns at either end, this helped shape the banner which was then popped up on dimensionals.


Recipe (Inside)
Stamp set: Contempo Christmas
Cardstock: Naturals Ivory
Ink: Cherry Cobbler, Crumb Cake

For the inside, an insert of Naturals Ivory card was stamped with the sentiment in Cherry Cobbler ink and then the Christmas tree stamped off the card at either side in Crumb Cake.

I'd ended up using Naturals Ivory for this project just because I'd run rather low on Very Vanilla (I'm sure I've got a pack hiding somewhere) but I'm so glad that I did. It's the first time that I've used this card and it looks fantastic teamed with the Crumb Cake, it gives a much more natural look.

Thanks for stopping by.

Sara xx

Sunday 21 November 2010

A new baby card for the Mojo Monday sketch


Today I've got a happy event to craft for. One of my friends has just had a little boy and so of course I want to send a card to congratulate her on her new addition.

Being so fixed on Christmas I needed a little kick start to get me going and so I turned to the Mojo Monday challenge (even though it's a little late in the week). The sketch (until tomorrow) is this one:


And this is may take on it:


Recipe
Stamp set: Fun and Fast Notes
Cardstock: Baja Breeze, Pear Pizzazz, Whisper White
Ink: Not Quite Navy, Baja Breeze
DSP: Nursery Suite, Elegant Soiree, Subtles Patterns Stack
Punch: Curly Label
Taffeta Ribbon: Whisper White
Non-SU: Die cut circles

I started with a landscape A6 card in Baja Breeze. The pram from the Fun and Fast Notes was stamped in Not Quite Navy onto circle of Whisper White card and again onto some Elegant Soiree DSP. The pram, wheels and heart were all paper pieced and the whole was adhered direct to a circle of Baja Breeze. A layer of Whisper White card was stamped with the sentiment in Baja Breeze and matted onto a layer of Pear Pizzazz card. Using the Curly Label punch, three edges were punched from Baja Breeze card and adhered underneath the sentiment and then a layer of Nursery Suite DSP added over the top so that just a portion of the punched shapes shows. Whisper White taffeta ribbon was wrapped around and a bow added with a glue dot. I decided that I needed another colour to brighten the card a little and so matted the card blank with a piece of Pink Pirouette DSP before added the main panel and the pram accent popped up on dimensionals.


Recipe (inside)
Stamp set: Fun and Fast Notes, Curvy Verses
Cardstock: Whisper White
Ink: Baja Breeze
DSP: Nursery Suite

On the inside I added a Whisper White insert with a strip of the Nursery Suite DSP adhered over to the left. The verse was stamped direct with Baja Breeze ink and the pram was first stamped off onto scrap paper before stamping onto the insert for a more subtle effect.

Off out to take Bess to her socialisation class now and then it's back to hit the books before my exam tomorrow!! Fingers crossed that the questions are kind to me.

Sara xx

Friday 19 November 2010

Not a hint of Baja Breeze on this flowery birthday card


Ssh, don't tell anyone, I've gone off the rails. Not only is today's card nothing to do with Christmas but there's no hint of Baja Breeze anywhere, lol.

This card is for a friend who regularly goes to the theatre with my Mum and I. She's not a crafter and I'm sure that she doesn't follow my blog, so I'm taking a chance and posting this before I've sent the card (also because that way I won't forget to photo and post it, doh!).

I've used the Fast and Fabulous set which is a gorgeous level 2 hostess set (yes you can get this set free by hosting a workshop with sales of £300 or more).


What I love about this 6 piece set (available as either wood or clear mount), is how versatile it is. You can create beautiful watercoloured effects with the 2 step stamping, quick backgrounds with either the fill or outline stamps or you can use the outline stamps on their own and colour in with your preferred medium. Thinking ahead, I can see these being great for Mother's Day cards. Just email me to book your own workshop if you'd like to earn this set for yourself.


Recipe
Stamp sets: Fast and Fabulous (level 2 hostess set), Party This Way (sentiment)
Cardstock: Pretty in Pink, Melon Mambo, Whisper White
Ink: Melon Mambo, Pretty in Pink, Old Olive
Punches: Corner Rounder, 1" Circle, Modern Label
Taffeta Ribbon: Whisper White
Other: Subtles Brads

All the matted layers had the Corner Rounder punch applied to the top and bottom right hand corners. The card blank is a portrait A6 in Pretty in Pink and was matted with Melon Mambo and another layer of Pretty in Pink. This top layer had been stamped with the large fill daisy in Pretty in Pink ink for a soft watermark effect. A strip of Pretty in Pink card was stamped with the tall outline flower in Melon Mambo ink, matted onto Melon Mambo card, then direct to the card front. A portion of the tall outline flower was coloured direct to stamp with Old Olive and Melon Mambo markers, stamped onto Whisper White card and then the flowers coloured in with Pretty in Pink. This was punched out with the 1" Circle and glued in the corresponding place over the pink on pink image for the spotlight effect. The sentiment (from the Party This Way set) was stamped in Melon Mambo ink onto Whisper White card and punched out with the Modern Label punch. Pretty in Pink brads were added to either end and the sentiment was popped up on dimensionals. Finally a little Whisper White taffeta bow was added with a glue dot.


Recipe (inside)
Stamp sets: Fast and Fabulous, Sincere Salutations (sentiment)
Cardstock: Whisper White
Ink: Melon Mambo, Pretty in Pink
Punch: Corner Rounder

On the inside I stamped the outline stamps in Melon Mambo and then overstamped with the fill stamps in Pretty in Pink.

Normal service will be resumed shortly, ie. I'll be back to Christmas or Baja Breeze before you know it, heehee.

Sara xx

Wednesday 17 November 2010

A flowery thank you


A little change today from all the Christmas bits and pieces but no change from the Baja Breeze, heehee (I'll make a big effort for the the next post I promise). Today's card is the one that I created a big batch of, to send out with all the orders to my customers over the last month, thanking them for crafting with me. I did take a photo of the batch when I'd made them but somehow deleted it from my camera before I transferred it to the laptop. Good job I've been able to photo this last one before I send it out.


Recipe
Stamp sets: Ornate Flowers, Because I Care (sentiment)
Cardstock: Baja Breeze, Pear Pizzazz, Whisper White
Ink: Pear Pizzazz, Poppy Parade, Pacific Point
DSP: Greenhouse Gala
Punch: Scallop Trim Border

The base card is a 4" square of Baja Breeze and I added a 1" strip of Greenhouse Gala DSP to the left side. Using Pacific Point ink I stamped the sentiment direct to the card. Pear Pizzazz and Poppy Parade markers were used to colour the flower direct to the stamp and then the it was "huffed" and stamped out onto Whisper White card. This was matted onto a Pear Pizzazz layer that had been punched top and bottom with the Scallop Trim Border and the whole was popped up on dimensionals on the card front.

Off now to get some more crafting done, my job for tonight is to make the next batch of thank you cards, lol.

Just place your order with me to snag your own.

Sara xx

Monday 15 November 2010

A snowflake gift bag and window decoration


Today's project is another that I made for Convention, this time for a 3d swap. Again I made 10 of these to swap with others in my group (9 to swap and 1 to keep for myself).

I stayed with the same stamp set and colour scheme as I used for the 
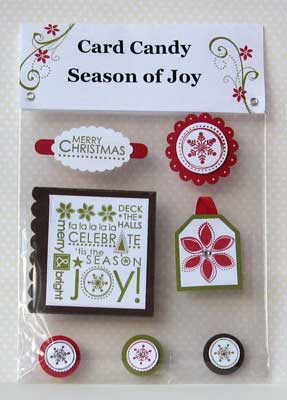
Card Candy, so anyone in the same group as me for both, will have an easy time making a quick card to go with this gift.


Recipe

Stamp sets: Serene Snowflakes, Sparkly & Bright (sentiment)

Textured Cardstock: Baja Breeze

Plain Cardstock: Not Quite Navy, Whisper White

Ink: Versamark, Not Quite Navy, Signo White Gel Pen

Punches: Scallop Oval, 1-3/4” Circle, 1-1/4” Circle

Other: Dazzling Diamonds, White EP, Stampin’ Pastels, Basic Rhinestones

Tools: Heat Tool, Mat Pack, Paper Piercing Tool


The directions for the bag are here. This was made using Baja Breeze textured card. For the front of the bag I started with an 8.5cm square of Not Quite Navy card and punched out the partial 1-3/4"Circle to match the handle. The paper pierced border had faux stitching added with a White Signo Gel Pen. A cascade of snowflakes was added diagonally across the square with Versamark and then heat embossed with White EP. The centres of the snowflakes had Dazzling Diamonds added. The square panel was popped up on the bag front with dimensionals. The sentiment was stamped in Not Quite Navy ink onto Whisper White card and punched with the Scallop Oval. Pastels were used to chalk the edges of the sentiment and a small rhinestone dots the "i". The sentiment was also popped up on dimensionals.

Inside the bag was a snowflake window decoration:


Recipe

Stamp sets: Serene Snowflakes

Cardstock: Medium Window Sheet

Ink: Craft White, White Stazon

Narrow Taffeta Ribbon: Whisper White (Marina Mist pictured)

Other: Heat & Stick Powder, Fine Cosmo Glitter, Metallic Eyelets

Tools: Heat Tool, Crop-a-dile

Non-SU: Sucker Hanger (Poundland)


For the decoration I started with an octagon cut from Medium Window Sheet. This is an 8.3cm square, with the corners cut off (measure in 2.4cm from each corner). The large snowflake was stamped in Craft White ink (this shows up better than Versamark if the glitter is pale), heat embossed with Heat & Stick Powder, sprinkled with the Light Blue fine Cosmo glitter and then heated again to set (heat gently at all times so as not to melt the Window Sheet). A hole was punched in the top of the decoration and a Silver Eyelet set in. The edges of the ornament were brushed with White Stazon (the White Craft takes ages to dry on Window Sheet if you don't heat set it) to define the edges of the decoration and have it stand out better against the window. It was then popped over the sucker hanger and a bow added to finish it off (my Whisper White ribbon is hiding from me today so Marina Mist stepped in to save the day for my pic).

Thanks for stopping by.

Sara xx

Sunday 14 November 2010

More swaps and a couple of bags from Convention

Hope you're having a good weekend. I'm having a great time catching up with all the swaps I collected at Convention. My MIL and I went through them all yesterday and there is a fantastic variety from everyone.

Here they are:


I thought I'd also just show you the Convention bag that we all received (filled with our Convention Programme, a copy of the catty, our Convention badges and 2, yes 2 free stamp sets):


And then in our Memento Mall shopping area I bought this tote:


I'll be back tomorrow to share the 3d swap that I made.

Enjoy the rest of your weekend.

Sara xx

Friday 12 November 2010

My general swap from Convention


Woohoo, I'm on my way home finally! Back to DH, the dog and all my crafting goodies.

Until I've had time to get creating again, I've still got a few things to show you from Convention. Today's card is the general swap that I made - around 60 of them, with a little assembly help from my downline Jan and upline Joanne. Thanks girls, don't know what I'd have done without you.


Recipe

Stamp set: Vintage Vogue

Cardstock: Rich Razzleberry, River Rock, Very Vanilla

Ink: Rich Razzleberry, River Rock, Always Artichoke

Narrow Taffeta Ribbon: Rich Razzleberry

Punches: Scallop Trim Corner, Scallop Trim Border

Narrow Taffeta Ribbon: Rich Razzleberry

Tools: Color Spritzer Tool


I started with the main image. (I took these away with me when I went to Cardiff for training and made a big batch of them. My friend Dawn also got a sneak preview as we made this card when I went round to her house for dinner - thanks again Dawn). The large flower from the Vintage Vogue set was stamped in Rich Razzleberry ink onto Very Vanilla card then stamped again onto a sticky note, cut out and used to mask the original before stamping the smaller flower twice in the same ink. The leaves were inked with River Rock and Always Artichoke using the rock 'n' roll technique and stamped several times before the ink faded and the stamp had to be inked again. Using a marker direct to the stamp, the sentiment was inked selectively with Rich Razzleberry so that the two sentences could be seperated out. This layer was then spritzed with a little Rich Razzleberry and River Rock before matting onto a layer of River Rock and then one of Rich Razzleberry which had been punched with the Scallop Trim Corner and the Scallop Trim Border.

The card blank was a landscape A6 of Rich Razzleberry. A large mat of Very Vanilla was stamped with the border stamp from the set, in River Rock and Always Artichoke inks using the rock 'n' roll technique (some of the later ones were only stamped in Always Artichoke to save time). Strips of River Rock and Rich Razzleberry card were matted together and then onto the Very Vanilla layer and narrow taffeta ribbon in Rich Razzleberry wrapped around all the layers before adhering direct to the card front (the wrapped ribbon was left off when I started running out of ribbon). A bow of the same ribbon was attached with a glue dot and the main panel was popped up on dimensionals.

I hope that my swapees liked their cards. I'll show you some of the ones I got in return soon.

Have a great weekend.

Sara xx

Wednesday 10 November 2010

Card candy swaps


Warning! Today's post is pic heavy.

I just lurve card candy, they're like regular crafting, squeezed into a concentrate, lol. And if I could only bear to part with them they make great presents for crafting friends too!

I took part in one of the ILWS organised swaps at Convention and made 10 lots of this candy:


Recipe

Stamp set: Serene Snowflakes, Four the Holidays (sentiment set)

Cardstock: Baja Breeze, Not Quite Navy, Whisper White, Medium Window Sheet, Vellum Paper

Ink: Not Quite Navy, Stazon White, Baja Breeze, Versamark

DSP: Elegant Soiree

Punches: Scallop Trim Border, Ornament, Butterfly, Scallop Square, 1-3/4” Circle, 1-3/8” Circle, 1” Circle, Star, Tag, Small Tag

Narrow Grosgrain Ribbon: Whisper White

Other: Silver Elastic Cord, Basic Rhinestones, Clear Rhinestone Brads, Dazzling Diamonds, Silver EP, White EP, Silver Brads, Large Silver Brad (Hodge Podge)


And these are all the lovely swaps that I got in return from the super talented ladies in my group (Group 3) (and I got to keep one of my own if you're wondering what happened to the 10th - it's not going spare, heehee).


From Emma using Cottage Garden


From Margaret using For Everything


From Michelle using Artisitic Etchings


From Kirsteen using Tiny Tags


From Rachel using Vintage Vogue


From Val using Growing Green


From Marisa using Season of Joy


From Jo using Cottage Garden


From Nicci using Contempo Christmas


And because Joanne and Jan (my upline and downline, together with me at Convention) were so jealous of my candy we've decide to have a little candy swap of our own so please pop back soon to see what we create for that.

Want your own card candy? Book a workshop with me and you and your friends can have a go at making your own. Just email me to find out how.

See you soon.

Sara xx

Monday 8 November 2010

Convention make and takes


Well I'd love to say that I'm home now doing lots of crafting but after working away at the beginning of last week, then heading straight out to Convention, I jumped on another train yesterday and I'm working away all this week. I only got to see DH and Bess for a few hours before leaving them again. Almost as bad - I had an order delivered at the beginning of last week and now I've got my new Convention sets too and I can't play with them until I get home on Friday! So not fair.

But I've still got lots to share with you from Convention so at least that will keep us going hopefully. It was a complete blast from start to finish. From the unofficial party we had at the hotel on the Thursday night ...
... through to getting to the venue and being greeted by Shelli, one of the co-founders of Stampin' Up! and a really elegant and smiley lady ...
... to getting our convention bag and pins and our free stamp sets! ...
... right through to the final session when we got another free stamp set that we weren't expecting!

Of course, along the way, we couldn't have a gathering without make and takes and we'd already been given our free sets, Just Believe and Party This Way so we had our own stamps for making these:


This little party invitation/birthday card uses the Party This Way set and I've a little confession to make. The sentiment in the centre is supposed to be on a brad and spin, but I had a DH moment and didn't read the instruction sheet, I just followed the picture. Whoops! Good job there are no mistakes in crafting. Could have been worse, it could have been a flat pack bookcase that I ignored the instructions for, lol.


This time I used the same set and colour combo to create a scrapbook page all ready to just add a standard photo.


This little set is made with Just Believe and opens up:


And holds two each of these dinky notelets/tags.


Then finally it was the Just Believe stamp set again to make this sweet watercolour card and matching envelope.


If any of these projects take your fancy then please get in touch with me. We'll organise a date and time for me to come over for a fun workshop with you and your friends.

Please stop by again soon and I'll share with you the card candy swap that I took part in. I've got some truly luscious card candy and I'm not going to be able to bring myself to open any of it, heehee, it's just for stroking.

Sara xx

Saturday 6 November 2010

Convention!! And a christmas snowglobe shaker card


Wow! Just walked in after two days at convention and it's just been fantastic! Such fun. What a lovely bunch of ladies, not just from the UK but from France and Germany too. (And they speak English so much better than I can manage French and German). So much crafting, so much swapping and so many laughs, absolutely brilliant. I can't wait to go again next year.

You'll never guess where it's going to be?

Give up?

We're going to be at Disneyland Paris!! (Squeals of delight)

Want to come with me? Email me to find out how.

I'll post more about this year's convention over the next few weeks.

For tonight, here's another challenge from over at In Love With Stamping. For this month's sketch challenge we have a snowglobe file that you can download here.

And this is what I made with it:


Recipe
Stamp sets: Winter Post, Serene Snowflakes, Sparkling, Four the Holidays
Cardstock: Baja Breeze, Very Vanilla, Whisper White, Medium Window Sheet
Ink: Not Quite Navy, Baja Breeze, Soft Suede, Whisper White Craft
Other: Dazzling Diamonds

The card blank is Baja Breeze cut using the In Love With Stamping snowglobe template but leaving it whole. I cut the card front (only) again, this time with the aperture, to use for the shaker sandwich. Using the Baja Breeze and Soft Suede markers direct to stamp I coloured the skaters selectively and stamped onto Very Vanilla card and then added some Dazzling Diamonds with a two way glue pen. This layer was adhered direct to the card front. Using the Whisper White Craft ink and the Sparkling wheel I stamped the snowflakes onto the Medium Window Sheet and adhered it behind the front layer aperture. The front layer was stamped with the sentiment in Not Quite Navy and snowflakes in Baja Breeze. The outer edges of a dimensionals sheet was placed all the way round the aperture on the reverse of the front layer and the snow (waste from punched borders) was added into the aperture before sealing to the front of the card.

Now I'm off to catch up on some sleep. Heehee

Sara xx