Friday, 30 April 2010

Some more inspiration from Craft Stamper magazine


On Wednesday I showed you a card I cased from Craft Stamper magazine. Still with mag, I took inspiration from both Lousette Ashton's "Stamp "n' Punch" article and Debbie Dolphin's "Easy Easels" article, to create this easel card:


Recipe
Stamp sets: Flight of the Butterfly, Medallion
Cardstock: Almost Amethyst, Whisper White
Ink: Almost Amethyst, White Stazon, Versamark, Lovely Lilac
Punches: Butterfly, Circle
Other: Dazzling Diamonds, Medium Window Sheet
Non-SU: Die cuts, Die cutting machine


I put the fold of the card just inside my die to get the card blank and then used the next smallest die to cut both the card front and the insert. The card front was stamped with the Medallion in Almost Amethyst, placing the centre in the upper half of my octagon. The centre of the medallion was then punched out using the 1-1/4" Circle. I stamped the base butterfly with Versamark and Lovely Lilac for shading and then punched out with the Butterfly punch. The top wings were made by stamping in White Stazon on Medium Window Sheet and punching out. I then used the White Stazon as a template for where to put my Tombow and Dazzling Diamonds. Once dry the glittered wings were adhered to the base wings using a rolled up glue dot. The whole butterfly was popped up on half a dimensional on either side of the punched circle. A layered and matted sentiment provides the stopper to rest the card front against when open.

It's quite a dinky card, a little less than 4" x 4". Here's the card folded flat:


I'm looking forward to a great long bank holiday weekend of crafting; tomorrow the May challenges will be posted at In Love With Stamping and on Sunday the Stamp With Us Birthday Bash online classes start!

Hubby? What hubby? He may not see very much of me this weekend, lol.

Have a great weekend and bank holiday everyone.

Sara xx

Wednesday, 28 April 2010

A cased card from Craft Stamper magazine


This card is one that I've cased from this month's (May 2010) Craft Stamper. It's a design by the very talented Lousette Ashton. I just loved this design so much that all I did was swap her pink colour scheme for my favourite purples.

The great thing about this card in real life is how the colours seen to change in the light. You may be able to see from the two pix here, that as you turn it either the Craft white Medallion stands out or the Dazzling Diamonds do.

Recipe
Stamp sets: Medallion, Flight of the Butterfly
Cardstock: Almost Amethyst, Lovely Lilac, Elegant Eggplant
Ink: Craft Whisper White, Versamark, Elegant Eggplant
Other: Dazzling Diamonds, Paper Piercing Tool, Mat Pack

All the instructions are in the mag.

Sara xx

Monday, 26 April 2010

Shabby and distressed friend for the Mojo Monday challenge


Tonight's MojoMonday challenge has taken me a little longer than usual to put together. I've been practising some of my distressing and shabby chic techniques ready for the Vintage Vogue class I'm doing on Saturday 8 May.

This is the sketch challenge from MojoMonday - you can choose to do the round, or the square, or both:


Here's my square version:


Recipe
Stamp sets: Occasional Greetings, Vintage Vogue
Cardstock: Chocolate Chip, So Saffron, Very Vanilla
Ink: Close to Cocoa, Versamark, Champagne Mist Shimmer Paint
DSP: Tea & Crumpets
Punch: Scallop Circle, Eyelet Border
Taffeta Ribbon: Chocolate Chip
Other: Gold EP, Gold Elastic Cord, Latte Designer Button, Cutter Kit

All the layers are distressed using the cutter tool and then sponged with Close to Cocoa ink. The Eyelet Border and the bloom are sponged with Champagne Mist Shimmer paint. I stamped off the Close to Cocoa ink twice before stamping the Vogue frond on the Vanilla card. The sentiment is heat embossed with Gold EP.


The Vintage Vogue class has grown and so I've moved it to another venue instead of my home, as more than 5 around my dining table just gets too cramped. That means that I've got a few more spare places now if you'd like to join us. We'll be at the Tankersley Welfare Hall, a few minutes from Junction 36 of the M1. Just email me if you'd like to book a place.

Thanks for stopping by.

Sara xx

Sunday, 25 April 2010

Birthday theme challenge at Stamp With Us


Our challenge today over at Stamp With Us is to create something to meet a:

birthday theme

I decided to go with some bright and bold colours to show that you don't have to stick with vintage colours or the distressed look when using the Vintage Vogue set.


Recipe
Stamp Sets: Vintage Vogue, Oval All, Very Vintage
Cardstock: Summer Sun, Tempting Turquoise, Whisper White
Ink: Summer Sun, Taken With Teal, Stampin' Pastels
Punches: Scallop Oval, Large Oval
Other: Circle Fire Rhinestone Brads

I rolled the Very Vintage wheel at a diagonal using my Wheel Guide to roll again and complete the top corner. The flowers were made using the rock and roll technique ie. inking the stamp with one colour and then rolling the edges of the stamp on another (contrasting or complementary) inkpad. The Tempting Turquoise turns green when mixed with the Summer Sun and I kept these flowers for the bottom petals so that they'd be more leaf-like. To have more of the Turquoise colour come through, I first inked with Summer Sun, rolled off some of the ink onto scrap paper then rolled onto Tempting Turquoise before finally stamping. The small flowers were just stamped with Tempting Turquoise ink. All were cut out and I shaped the petals before layering and securing with a Rhinestone Brad. The sentiment was stamped in Turqouise, coloured with a Summer Sun marker and then chalked around the edges with Summer Sun.

Please go take a look at the other wonderful creations made by the Design Team.

Enjoy the rest of your weekend.

Sara xx

Friday, 23 April 2010

A sweet pea birthday card with lots of fabric elements


I've had a tough day today, full of meetings with unhappy audit customers and so I'm looking forward more than usual to tonight's workshop and a fun night of crafting. I always find crafting to be great therapy and my hostess is such a cheerful lady, I'm sure the evening will whizz by.

A quick post then before I head off out.

For this card I've used a stamp from the new My Sweet Pea set for the background.


And used the gorgeous stitched felt flowers, which come in a pack of 52 pieces.


And here's my card:


Recipe
Stamp sets: My Sweet Pea, Happy Moments (sentiment)
Cardstock: Rose Red, Old Olive
Ink: Craft Whisper White
DSP: Sweet Pea
Double Stitched Grosgrain Ribbon: Rose Red
Other: Sweet Pea Stitched Felt, Twine (hidden behind the bow)

I used the flower centre to stamp the background on the card blank with Whisper White ink to match the stitching on the felt and the ribbon. The sentiment was also stamped at the same time. Double stitched ribbon was wrapped around layered Sweet Pea DSP and Old Olive card and secured around the back before popping up on the card using dimensionals (the ribbon is quite thick so popping up in this way avoids too much bulk between your layers). I tied the centre of the ribbon first with twine and then attached a bow with glue dots. This way you can position the bow just right. The fabric pieces were also attached with glue dots.

Have a great weekend.

Sara xx

Wednesday, 21 April 2010

A set of cards in kraft with matching punched trios


Today I've made a couple of quick cards to complete a set that I'll be giving away in my free draw at Friday night's workshop.


Recipe
Stamp sets: One of a Kind, Whimsical Words
Cardstock: Kraft, Whisper White, Green Galore/Only Orange
Ink: Green Galore/Only Orange
Punch: Boho Blossoms

The aperture is punched with the Boho Blossoms punched and then stamped and punched images matched in place underneath the apertures on the inside back of the card.

They match one I made at my Open Day:


And one of those featured on the Mini catalogue bloghop:


... to create a quick and easy set of cards that make a great gift.

Hope you like.

Sara xx

Monday, 19 April 2010

A birthday card in pinks and greys for the Mojo Monday sketch challenge


Can it really be Monday already?

Saturday night's theatre was brilliant. We went to see Calendar Girls and it was funny and very sad and moving all at the same time. Hats off to Lynda Bellingham, Letitia Dean and the rest of the ladies. I think they're very brave performing in front of a live audience when you can't be absolutely sure that the props will behave as they should (they stayed where they should on Saturday though). Another one I can recommend.

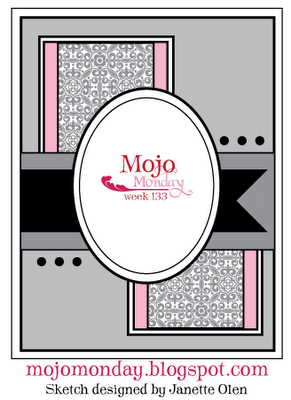
As a wind down after work today I thought I'd play along with the Mojo Monday challenge. The sketch this week is this:

And here's my card:


Recipe
Stamp sets: All for Friends, On a Pedestal (sentiment)
Cardstock: Regal Rose, Whisper White, Basic Gray
DSP: Nouveau Chic, Sweet Pea
Ink: Black Stazon, Craft White, SU Markers
Wide Grosgrain Ribbon: Regal Rose
Gingham Ribbon: Light Pink
Punch: Scallop Edge
Other: Clips Assortment, White EP
Non-SU: Die cuts

I love pink and grey as a combo and so I teamed up papers from the Nouveau Chic set and the Sweet Pea stack. Lots of matting and layering and plenty of ribbon.

Thanks for stopping by.

Sara xx

Saturday, 17 April 2010

Another xmas card and news that the full heart punch is available while stocks last


Back home and I slept so well last night. Bliss!

And I'm back to having all my crafting supplies to hand. My plan is a little light studying today just to finish up some of my notes from the last week, lots of crafting and then it's off out to the theatre tonight to see Calendar Girls.

I felt so well organised, making my xmas card for last week's Stamp With Us challenge (only another 70 or 80 to go, lol), that I couldn't resist making another one using the gorgeous Dasher stamp from the new Mini.

This is one of the new single stamps and he matches one of the images we have in the Christmas Jingle Simply Scrappin' kit. I used him as my focal point combined with some Serene Snowflakes.


Recipe
Stamp sets: Dasher, Serene Snowflakes
Cardstock: Not Quite Navy, Very Vanilla
Ink: Platinum Shimmer Paint
Punch: Eyelet Border

This is a very quick and easy card with just a little drying time for the shimmer paint. I daubed the shimmer paint direct to stamp using my sponge dauber and stamped the trio of snowflakes repeatedly down the sides of my card, rotating the stamp each time. This background was matted and layered onto a Not Quite Navy blank. Dasher was stamped in the same way and matted onto Very Vanilla that had been punched either side with the Eyelet Border. Super quick for stamping a stack of xmas cards.

We've just been advised today that there are still some Full Heart punches left in stock from our promotion last month and available at £12.50 (order no. 113693). This punch works great alone or teamed with stamps from I {Heart} Hearts, Simply Said and also last year's Sale-a-bration Polka Dot Punches set. I used it on the top heart on the card below.

It's available while stocks last but then you won't be able to get hold of it again until the new Idea Book and Catalogue comes out in October. Email me to order yours.


Have a great weekend.

Sara xx

Thursday, 15 April 2010

A bright card just to say Hi


Phew! Just one more day then I'm heading home. Looking forward to getting back to DH and Bess ... and sleep! I never sleep too well when I'm working away and all the studying means that my brain's still buzzing when my head hits the pillow. Let's just hope that it's still buzzing when the exam paper is put in front of me in June :-)

The card I have for you today is a quick one and an excellent way to use the Yoyo Yellow that many of us have difficulty with (probably why it's going in the Autumn).


Recipe
Stamps: Say it with Scallops, Tiny Tags
Cardstock: Yoyo Yellow
DSP: Night & Day Specialty
Ink: Basic Black, Versamark
Punches: Scallop Square, Medium Jewelry Tag
Gingham Ribbon: Black
Other: Black EP, Linen Thread

A standard A6 card blank in Yoyo Yellow was wrapped with the printed Window Sheet from the Night & Day Specialty paper. I'm canny with the good stuff so my wrap doesn't go all the way around, just about 1cm or so around the back, secured with Sticky Strip. Black gingham ribbon was tied around the card front and wrap and stamped sentiments (Hello and Hand crafted) from the Tiny Tags set attached with twine. I stamped the Hi scallop square with Versamark on Yoyo Yellow card, heat embossed with Black EP and punched it with the square scallop before sticking to the front of the Window Sheet.

Hmm - starting to think I may miss this colour now ...

Sara xx

Wednesday, 14 April 2010

An easel card for a new arrival


Hello from Cardiff. My course is very intense again and this has been my first chance to get on the internet since I got here. On Monday night I was lucky enough to meet up with a friend from the In Love With Stamping forum (Hi Dawn *waves*) and had a lovely evening nattering about craft. Last night and tonight it's back to the books as our tutors give us a test every morning - grrr.

On Monday morning I received news that our friend's baby boy had arrived. (Not so little) James was 9lb 4oz and Mum and baby are doing well. Luckily I'd planned ahead and left DH with this card to send from us:


Recipe:
Stamps: All for Friends (Level 2 hostess), Tiny Tags, Curvy Verses (sentiment inside)
Cardstock: Sage Shadow, Ballet Blue, Whisper White
Ink: Ballet Blue, Sage Shadow, Black Stazon, SU Watercolour Wonder Crayons
DSP: Sweet Pea Paper Stack
Punches: Scallop Oval, Large Oval, Medium Jewelry Tag
Other: Buttons (Soft Subtles), Linen Thread


I started with a 5" card blank in Sage Shadow which I folded for an easel card and matted with Ballet Blue and one of the new Sweet Pea papers that I cut to show the birds on the wire, to mirror the baby washing on the line. The romper suit was stamped three times with black stazon and painted with watercolours using my aquapainter. I then "hung" them with twine (just stuck to the back between the dimensionals) threaded through the buttons which were adhered with mini glue dots. I also used the new Tiny Tags and matching punch for the extra sentiment attached to the washing line:


Off now to revise for tomorrow. Hope your evening is more relaxed than mine.

Sara xx

Sunday, 11 April 2010

A man's xmas card for the sketch challenge at Stamp With Us


We had a great beginners class yesterday (thanks for being great company ladies *waves*) though it did go a bit beyond beginners. It was a three hour class rather than my usual 2 hour version and so I'd added in more use of the wheel and even the rock and roll technique - sorry if I pushed too hard but you got beautiful results!

Today's a new challenge day over at Stamp With Us and we have this sketch:


I've been looking for an excuse to break out my new Christmas set from the Mini and figured this was ideal. Serene Snowflakes is a set of 4 stamps but has 6 snowflakes in total, the three dinky ones in the bottom right hand corner are on a single stamp.


I found that the small snowflake (top right hand corner) fits perfectly in the 1-1/4" Circle punch. I chose Not Quite Navy, and Very Vanilla with a hint of Basic Gray to create what I hope is a more manly christmas card. I'm glad that Not Quite Navy will be staying when we swap over in Autumn, it's my go to colour for men's cards.


Recipe
Stamp sets: Serene Snowflakes, Occasional Greetings
Cardstock: Not Quite Navy, Very Vanilla, Basic Gray
Ink: Platinum Shimmer Paint
Punch: 1-1/4" Circle
Other: Silver Brads, Mat Pack, Paper Piercing Tool

The snowflakes and sentiment were stamped with Platinum shimmer paint added direct to the stamp with a sponge dauber. After leaving to dry for a few minutes they were then punched out with the Circle punch. Squares of Very Vanilla were decorated at the edges with paper piercing and then layered onto Basic Gray card to meet the sketch. Silver brads to tone with the Platinum paint were added at all the corners before layering onto the card blank. The snowflakes were popped up on dimensionals.

Please check out the rest of the Design Team samples here - they're all gorgeous but I especially love Natalie's Window Sheet design, it's stunning.

No class for Bessie this morning - she's had a flare up of her allergy again so we're keeping her in. We're not sure whether it's because she fell into the field that's beyond our garden (she was trying to chase off a cat that was on her territory) or whether it's because we've just cut the grass, we'll have to monitor and see. This is the first time in about six months that we've had a bad flare up. We thought that was down to the de-sensitising injections she's having but it could just have been the time of year.

I'm off to Cardiff again this afternoon for another training course but it won't be a craft free week. I'm meeting a friend from the In Love With Stamping forum tomorrow and I'm taking some stamped images with me to colour. I've also made a few more cards to blog about while I'm away so please pop back soon.

Sara xx

Saturday, 10 April 2010

Coming this Autumn - an updated wardrobe of colours

We've had some very exciting news this week from our Head Office. Fashions change, just as much in cardmaking as clothes and we're updating our wardrobe!

When the new catalogue launches in October we're going to have a change to some of our core colours - what are currently called the colour families. We'll be changing from the 4 groups of 12 that we have now to 4 colour collections of 10; Subtles, Brights, Regals and Neutrals. Don't worry, we're not losing all the Earth Elements (though we will lose some) they just move from one family to a different collection eg. Old Olive moves from Earth Elements to Brights. This goes for some of the other families too. In total we'll be getting 15 new colours:

Daffodil Delight, Eraly Espresso, Marina Mist, Cajun Craze, Cherry Cobbler, Melon Mambo, Pacific Point, Tangerine Tango, River Rock, Soft Suede, Riding Hood Red, Rich Razzleberry, Wild Wasabi, Pink Pirouette and Baja Breeeze (and Kraft gets a name change to Crumb Cake - go figure, lol).

This colour chart shows the full range of the colour collections (old and new) that we'll be getting:


Now some of us have complained in the past (me included) about not getting the In Colours that the US get (that's an extra, small set of colours that just last for around six months). Well the eagle eyed among you will have noticed that some of the recent, popular In Colours have made it into the new core collections eg. Rich Razzleberry and Baja Breeze. And I keep talking about "core" colours, why is that? Because we'll also be getting In Colours too! Yay! Each year we will get 5 new In Colours and they will stay for two years so the new In Colours we get in October won't retire until the new set in 2012-2013 come in. This year we'll have 5 In Colours (I don't know what they'll be yet but I'll share as soon as I do know) but then next year another 5 will come in so that we always have 10 In Colours from then on.

So if this isn't happening until October then why am I telling you about it now? Well two reasons really. I want you to know what I know, I don't want you to invest in colours that you're not so keen on just to complete your colour families and then find out at the last minute that they're all changing. That just wouldn't be fair. The other reason is so that you have plenty of time to stock up on those retiring colours that you do love.

I know that I'm going to stock up over the next few months on Taken with Teal and Almost Amethyst (some of my all time favourites). Then when October rolls around I can't wait to get my hands on the luscious Marina Mist and Baja Breeze (love those already).

To help you plan, here are the colours that we'll be saying a fond farewell to when the new catalogue comes out in October:


Well I hope that you're as excited as I am and looking forward to the new colours. If you have any questions then leave me a comment and I'll try to answer them or let you know what we still don't know either.

Have a great weekend.

Sara xx

Friday, 9 April 2010

News of Snooker Legends at the Crucible and here's the April chalks challenge at In Love With Stamping - take 2


Last night I went with my Mum to the Sheffield Crucible (home of the World Snooker Championship) to see "Snooker Legends". John Virgo hosted and playing we had:
  • Alex (Hurricane) Higgins;
  • Jimmy (Whirlwind) White;
  • John (The Entertainer) Parrot; and
  • Cliff (The Grinder) Thorburn
As someone who grew up watching Pot Black (showing my age) every Friday night with my Gran and Grandad it brought back a lot of happy memories and reminded me how much I enjoy watching the game. The snooker was spellbinding. Fast and furious frames between White and Parrot, slower with some tricky snookers between Higgins and Thorburn. It was rather sad to see Higgins looking so poorly. I understand that he's had pneumonia and from the looks of last night and his coughing, I don't think he's over it yet.

Some of the audience got a chance to try trick shots with John Virgo, a la Big Break. Another member of the audience was drawn from a paid raffle to play a game of doubles with the losers of the first match. The raffle winner didn't get much of a chance to play as his partner White cleaned up the table but Jimmy did kindly let him sink the last black.

The show is going on tour soon and if you're a fan of snooker then I can definitely recommend this.

On now to the crafting and here's my second card for the Chalks challenge over at In Love With Stamping:


Recipe
Stamp sets: Vintage Vogue, Oval All, Very Vintage
Cardstock: Perfect Plum, Pale Plum, Very Vanilla
Ink: Perfect Plum, Pale Plum, Versamark, Stampin' Pastels chalks
Punches: Eyelet Border, Scallop Oval, Large Oval
Other: Pretties Kit

The card base is Perfect Plum cut to a standard A6 landscape card. Using the Very Vintage wheel and Perfect Plum ink, the background was rolled top and bottom of the card. A strip of Pale Plum was punched along both long edges with the Scallop Edge punch. This was stamped randomly with the vine from the Vintage Vogue set in Pale Plum ink and the edges were chalked by rubbing Pale Plum chalk on a sponge dauber in a circular motion.

The large flowers and leaves from the Vintage Vogue set were stamped with Versamark on Very Vanilla card and then chalks pounced (tapped) on with sponge daubers (flowers in Pale Plum and Perfect Plum, leaves in Garden Green). The chalk "sticks" to the Versamark - be careful not to rub or you may smudge the image. Excess chalk was blown off and then the image brushed very lightly with a dry paintbrush. Flowers and leaves were cut out, shaped and stuck flat to the card except for the centre flower which was raised on two dimensionals stuck together for extra height. Medium cream halfback pearls were added to the centre of the flowers with glue dots.

For the sentiment the Best Wishes was stamped in Perfect Plum ink on Very Vanilla card and then punched with the Large Oval punch. The edges were chalked with Pale Plum. This was stuck flat to a punched Scallop Oval from Perfect Plum card and raised on dimensionals on the Pale Plum decorated strip. A small cream halfback pearl was added using a glue dot to finish.

All chalked images can be sprayed with a sealant (hairspray works) before adding to the card if needed.

Back again soon.

Sara xx

Wednesday, 7 April 2010

April colour challenge at ILWS - take 2 plus a couple of dinky baskets


Another card for the colour challenge at In Love With Stamping today and I also realised that I didn't show you the Easter baskets that my MIL and I made on Good Friday when MIL and FIL came to visit. The baskets first:

This one's my MIL's.


I've demonstrated and taught this little basket to so many people in the last month or so that I didn't realise I hadn't shown my MIL, lol and she loves to make bags and boxes, much more so than cards. She loved how easy this design is - more time for creating the flowers.

And here's my version with a little sponging around the edges of the flowers and leaves.


And next on to the colour challenge card. The colour challenge is to use Pixie Pink, Pink Passion and Pretty in Pink (with Whisper White or Very Vanilla if you like). I used one of the new sets out of the Mini:

Not just for Valentines, this set is great for punching out. The Full Heart, Small Heart and Heart to Heart punches all work with this set. Or you can just cut them out if you prefer. Here I did a bit of both.


Recipe
Stamp set: I {Heart} Hearts
Cardstock: Pink Passion (textured), Pixie Pink (textured), Whisper White
Ink: Pixie Pink, Pink Passion
Punches: Full Heart, Corner Rounder
Other: Rhinestone Brad

A Pink Passion (textured) 4" x 4" square card was used as the base and all corners rounded with the punch. The Friend heart was inked with Pixie Pink and then the edges with Pink Passion before stamping onto Whisper White card. This was then punched out with the Full Heart punch. The lacy heart was stamped three times with Pixie Pink ink on Whisper White card. These hearts were then cut by hand as they don't quite fit the Full Heart punch (I still used it though to make the cutting out easier. A medium clear Rhinestone Brad was pushed through the centre of a 3-3/4" square Pixie Pink (textured) corner rounded layer before adhering it to the Pink Passion blank (so that the split pins don't show through. The hearts were then popped up on dimensionals around the brad.

Please just drop me a line if you need the recipes for the baskets.

Sara xx

Monday, 5 April 2010

A card for the Mojo Monday challenge


A quick second post today as I'm entering the Mojo Monday challenge. This is this week's sketch:


And my card:


Recipe
Stamp set: I {Heart} Hearts, Happy Moments (sentiment)
Cardstock: Basic Black, Whisper White
DSP: Night & Day Specialty
Ink: Real Red
Wide Grosgrain Ribbon: Real Red
Other: Silver Brads, Platinum Shimmer Paint
Non-SU: Die-cuts

I used Platinum shimmer paint to edge the scallop oval layer for a neutral contrast against the black and white. The sentiments were placed against the heart using a stamp-a-ma-jig for placement.

Thanks for stopping by.

Sara xx

April colour challenge at In Love With Stamping and a thank you to everyone who came to my Open Day


Hope that you're all enjoying the Easter holidays. I'm looking forward to a lazy day today but as I didn't have time to post yesterday, today's is a bumper catch up.

Saturday was fab! Thank you to all the ladies that came along. We had a great mix of people fairly new to crafting and more experienced crafters but everyone managed their make and take bookmark without too many difficulties. I demonstrated a couple of chalking techniques in two different colourways, so that those who'd dropped in later didn't miss out. I also showed how the punches are great to make a quick card and how easy it is to make a matching set (great for a gift) by switching the colours. We also had a look at the different effects you can get with the shimmer paints. There was a whole lot more discussed and tips shared around the group (I just love it when crafters get together). Everyone got a free gift and free postage with their orders ... and we had cake too! Here's some of what we made on the day:


And Laetitia made me this lovely card:


And Jill brought me these gorgeous daffodils (that Bess then tried to eat, lucky she only got one):


Thank you all for such a fun day.

That was followed by the Cup Challenge over at In Love With Stamping. Wow was that fun and frantic. I thought I'd have an easy night of it as I was on the organising committee and charged with setting one of the challenges, commenting on cards and cheering everyone along. Well ... after the first half hour, I couldn't keep up. Everyone was posting great cards and such a lot of them, I just couldn't type fast enough, lol.

Yesterday was Bess's socialisation class and she was just in a mood (perhaps the excitement of the Saturday had just been too much for her). Strangely many of the other dogs in the class also seemed in a bit of a mood, there was far more barking than usual and a few more scuffles too. We decided they were miffed that they hadn't got Easter Eggs!

On now to another card. This one was for the colour challenge at In Love With Stamping. This month we are to use the colour combo of Pixie Pink, Pink Passion and Pretty in Pink (though it is OK to add Whisper White or Very Vanilla). This is my take on a card in the new Mini catalogue (page 6).


Recipe
Stamp Set: I {Heart} Hearts
Cardstock: Pixie Pink, Pink Passion, Pretty in Pink, Whisper White
Ink: Pink Passion
Punches: Scallop Edge, Small Heart
Gingham Ribbon: Light Pink

I started with a Pixie Pink 4" x 4" square card as my base. A square of Pink Passion card was punched along one edge with the Scallop Edge punch. I snipped out one of the scallops to make a straight edge for the ribbon to wrap against. After tying a small bow in the gingham ribbon I wrapped it around and secured on the back with Sticky Strip. A small square of Pretty in Pink card was added above the ribbon. Using the dinky heart from the I {Heart} Hearts set I stamped with Pink Passion ink on Whisper White card and punched with the new Small Heart punch. I punched another 8 hearts from Pink Passion card and popped them all up on dimensionals that had been cut in half. The whole topper was then raised on dimensionals centred on the card base.

Don't forget, you have until 10pm tonight if you want to take advantage of my special offer of free postage on orders over £45, just email me with your order.

Enjoy the rest of your bank holiday.

Sara xx