Wednesday, 30 December 2009

A hand picked bunch of In My Garden thank you cards


I got a nice little bunch of thank you cards going on my production line yesterday using the In My Garden, level 1 hostess set. One of my new years resolution is to make a lot more duplicate cards. That way I'll have more ready for the craft fairs that JJ and I go along to and more sets to give as gifts to my hostesses.

I've already got this resolution underway by colouring 4 of each of these flowers. There's a full set here for you to see and I'll finish assembling the other 9 today.


Recipe (for all)
Stamp sets: In My Garden, Circle Circus, Fresh Cuts
Cardstock: Basic Black, Bold Brights (to fit flower), Whisper White
Ink: Stazon Black, Bold Brights (to match cardstock), Markers (to colour flowers)
Gingham Ribbon: Black
Punches: 1-3/4" Circle, 1-3/8" Circle, 1-1/4" Circle, Word Window, Corner Rounder


Recipe (Snowdrop version)
Cardstock: Green Galore
Ink: Green Galore
Markers: Glorious Green, Green Galore, Gable Green


Recipe (Poppy version)
Cardstock: Orchid Opulence
Ink: Orchid Opulence
Markers: Glorious Green, Green Galore, Orchid Opulence, Lovely Lilac


Recipe (Rose version)
Cardstock: Pink Passion
Ink: Pink Passion
Markers: Glorious Green, Green Galore, Pink Passion, Pixie Pink

I also resolve to start making my christmas cards much earlier this year. It was last minute crafting for christmas this year because I'd sold all my cards at the craft fair - don't want to get caught out like that again.

Are you making any New Years resolutions?

Sara xx

Monday, 28 December 2009

A wedding anniversary in white satin and embossed gold


Phew, so glad the christmas rush is over. I hope that you all had a happy and peaceful time. Everyone here's well fed and family members have been and gone so I can look forward to a quiet day of crafting tomorrow, before it all starts all over again and I prepare the house for my New Year's Eve guest, lol. The pain in my jaw has virtually disappeared now and I've started eating (very gingerly) on that side of my mouth again. Thanks to everyone for their good wishes and comments.

I haven't had time for any crafting so far this holiday, so today I thought I'd share with you the card I made for my parents' wedding anniversary which was on the 18 December. I also submitted this card as part of my entry to the DT call over at In Love With Stamping. The successful entrants are to be announced at the Crafter's Cup Challenge taking place on 2 January - fingers and toes crossed :-)


Recipe
Stamp sets: Mr & Mrs, Cheers to You, Oval All
Cardstock: Blush Blossom, Creamy Caramel, Whisper White
DSP: Bride
Ink: Versamark, Blush Blossom
Ribbon: White Satin
Punches: Eyelet Border, Large Oval, Scallop Oval, 1-3/4" Circle
Other: Gold EP, Crystal Effects, Dazzling Diamonds

All the stamping was done with Versamark and heat embossed with gold EP. I then filled in the glasses with Crystal Effects and dipped a cocktail stick into Blush Blossom ink and Dazzling Diamonds and transferred it to the Crystal, to create the "fizz" in the glasses.

I love all the SU ribbons but this satin one is especially gorgeous and adds a real luxury feel to the card.

Thanks for stopping by.

Sara xx

Saturday, 26 December 2009

Gift box wrapping using a window sheet


I hope you had a great day yesterday and that Santa brought you everything you hoped for. If you're itching to spend your Christmas money on crafting goodies then check out the Sale-a-bration offer of free stamp sets here.

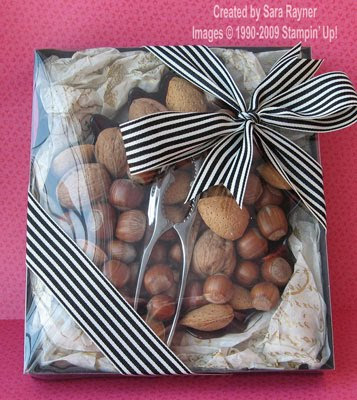
The challenge over at Secret Crafter Saturday Challenge for the Christmas fortnight is last minute gifts. Well this ended up being last minute gift packaging, although it wasn't meant to be. As I mentioned a few weeks ago, we bought this glass dish as a gift but there was no box for it and so I planned on making my own. As I've been unwell I only actually got round to making it on Wednesday to deliver that same day. My aunt will have opened it by now so it's safe to show you. As the dish was a leaf shape we decided to fill it with nuts and a nut cracker.


Recipe
Cardstock: Basic Black
Striped Grosgrain Ribbon: Basic Black
Other: Medium Window Sheet

I had to make a basic box rather than a double folded edge box because the dish was pretty large and would have needed more than 12" x 12" card otherwise. I measured the width and length of the dish and added the depth of it (3cm) to every side of the rectangle. For the box base I scored at the depth measurement (3cm inwards from every edge) and at each corner, snipped from the outside edge to the scoreline, folded and stuck to create the basic box shape. For the clear lid I scored an extra 1mm out (2.9cm from every edge) to allow it to fit easily over the base. The scoring blade on the paper trimmer does a good job of scoring this heavy duty acetate (and this is only the medium window sheet I've used, the thick window sheet is ... well, even thicker, lol). I padded the box with some crumpled tissue as the dish isn't rectangle shaped and finished with the lush striped ribbon.

It may be a bit late for Christmas now but this gift packaging works year round.

Enjoy the rest of the holiday.

Sara xx

Thursday, 24 December 2009

Mini cracker twist box tutorial


This mini choc box is just big enough to hold a couple of Ferraro Rocher chocolates.

I've made tutorial box in a pale colour with score lines drawn in a dark colour so that you can see them clearly. Don't mark the end piece score lines on your own box or they will show when the box is finished (as you can see in the photo below).

Recipe
Cardstock of choice
Scoring tool
1/2" Circle Punch
Stamp set/embellishments of choice

The cardstock is cut to 14cm x 15cm. Along the long edge, score at 3.5cm, 7cm, 10.5cm and 14cm. Along the short edge, score at 3.5cm and 10.5cm. I have cut the end piece flaps away so that there is less bulk when folding the ends but you can leave these in place if you wish. Score the ends as shown and use the 1/2" Circle punch to create the holes as shown. Fold along all score lines. It's easier to add any flat decoration to the outside of the box at this stage.

On the outside of the flap (the reverse side as shown in the photo) apply Sticky Strip, form into a square tube and fasten.


Push the centre of each square edge into the centre to form a cross shape as shown here.


This is the difficult bit to describe. Twist the cross, pushing each point to the next corner along (either clockwise or anti-clockwise).


As you do so, unfold from the centre.


Repeat at the other end to form your box.


Enjoy.

Sara xx

Wednesday, 23 December 2009

A scrapped Christmas card and a gappy new year


Sorry if you've dropped by today hoping for the box tutorial. I'm still not quite well enough to manage that but hope to get it up on here tomorrow.

If you're squeamish then please skip past the next paragraph to the crafting part.

I went back to the doctors yesterday because I was still in so much pain and he referred me to my dentist if I could get in or to the dental hospital. Luckily my dentist could see me, I guess they'd probably had cancellations due to the weather. He found an abscess, caused by infection from my crown post having worked it's way through the edge of my tooth. I had the option of having the tooth out straight away or waiting until after Christmas but if I waited then there was nothing else he could do for the pain ... so I had the tooth out. And it came out in pieces. I think the poor dentist wished he hadn't offered to do it, he was supposed to have gone home already, poor thing. He ended up leaving a small section of root in but he believes he got the infected part out. Time will tell I guess. I'm still in some pain today but it's no worse than it has been and I'm hoping that it will go over the next few days as my body polishes the infection off.

While you're waiting for the tutorial I thought I'd share the family christmas card that I made for our parents and for my brother. Here's the smile with all the teeth still in, lol. My new year smile will have a gap.


Recipe
Stamp set: Scandinavian Season
Cardstock: Real Red, Basic Black, Whisper White
Ink: Versamark, Basic Black
DSP: I Wish Scrappin Kit (retired)
Other: Black EP, Silver EP, Rhinestone Brad, Fine Galaxy Glitter (black)
Non-SU: Silver mirri card

I created a joy fold card and tucked the smaller one behind the christmas tree. Here it is opened out.


The sentiment on the inside is from Season of Joy and I used a corner rounder punch on the insert.

Thanks for stopping by.

A Very Merry Christmas and a Happy New Year.

Sara xx

Monday, 21 December 2009

Blog candy winner ...

I went back to work today and because of the snow, my half hour journey home took nearly 2 and half hours. At least I've got my laptop back so I can work from home now if I need to and I got to have lunch with my friends

:-)

All that's my excuse for taking my time announcing the winner of my blog candy.

So, drum roll please ...

... the winner is:

Becki

Congratulations! Please email me your address and I'll put your winnings in the post to you.

A big thanks to everyone else who entered.

Sara xx

Sunday, 20 December 2009

Blog candy to celebrate my first blogoversary

This post will remain at the top until the blog candy is drawn. Please scroll down to see new posts.

Wow! 1 December already. Today's my blogoversary. It's a year since I became a Stampin' Up! demo and started this blog and so it seems only fair to celebrate this grand occasion with some candy.

Here's what's up for grabs:


It includes:
  • Washington Apple Designer Series Papers
  • Botanical Blooms stamp set
  • Polka Dot Punches stamp set
  • Tag punch
  • Fire Circle Rhinestone Brads
All are brand new and unopened, good for gifting if you have them already.

To be in with a chance of winning this candy you need to:
  • Leave me a comment letting me know which is your favourite Stampin' Up product (eg. which stamp set, DSP etc); and
  • Put a link on your own blog to tell people about my candy; and
  • Become a follower (if you aren't already)
As this is a heavy little package of goodies I can only deliver within the UK.

I'll draw the winner after 9pm on Sunday 20 December.

Best of luck

Sara xx

A christmas place setting for the SWU challenge


Thanks to everyone for their get well wishes and suggestions. I'm using a blend of oils in my burner and I'm going to steam my head again today :-) I had to resort to strong painkillers on Friday, it was either that or put my head in a vice to relieve the pain - anyone who's had a sinus infection will be able to relate, I'm sure. The painkillers are now being phased out again though, I'm able to wait a little longer between them now, so I guess the antibiotics are having an effect.

I still haven't got a great deal of crafting done, mainly gift tags for the presents. How come every year I forget just how long it takes to wrap presents? Of course this year I also had Bess helping - sticking her nose against the cellotape, walking across the wrapping paper, trying to lick the gifts (and I can just hear you out there saying "yes you do that too" to your moggy/doggy, lol).

The other bit of crafting I did get done was for today's new challenge over at Stamp With Us, it's on the theme of

Christmas

and I made the table settings for Christmas Day to match my existing burgundy and gold tableware.


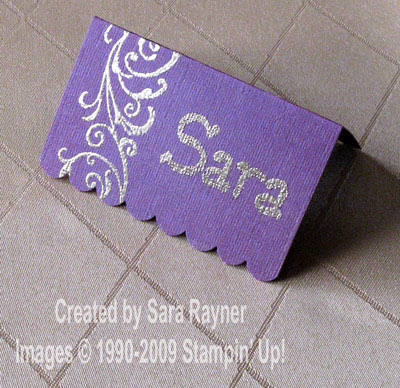
Recipe (Place Card)
Stamp set: Baroque Border
Cardstock: Bravo Burgundy textured
Ink: Versamark
Punch: Scallop Edge
Other Gold EP

I loaded a blank wheel cartridge with Versamark ink which I rolled along one edge of the place card and heat embossed with gold embossing powder. The name setting is written freehand with my Versamark pen and heat embossed again with gold powder. If you're not confident of your handwriting then you can always print the cards on a computer and trace over the printing with the Versamarker, once heated the gold embossing with hide the original printing.


Recipe (Napkin Ring)
Stamp set: Baroque Border
Cardstock: Bravo Burgundy textured
Ink: Versamark
Punch: Scallop Edge
Other Gold EP

The centre design was again made with the Baroque Border wheel but I added a gold line either side by drawing my Versamarker against the wheel guide at the edge of the card.


Recipe (Mini choc box)
Stamp set: Baroque Border
Cardstock: Bravo Burgundy textured
Ink: Versamark
Punch: 1/2" Circle
Other Gold EP

This little box holds a couple of Ferrero Rocher chocs (well, I've got to spoil the family haven't I). It's a twist/squish box that I found over at Splitcoaststampers that I've scaled down to fit my chocolates. I'll post the dimensions and a tutorial in a few days, just as soon as I'm feeling a little better.

I hope that you'll play along with our challenge - I'm sure that you can find one more Christmas item that you need to make; a last minute card, a tree decoration or a tag. And please hop along and see the beautiful creations made by the rest of the Design Team, including our new Team members, they're truly gorgeous (the projects and the team members).

Enjoy the rest of your weekend.

Sara xx

Oh and don't forget my blog candy draw closes at 9pm tonight!

Thursday, 17 December 2009

The most fantastic time of the year


Yes we've almost reached the most fantastic time of the year - no, not Christmas but Sale-A-Bration. Am I sad? Well perhaps, but I'm also a canny crafter and this is a brilliant offer, running a little bit earlier this year, from 30 December 2009 - 28 February 2010.

Here's what you can get during Sale-A-Bration:
  • Customers - get an exclusive, free Sale-A-Bration set for every £45 purchase. With no limit on how many you can get, this is the best possible time to treat yourself to that new stamp set you've had your eye on, or simply stock up on the essentials; cardstock, glues, inks etc. See my own special offers linked with Sale-A-Bration here. Email me to order
  • Hostesses - get an exclusive, free Sale-A-Bration set with a £300 or more workshop. This is in addition to the regular hostess benefits and in addition to any Sale-A-Bration set you may earn as a Customer. Email me to book a date.
  • New Demo Recruits - get any retail stamp set (a Value up to £38.95) from the current catalogue when they sign up during the promotion. Find out more about becoming a demo here.
Here's what the Sale-A-Bration sets look like:

Happy Moments - a great little set for occasions. A set of 7, including 3 sentiments.


Whimsical Words - a set of 6 sentiments that will come in handy week after week


Vintage Labels - a set of 6 stamps, with 3 frames and 3 sentiments (the ornate circle matches the 1" Circle and the Scallop Circle punches)

Good Neighbours - a fun set of 10 stamps for building your own scenes.
Aren't these fantastic sets and especially for free.

Email me to place your order now.


Sara xx

The dreaded lurgy and a heating breakdown but a couple of bright spots to balance it out

It's a bit of bleak week so far but I'm hopeful that things are picking up.

On Tuesday night I started with the dreaded lurgy. Trouble is, it's on top of sinusitis and so I'm in a lot of pain with it and had to miss our Christmas meal at work yesterday. I also feel too poorly to craft, which is never a good sign but I'm just back from the doctors and have some antibiotics to take care of that.

Then last night our central heating broke down. Thank goodness we have a Homecare agreement - I reported it first thing this morning and the engineer is working on that one right now.

On the plus side the lovely (and very funny) Suzie Q nominated me for this award:

Thanks Suzie pet, so sweet of you to think of me (or was it thought association). Her facts were hilarious, don't think I'll be able to top those.

There are a few rules that have to be followed with this award and here they are.

1. Copy this award to your blog
2. Link to the person who gave you this award
3. Identify 7 interesting facts about yourself
4. Choose 7 other bloggers to pass this award on to
5. Link to their blogs
6. Leave them a comment to let them know about this award

So, 7 interesting facts ...

1) I'm a PADI Advanced Scuba diver and did my training in the Red Sea (much clearer and warmer than Stoney Cove though I've dived there too). I've been on wreck dives and also done night dives with scorpion fish following my torch. It has been a few years now though since my last dive (I have problems clearing my ears these days).

2) I've eaten Alpaca and frogs legs (separately, not at the same sitting). But I won't eat anything that tastes mouldy or slimey, so that's mushrooms, shellfish and blue cheese out the window.

3) I share my birthday with Elizabeth Hurley but she's a year older than me. You can tell can't you?

4) I married my current husband (keep him on his toes) on the island of Hawaii, at sunset. I'm planning to go back for our tenth wedding anniversary in a few years time - with or without him. (Bless him, he's a sweetie really - let's me buy lots of crafting goodies).

5) I've been down a salt mine. When we visited friends in Poland we went down the mine at Wieliczka and saw all the little statues and carvings that the miners made to entertain themselves on their rest breaks.

6) I've swum with dolphins. We swam with dolphins at the Dolphin Research Centre in the Florida Keys. A great place that rescues injured or retired dolphins (retired as in used to work in dolphin shows).

7) I've robbed a bank ... OK maybe I haven't done that, but perhaps I need to, to fund the next lot of interesting facts and my crafting habit.

I'm passing this award on to:


There you go ladies. Can't wait to read all your interesting facts.

The other bright spot on the horizon is that we have Sale-a-bration on the way. Free stamps! There'll be a chance to get hold of exclusive free stamp sets from 30 December 2009 through to 28 Feb 2010. I'll be back later with full details and a few special bundles to help you get the most out of this offer.

Sara xx

Tuesday, 15 December 2009

A suspension card in four different colour-ways


I like to make something a little special for my closest friends at work but I'm fast running out of time, so to make it a little easier I went for the same design but made it in different colour combinations. It goes a bit quicker when you're putting the same elements onto each card. The suspension apertures are made by laying the thread (nylon beading thread in this case) across the apertures and then sandwiching it between layers of cardstock and/or DSP.

The basic recipe is as follows:

Basic Recipe
Stamp set: Scandinavian
Cardstock: Pale base, darker feature (as detailed below), Whisper White/Very Vanilla
DSP: To match cardstock (as detailed below)
Ink: Versamark, to match darker cardstock (for inside)
Punches: Eyelet Border, 1-3/8" Circle, 1" Circle
Other: White EP, Dazzling Diamonds, Rhinestone Brads

For the card front the tree and snowflake are stamped in Versamark and heat embossed with white embossing powder. The framed tree is mounted on dimensionals.


Blue variation
Cardstock: Bashful Blue, Not Quite Navy
DSP: Ski Slope (retired)


Purple variation
Cardstock: Lovely Lilac, Almost Amethyst
DSP: Tea Party


Pink variation
Cardstock: Pretty in Pink, Rose Red
DSP: Tea Party

Chocolate variation
Cardstock: Close to Cocoa, Chocolate Chip
DSP: Bella Bleu

On the inside the snowflake is stamped onto White/Vanilla card with ink to match the darker cardstock.


Which one's your favourite colour combo?

Thanks for stopping by.

Sara xx

Sunday, 13 December 2009

Cringle Mingle card candy and a nite light holder


Yesterday was my Cringle Mingle for my downlines and hostesses and as I'd been in Plymouth all week I was still rushing around at the last minute trying to finish things up as they were walking in the door. I therefore didn't get any pix of what I'd prepared for them (sorry about that). Each guest got a sheet of card candy, a little box of chocolates and a package of snowman soup. Luckily I'd made extra card candy for hostess gifts in the new year so I can at least show you that, lol. I got the idea for this from some of the demos that went to convention and did a card candy swap.


Recipe
Stamp sets: Darling Dots (hostess level 1), Fun and Fast Notes (for sentiments)
Cardstock: Close to Cocoa, Creamy Caramel, Ruby Red, Whisper White
Ink: Chocolate Chip, Close to Cocoa, Creamy Caramel, Ruby Red, Old Olive
Punches: Eyelet Border, Scallop Circle, 1-3/8" Circle, 1-1/4" Circle, Word Window, Large Star, Tag, Small Tag
Other: Gold Elastic Cord, Buttons, Gold Brads, Fine Galaxy Glitter

We had an open crafting session with everyone doing their own thing but one project that we did all have a go at together, was to make a nite light holder, following this tutorial over at ILWS. Here's mine.


Recipe
Stamp sets: Season of Joy, Scandinavian Season
Cardstock: Old Olive, Vellum
DSP: Holiday Treasures (retired)
Ink: Old Olive, Versamark
Punch: Eyelet Border
Other: White EP, Battery Tea Light

The battery operated tea light ensures that I won't burn the house down.


Now back to christmas card duty ...

Sara xx

Wednesday, 9 December 2009

Glittery baubles in the window


The different size Tag punches are ideal for making a frame within a frame and so I combined them with the Medium Window sheet to make a window card. Don't forget that you can still get either of the Tag punches (or even both) when you order from the Christmas Gift-giving Guide here. Just drop me an email to place an order.


Recipe
Stamp sets: Tree Trimmings, Best Yet (retired)
Cardstock: Lovely Lilac, Almost Amethyst
DSP: Tea Party
Ink: Versamark, White Craft
Punches: Tag, Small Tag, Eyelet Border, Large Oval, Scallop Oval
Other: Medium Window Sheet, Heat & Stick Powder, White EP, Dazzling Diamonds

I punched the larger Tag windows first of all, spacing them evenly. Then with a strip of the Almost Amethyst lightly tacked in place behind I punched with the Small Tag to create the frames. Medium Window Sheet was sandwiched between the two cardstock layers (stuck permanently this time) and I used my Stamp-a-ma-jig to position the Tree Trimming baubles in each window. This view shows the windows a little more clearly.


In Love With Stamping have another Prize Patrol for those playing along with their Explosion Card tutorial and uploading their entry. Details of the tutorial and how to enter are here and the deadline is midnight on Friday 11 December. Unfortunately I can't play along this time as I'm in Plymouth and only have a very few crafting materials with me but good luck with your entries.

Sara xx

Monday, 7 December 2009

A successful shopping trip and another challenge fulfilled


Yesterday's shopping trip went quite well. I found a lovely glass dish for one of my relatives (I doubt that she visits my blog but I'll still not say which one just to be on the safe side). It's in the shape of a leaf and so DH suggested filling it with a selection of nuts and a nutcracker. I thought he did great with that brainwave. The dish wasn't packaged in any way and so I'll need to make a box to give it in. Oh what a chore, lol.

When I got back home I managed to sneak in a little bit of crafting and I've played along with the Secret Crafter Saturday Challenge which was on the theme of a matching set (which you may have noticed by now, I love to do anyway). Here's what I came up with:


A pyramid card and a matching french fries box.


Recipe
Stamp sets: Season of Joy, Polka Dot
Cardstock: Not Quite Navy, Sage Shadow, Whisper White
Ink: Versamark, Sage Shadow
Other: Clear EP, White EP, Filigree Brad, Circle Ice Rhinestone Brad

I used the Polka Dot background stamp with Versamark to stamp two sides of the pyramid and heat embossed with White EP. You can't tell from the photos but the trees are glossy. To get this effect I first added Versamark to the stamp, followed immediately by Sage Shadow ink, before stamping out both layers of ink together onto Whisper White card and heat embossing with Clear EP. A Filigree Brad with a Rhinestone Brad centre, top off the tree.


Recipe
Stamp sets: Season of Joy, Polka Dot, Spotlight on Christmas
Cardstock: Not Quite Navy, Sage Shadow, Whisper White
Ink: Versamark, Sage Shadow, Not Quite Navy, White Stazon
Punch: Word Window
Narrow Grosgrain Ribbon: Very Vanilla
Other: Clear EP, White EP, Small Flat Cellophane Bag
Non-SU: French Fries die cut

The french fries box was made in a similar way to the card with the addition of the Christmas sentiment, selectively inked from the Spotlight on Christmas oval stamp. This was punched out with the Word Window and trimmed to make a mini banner. I stamped a Small Cellophane bag with the snowflake from the Season of Joy set, in White Stazon, before filling with choccies and tying with ribbon.

Thanks for stopping by.

Sara xx

Sunday, 6 December 2009

Welcome to my new DT team mates and a new SWU challenge


Yesterday was my first christmas meal out. We went to a lovely local hotel that also has a spa and the meal was followed by a massage - very mellowing. I also received my first christmas present and I've only just started my christmas shopping, eek, better get a move on! It's another busy week this week, I'll be in Plymouth from Monday to Friday for work, followed by the Cringle Mingle for my downlines and hostesses on Saturday, so I'm squeezing in shopping today. Hmm that might be a tall order.

Enough of the wittering I can hear you say and onto the crafting. Ok then, we have a new challenge today over at Stamp With Us and I have some new team mates on the Design Team, so a very big welcome to Nicci, Rosie Stephanie and Dawn. Gonna love working with you guys, your entries were fantastic and I loved browsing your blogs.

For this fortnight's challenge at SWU we have this sketch:


Well I finally broke the seal on my Bella Bleu papers, instead of just stroking them through the plastic wrap lol and I'm so glad I have. They're gorgeous and I'm going to want to order more of them anyway so I may as well start using this pack up. I loved making this card and plan to do another version of this today, when I get back from the shopping, using Not Quite Navy and the paper you can see in the background - should work well I think.


Recipe
Stamp set: Silent Night
Cardstock: Close to Cocoa, Chocolate Chip, Very Vanilla
DSP: Bella Bleu
Ink: Craft White
Narrow Grosgrain Ribbon: Very Vanilla
Punches: Boho Blossoms, 1-1/4" Circle
Other: Earth Elements Button, Dazzling Diamonds, Gold Elastic Cord, Gold Brads
Non-SU: Nestabilities

I stamped the image with Craft White ink and then used an aquapainter with the same ink to colour the church roof and foreground. I'm not quite used to this ink yet even though I used to use pigment inks all the time before I found SU. I added my Dazzling Diamonds before the ink had dried and so it stuck wherever there was ink. It's a lovely effect but I would have been better to use Heat and Stick powder in between to "fix" the glitter and stop it shedding. Another method would be to heat the craft ink gently to fix it and then use my 2-way glue pen to add glitter just at the spots I wanted it. At least I've learned for the next version.

Don't forget that you have a fortnight to enter this challenge so even with all your christmas festivities and jobs to do, I hope that you'll be able to find time to join us.

Enjoy the rest of your weekend. Off to the shops now for me.

Sara xx

Friday, 4 December 2009

A silver and not quite navy bauble card


Dreamboats and petticoats was a great night out on Wednesday. If you like the music of Roy Orbison and that era (ie. fairly early Roy) then you'll probably enjoy this show. The guy that played Bobby, the male lead, was quite a slight guy but what a voice!

We took Bess to the vets last night for the first shot of her vaccine. This is to desensitise her for her allergies to fleas, cats, dust mites and grass. She'll need a shot every two weeks to start, then extending to three and then four. The vet showed us how to inject her, so that in future we may be able to give her the vaccine at home. We'll go back for the next shot just so the vet can see that we do it right. Her allergy hasn't flared up for a good 6 weeks now (as the grass pollen isn't a problem at this time of year) but hopefully the vaccine will keep her rash free for quite some time even when the weather turns better in the Spring. Fingers crossed.

Anyhow, onto today's card:

Recipe
Stamp sets: Tree Trimmings, Season of Joy
Cardstock: Not Quite Navy, Whisper White
DSP: Ski Slope (retired)
Ink: Not Quite Navy, Versamark
Punches: Corner Rounder, Large Oval
Other: Stampin' Pastels, Silver EP, Earth Elements Brad, Silver Elastic Cord
Non-SU: Nestabilities

I cut the large oval aperture using my Nesties and punched the sentiment aperture with my large oval punch. The background card was sponged with Not Quite Navy and Night of Navy chalk. This bauble is popped up on a dimensional but you could leave it free swinging.

Have a great weekend everyone and don't forget to enter for my blog candy.

Sara xx