Tuesday, 13 July 2010

Handbags and pearls for a girlie birthday card


Todays card is made using a new stamp set that I've bought specially for the Summer Stamptacular on 24 July. We still have a few places left if you'd like to book (click here and use the Buy Now button(s) or email me for alternate payment options) but we'll need to close the guaranteed bookings no later than next Sunday, 18th July to ensure that we can get all materials delivered and prepared in time. (After the 18th you'll be counting on cancellations to get a spot).

I decided to have a play with the set to test it out, lol. I remembered seeing some little handbags like these over at ILWS and have to thank Maggie and Joanne for their inspiration.


Recipe
Stamp sets: Totally Tabs, Vintage Labels (sentiment)
Cardstock: Bashful Blue, Not Quite Navy
Ink: Not Quite Navy, Versamark
DSP: Bashful Blue Patterns, Bride
Punches: Round Tab, 1-3/4" Circle, 1" Circle, 3/4" Circle, Word Window, Full Heart, Scallop Edge
Other: Small Halfback Pearls (Pretties Kit), White EP

The card blank is Bashful Blue and the handbags were made by stamping with Not Quite Navy ink (centre bag is Verasmark and heat embossed with White EP) onto Bashful Blue Patterns DSP, then punching out with the Round Tab. This was folded in half and a handle added by punching Not Quite Navy card first with the 3/4" Circle then centring and punching with the 1" Circle. A different "flap" was added to each bag using the Word Window, Full Heart (pointed base) and 1" Circle trimmed to size and finished with small halfback Pearls as "clasps". The aperture was made by punching a Scallop Edge to one long edge of Not Quite Navy, then using the 1-3/4" Circle punch pushed all the way against the Scallop Edge and a fraction in from each side and then in the centre. Bride DSP was added direct to a Scallop Edged mat of Bashful Blue Patterns and then the aperture was popped up on dimensionals. The handbags were placed through the centre of each aperture.

The sentiment was stamped to one side along the bottom and then the offcut from a Not Quite Navy Scallop Edge was trimmed to size and Tombowed in place around the sentiment. Strips of Bride were cut to a similar size and added to the aperture.

A fun card for any handbag loving girlie that can be personalised by choosing their favourite colour.

Thanks for stopping by.

Sara xx

Sunday, 11 July 2010

A colouring class and a thank you card


Well I don't want to bore you (I'm plenty bored with it for both of us) but my broadband has gone again. Something obviously happens on a Saturday night/Sunday morning that sets our broadband profile back to something around dial up speed. If anyone else has had this problem and knows a fix then pleeease let me know and we'll try and explain it to the BT engineers when they next call around (they'll be going on my xmas card list soon, we're seeing that much of them). This is driving DH and me just crazy. I can't manage these days without an internet connection. I really think that BT should be funding all these extra trips to coffee houses that I'm having to make.

Enough of that now though.

Last weekend I attended a craft class. I love delivering classes and sharing tips and techniques with others but it was also great to sit back and soak up the knowledge of someone else for a couple of hours. This was a colouring class using alcohol based markers (Copics and Promarkers) given by the lovely Jo. I turned one of the images I made on the night into a thank you card for her and used the MojoMonday sketch as my layout:

Jo should have received the card by now so I think I'm safe to post it. We used a variety of stamps in the class that were all non-SU but I've still been able to combine with my SU stash to create the rest of the card:


Recipe
Stamp set: Circle of Friendship
Textured Cardstock: Green Galore, Real Red, Orchid Opulence
DSP: Kaleidoscope
Ink: Basic Grey, Orchid Opulence
Punches: 1" Circle, 1-1/4" Circle
Non-SU: White card, Nestabilities, Copics, Sugar Nellie stamp

I coloured the image with Copics and then the rest is matting and layering.

Well I hope your weekend is going better than mine. Enjoy the rest of it.

Sara xx

Friday, 9 July 2010

Back again with an all purpose congratulations card


My broadband is back up and working again ... hopefully for longer than just a few days this time (fingers crossed).

DH and I went to see Alice at the Crucible on Wednesday - a somewhat strange mix, some parts (set design and the back story) were really clever and original and some bits were just ... a little bit odd. Glad we went to see it though - an interesting experience.

Today's card for you is a Congratulations card to have on hand to respond to any special announcement eg. wedding, engagement, baby. I've kept the colour scheme fairly neutral for that reason.


Recipe
Stamp sets: Say it with Scallops
Cardstock: Apricot Appeal, Very Vanilla
Ink: Apricot Appeal, Versamark, Stampin' Pastels (Apricot Appeal)
DSP: Bride
Punch: Scallop Square
Other: Gold EP, Paper Cutter, Bone Folder

Did you think I'd made a typo and that I'd used Bridesmaid DSP for this card? The patterned paper has quite a vanilla look to it, but this was actually achieved by dusting Bride DSP (available in my Summer Share) with Apricot Appeal chalk. The Bride DSP is fab and can made to match any of your existing card or papers simply by adding chalks or ink to it. I punched four Scallop Squares from the chalked DSP and sponged lightly around the edges with Apricot Appeal ink. These squares were adhered direct to a plain square of Very Vanilla card. I created the embossed edge around the Apricot Appeal square card blank, by laying it face down over the groove of the paper cutter and scoring with the bone folder along the groove, stopping short at either end. Then simply rotate 90ยบ and score again, repeating until you complete the square. Finally the Congrats sentiment was stamped with Versamark on Apricot Appeal card, heat embossed with Gold EP, punched out with the Scallop Square and popped up on dimensionals in the centre.

Please email me if you'd like to order your own share of Bride DSP, Pretties Kit and taffeta ribbon.

Have a great weekend.

Sara xx

Tuesday, 6 July 2010

July technique challenge at In Love With Stamping - take 2


Well, I spoke too soon. The broadband connection is once again grinding to a halt and dropping out, despite the fix last week. I'm not able to do much blog-surfing at the moment and I'm back to using coffee-houses for their wifi. I think I must be jinxed. My usual lunchtime haunt is also have problems with their broadband, so I'm having to walk to the next nearest, which is another 10min of my lunchtime gone :-(

Thankfully I can at least check my emails with my iphone. It's only an Edge connection at home but better than nothing.

Enough of my sob stories now and back to the crafting. For my second take at the technique challenge I set over at ILWS I created an origami box to match the card I made here.


Recipe
Stamp set: Circle Circus
Textured Cardstock: Cameo Coral
Plain Cardstock: Whisper White
Ink: Cameo Coral, Summer Sun
DSP: Pink Flamingo
Punches: Scallop Circle, 1-1/4" Circle, 1" Circle
Other: Halfback Pearls (Pretties Kit), Medium Window Sheet

The box was made following the instructions here but using an 8" x 8" piece of DSP to create a box that would just fit 4 chocs in it. For the lid I used a 4" x 4" piece of Medium Window sheet and scored it at 1/2" on all sides. I snipped along one of the short score lines at each corner to create a tab, folded in and adhered with sticky strip. Four 1-1/4" Circles were punched from Textured Cameo Coral card and scored into quarters. Each Circle was snipped from the outside edge to the centre along just one of the score lines. Sticky Strip was added to each quarter, one was folded on top of another to create a pyramid and then one was stuck to each corner of the lid. See here for a more visual explanation. Halfback pearls were added to each decorated corner. Different size circles were stamped in Summer Sun and Cameo Coral onto Whisper White card and punched with appropriate size punches. They were then stacked with dimensionals in between, added to the centre of the lid and topped with a large vanilla halfback pearl adhered with a glue dot.


And here it is with the card:


Please email me if you'd like to order the Pretties Share. As I mentioned, I am getting my emails OK, so there won't be any delay in getting them out to you :-)

Sara xx

Monday, 5 July 2010

July colour combo challenge at In Love With Stamping


This is my second take on the colour challenge I set over at ILWS which was to use Lovely Lilac, Almost Amethyst and Chocolate Chip (with optional Whisper White or Very Vanilla).


Recipe
Stamp sets: En Francais, Tiny Tags
Cardstock: Almost Amethyst, Chocolate Chip, Lovely Lilac, Whisper White
Ink: Lovely Lilac
Punches: Boho Blossoms, Medium Jewelry Tag
Narrow Grosgrain Ribbon: Chocolate Chip
Other: Large Flower, Halfback Pearls (Pretties Kit)

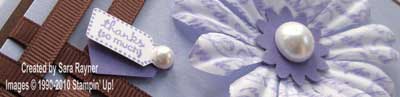
My card blank is a 4-1/2" square in Almost Amethyst. This was matted with Chocolate Chip, popped up on dimensionals. A 4" square of Almost Amethyst was wrapped with two parallel strands of Chocolate Chip grosgrain ribbon, interwoven at the corner. Using Lovely Lilac ink, I stamped En Francais onto the largest flower from the Pretties Kit. The largest flower from the Boho Blossoms punch was added in Lovely Lilac card for the centre, topped off with a large white halfback pearl. This was adhered into the empty frame created by the ribbon. Finally, the tag shape and the sentiment were stamped onto Whisper White card (using the stamp-a-ma-jig to get the positioning right) and punched out with the Medium Jewelry Tag. A small white halfback pearl was added with a glue dot and the tag popped up on half a dimensional onto a Lovely Lilac tag also popped up. This mat was popped up on dimensionals onto the card front.

I love the touch of elegance that the Pretties Kit gives, don't you?

Sara xx

Sunday, 4 July 2010

July inspiration challenge at In Love With Stamping


This is our inspirational challenge for July over at In Love With Stamping:


Certainly a challenge! The wallpaper reminded me a little of Bella Toile and so I took that for my starting point and created this:

Recipe
Stamp sets: Bella Toile, Oval All
Cardstock: Pink Passion, Close to Cocoa, Very Vanilla
Ink: Pink Passion, Close to Cocoa
Punches: Scallop Oval, Large Oval
Taffeta Ribbon: Chocolate Chip, Very Vanilla
Other: Hat Pin, Beads, Halfback Pearl (Pretties Kit)

With the lush hatpin and beads from the Pretties Kit and the taffeta ribbon as my focus, I decided to keep the layout of the card fairly simple. I stamped Bella Toile onto Very Vanilla card with Close to Cocoa and matted this flat onto Close to Cocoa card and then a Pink Passion card blank. The Best Wishes sentiment was stamped onto Very Vanilla card with Pink Passion ink and punched with the Large Oval. This was matted direct onto Pink Passion card punched with the Scallop Oval. The hatpin was made up with Pearl and Clear beads (and spacer beads in between) and tied with Chocolate Chip and Very Vanilla taffeta ribbon. I rolled glue dots around the stem of the hatpin to keep the beads in place. The sentiment was popped up on a double layer of dimensionals and adhered over the hatpin to keep it in place. A halfback pearl was added to the sentiment to complete it and tie in with the hatpin.

Enjoy the rest of your weekend.

Sara xx

Saturday, 3 July 2010

July sketch challenge at In Love With Stamping


Our sketch challenge this month over at In Love With Stamping is this one:


I decided to create an image that I then split into segments and then because I'd placed my focus in the upped right corner I just flipped the sketch to put my square on the opposite side for balance:


Recipe
Stamp sets: Touch of Nature, Sincere Salutations (sentiment)
Cardstock: Certainly Celery, Old Olive, Whisper White, Summer Sun, Basic Black
Ink: Black Stazon, Old Olive, More Mustard, Pumpkin Pie
SU Markers: Summer Sun
Stampin'Pastels: Certainly Celery, Old Olive
Other: Flowers, Rhinestone Brads (Pretties Kit)

I started by stamping the butterfly in Black Stazon and coloured it with Summer Sun marker and then shaded with More Mustard and pumpkin Pie picked up with a blender pen. This allows you to control the intensity of the colour so that it isn't too strong if that's the effect you're after. I masked the butterfly by stamping it again onto a post-it, cutting it out and placing over the original. The fern was stamped around in Old Olive. This image was then cut into segments and each segment was chalked around the edges with Certainly Celery (towards the inner) and Old Olive (at the outside edge). A little Old Olive ink was then sponged around the edges and the segments were adhered direct to an Old Olive mat. Flowers from the Pretties Kit were secured to the mat with Rhinestone Brads, cutting them up to fit the segments and layout. The mat was then adhered to the Certainly Celery card blank. A sentiment was stamped onto Summer Sun card with Black Stazon and matted onto Basic Black card. This was popped up on dimensionals on the card front.

Thanks for stopping by.

Sara xx

Friday, 2 July 2010

June Mini Draw

And the winner of my June Mini Draw is ... *drumroll* ...

Barbara

from my June Tart & Tangy class. I'll get your winnings out to you as soon as possible Barb.

If you'd like to be in with a chance of winning the July Mini Draw or the August Grand Draw then take a look here for details.

Paper folding for the ILWS challenge


Yay - I think I've finally got my home broadband back, just in time for the weekend. It started to grind to a halt last Sunday and then wouldn't work at all for the last few days but the engineer's been out and I think it's been fixed. Thank goodness. I've spent the last week extending my lunch breaks and going straight to Meadowhall after work just to be able to hop onto the free wifi offered by certain shops. I'm so wired from all the caffeine, it's no wonder I've not been sleeping properly, lol. Fingers crossed it will be smooth sailing again from now.

Anyhow, my second challenge for In Love With Stamping this month is a technique challenge - this could be anything from simple paper pleating through to origami. As long as there are three or more folded edges, it counts!

I went with this fan fold which then ended up as a set of circles:


Recipe
Stamp set: Circle Circus
Textured Cardstock: Cameo Coral, Creamy Caramel
Plain Cardstock: Whisper White
Ink: Cameo Coral, Summer Sun
DSP: Pink Flamingo
Punches: Scallop Circle, 1-3/4" Circle, 1-1/4" Circle, 1" Circle, Large Oval, Corner Rounder
Other: Cream Half-back Pearls (Pretties Kit)

I started with 5" square card blank in Cameo Coral textured cardstock and matted Creamy Caramel textured cardstock direct to it. Following Karin's Folded Medallion Flower Tutorial here and I created my large flower with Pink Flamingo DSP cut to 6cm x 8cm. Four "fans" created the full circle. I stuck them together using tape and then added them to the card front using glue dots. A large vanilla halfback pearl finished this largest circle. Next I stamped and punched the various Circles and arranged a layout before punching out segments so that they fit together. As I don't have a punch that really fits my fan-fold circle I used the Large Oval to trim my punched shapes. The Summer Sun circles were adhered flat to the card front and then I added the Cameo Coral circles popped up on dimensionals. To create a further theme to the Cameo Coral circles, I added smaller vanilla halfback pearls to them with glue dots.

Am I tempting you to join my Summer Share yet? Details are at the top of the page.

Have a great weekend.

Sara xx


Thursday, 1 July 2010

My colour combo challenge for you over at In Love With Stamping


Well it's a new month and so a new set of challenges over at In Love With Stamping. It was my turn to propose two of the challenges and this was the colour combo I set:

Almost Amethyst, Lovely Lilac, Chocolate Chip with optional Whisper White or Very Vanilla

And this is how I've used them:


Recipe
Stamp set: Oval All
Cardstock: Lovely Lilac, Almost Amethyst
Ink: Lovely Lilac, Almost Amethyst, Chocolate Chip
Punches: Scallop Oval, Large Oval
Taffeta Ribbon: Chocolate Chip
Rub-ons: Hidden Garden Blossoms
Other: Pretties Kit, Rhinestone Brad (Circle Ice)
Non-SU: Scallop and Circle die cuts

Two large scallop circles were die cut from Lovely Lilac and the back layer was scored in a straight line with seven scallops on one side of the scoreline. This seven scallop portion was adhered to the front layer with sticky strip, creating a stand for the card. The large Chocolate Chip rub-on from the Hidden Garden Blossoms was applied to a large circle, die cut from Almost Amethyst. Using the Lilac and Amethyst markers I coloured a small flower from the Pretties Kit and secured it to the centre of the rub-on with a rhinestone brad. Chocolate Chip taffeta ribbon was wrapped around the lower portion of the circle. This layer was popped up on dimensionals on the front of the card. Fabulous Friend was stamped in Chocolate Chip on Almost Amethyst and punched with the Large Oval. The flowers were coloured using the blender pen and Chocolate Chip ink. The sentiment was popped up on dimensionals on a Scallop Oval punched from Lovely Lilac. Both layers were then popped up on dimensionals on top of the ribbon.

Hope to see your creations with these colours in the gallery soon.

Sara xx