Showing posts with label Serene Snowflakes. Show all posts

Saturday, 18 June 2011

Learn new techniques for standout christmas cards


At our next technique class on Saturday 9 July we'll be covering:
  • the glitter window technique; and
  • the faux metal technique
to make these Christmas cards ...


... and a couple of other projects besides.

If you'd like to join us for this class which will take place at St Saviour's Church Hall, High Green, then please book your place(s) using the Paypal button on the right, no later than Saturday 2 July.

You can find more details here or you can email me if you have any queries.

Hope to see you there.

Sara xx

Monday, 20 December 2010

A batch of xmas cards with a bit of bling


We had a fantastic meal out with my parents for their anniversary on Saturday night. The restaurant had a real fire that was so cosy in contrast to the biting cold outside. And the food, the food was heaven. I was so glad we were able to make it even though the journey was a little risky. Little bruv did a great job driving the minibus.

Anyway, on with the crafting. I hope that I'm not spoiling the surprise for anyone with my post today. All my Christmas cards are on their way, but I guess with the weather conditions, there's no guarantee that they've arrived on time. I used two different designs for my batches of cards this year (in addition to the individual cards I've made throughout the year). This is one of them. I think I made around three dozen or so of these in total.


This is styled on an earlier card you can see here.


Recipe
Stamp set: Contempo Christmas, Serene Snowflakes
Cardstock: Cherry Cobbler, Naturals Ivory, Crumb Cake
Ink: Cherry Cobbler, Soft Suede, Versamark, Champagne Mist Shimmer Paint
Punch: Ornament
Other: Heat & Stick Powder, Fine Galaxy Glitter
Tools: Heat Tool, Crimper

The card is made in a similar way to the earlier version but the crimped square was sprayed with a shimmer mist that was made by mixing the Champagne Mist Shimmer Paint with rubbing alcohol in a spray bottle. For the side panels, the small single snowflake from Serene Snowflakes was stamped in Soft Suede onto the Naturals Ivory and the trio of snowflakes was stamped direct with undiluted Shimmer Paint.


For the inside, a mat of Naturals Ivory was stamped with the snowflake again in Soft Suede and with the sentiment from the Contempo Christmas in Cherry Cobbler.

Thanks for stopping by.

Sara xx

Sunday, 28 November 2010

A crafty gift for Christmas and year round


I created this mug and one like it for myself and my downline Jan to use at the recent convention we attended. I forgot to photograph Jan's before I gave it to her but it was identical except that the letters spelled out Jan's Java instead. The mugs were bought from Starbucks and are specially designed for you to add your own decoration (note - the mugs are handwash only, you can't pop them in the dishwasher). Although these are currently trimmed up for the Winter season we'll easily be able to ring the changes throughout the year.


Recipe
Stamp sets: Varsity Alphabet, Serene Snowflakes
Cardstock: Whisper White
Ink: Soft Suede, Baja Breeze

The mug comes with Starbuck's own instruction sheet inside and I simply unscrewed the base and used their instruction sheet as a template to cut my own cardstock insert. I stamped the letters in Soft Suede ink using the Varsity Alphabet set, angling then so that they'd fit. If you need to spell out longer names/words then you'll need a smaller alphabet (eg. Just Perfect). The Serene Snowflakes were added in Soft Suede and Baja Breeze inks.


You then roll your template around the inner core and slide it into the mug sleeve from the base, before screwing the base on again. The inner sleeve is a very tight fit and so you won't be able to add any embellishments. The Whisper White cardstock just about fits but it is a squeeze and I suggest trying thinner paper/card if you have difficulties.

I think these make a great personalised gift and there's no fear of mixing up people's drinks this way!

Enjoy the rest of your weekend.

Sara xx

Monday, 15 November 2010

A snowflake gift bag and window decoration


Today's project is another that I made for Convention, this time for a 3d swap. Again I made 10 of these to swap with others in my group (9 to swap and 1 to keep for myself).

I stayed with the same stamp set and colour scheme as I used for the Card Candy, so anyone in the same group as me for both, will have an easy time making a quick card to go with this gift.


Recipe

Stamp sets: Serene Snowflakes, Sparkly & Bright (sentiment)

Textured Cardstock: Baja Breeze

Plain Cardstock: Not Quite Navy, Whisper White

Ink: Versamark, Not Quite Navy, Signo White Gel Pen

Punches: Scallop Oval, 1-3/4” Circle, 1-1/4” Circle

Other: Dazzling Diamonds, White EP, Stampin’ Pastels, Basic Rhinestones

Tools: Heat Tool, Mat Pack, Paper Piercing Tool


The directions for the bag are here. This was made using Baja Breeze textured card. For the front of the bag I started with an 8.5cm square of Not Quite Navy card and punched out the partial 1-3/4"Circle to match the handle. The paper pierced border had faux stitching added with a White Signo Gel Pen. A cascade of snowflakes was added diagonally across the square with Versamark and then heat embossed with White EP. The centres of the snowflakes had Dazzling Diamonds added. The square panel was popped up on the bag front with dimensionals. The sentiment was stamped in Not Quite Navy ink onto Whisper White card and punched with the Scallop Oval. Pastels were used to chalk the edges of the sentiment and a small rhinestone dots the "i". The sentiment was also popped up on dimensionals.

Inside the bag was a snowflake window decoration:


Recipe

Stamp sets: Serene Snowflakes

Cardstock: Medium Window Sheet

Ink: Craft White, White Stazon

Narrow Taffeta Ribbon: Whisper White (Marina Mist pictured)

Other: Heat & Stick Powder, Fine Cosmo Glitter, Metallic Eyelets

Tools: Heat Tool, Crop-a-dile

Non-SU: Sucker Hanger (Poundland)


For the decoration I started with an octagon cut from Medium Window Sheet. This is an 8.3cm square, with the corners cut off (measure in 2.4cm from each corner). The large snowflake was stamped in Craft White ink (this shows up better than Versamark if the glitter is pale), heat embossed with Heat & Stick Powder, sprinkled with the Light Blue fine Cosmo glitter and then heated again to set (heat gently at all times so as not to melt the Window Sheet). A hole was punched in the top of the decoration and a Silver Eyelet set in. The edges of the ornament were brushed with White Stazon (the White Craft takes ages to dry on Window Sheet if you don't heat set it) to define the edges of the decoration and have it stand out better against the window. It was then popped over the sucker hanger and a bow added to finish it off (my Whisper White ribbon is hiding from me today so Marina Mist stepped in to save the day for my pic).

Thanks for stopping by.

Sara xx

Wednesday, 10 November 2010

Card candy swaps


Warning! Today's post is pic heavy.

I just lurve card candy, they're like regular crafting, squeezed into a concentrate, lol. And if I could only bear to part with them they make great presents for crafting friends too!

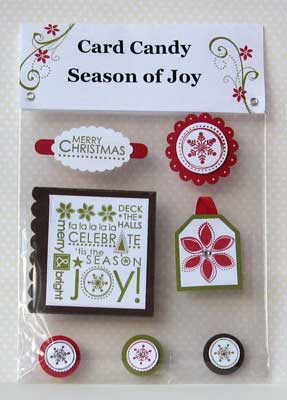
I took part in one of the ILWS organised swaps at Convention and made 10 lots of this candy:


Recipe

Stamp set: Serene Snowflakes, Four the Holidays (sentiment set)

Cardstock: Baja Breeze, Not Quite Navy, Whisper White, Medium Window Sheet, Vellum Paper

Ink: Not Quite Navy, Stazon White, Baja Breeze, Versamark

DSP: Elegant Soiree

Punches: Scallop Trim Border, Ornament, Butterfly, Scallop Square, 1-3/4” Circle, 1-3/8” Circle, 1” Circle, Star, Tag, Small Tag

Narrow Grosgrain Ribbon: Whisper White

Other: Silver Elastic Cord, Basic Rhinestones, Clear Rhinestone Brads, Dazzling Diamonds, Silver EP, White EP, Silver Brads, Large Silver Brad (Hodge Podge)


And these are all the lovely swaps that I got in return from the super talented ladies in my group (Group 3) (and I got to keep one of my own if you're wondering what happened to the 10th - it's not going spare, heehee).


From Emma using Cottage Garden


From Margaret using For Everything


From Michelle using Artisitic Etchings


From Kirsteen using Tiny Tags


From Rachel using Vintage Vogue


From Val using Growing Green


From Marisa using Season of Joy


From Jo using Cottage Garden


From Nicci using Contempo Christmas


And because Joanne and Jan (my upline and downline, together with me at Convention) were so jealous of my candy we've decide to have a little candy swap of our own so please pop back soon to see what we create for that.

Want your own card candy? Book a workshop with me and you and your friends can have a go at making your own. Just email me to find out how.

See you soon.

Sara xx

Saturday, 6 November 2010

Convention!! And a christmas snowglobe shaker card


Wow! Just walked in after two days at convention and it's just been fantastic! Such fun. What a lovely bunch of ladies, not just from the UK but from France and Germany too. (And they speak English so much better than I can manage French and German). So much crafting, so much swapping and so many laughs, absolutely brilliant. I can't wait to go again next year.

You'll never guess where it's going to be?

Give up?

We're going to be at Disneyland Paris!! (Squeals of delight)

Want to come with me? Email me to find out how.

I'll post more about this year's convention over the next few weeks.

For tonight, here's another challenge from over at In Love With Stamping. For this month's sketch challenge we have a snowglobe file that you can download here.

And this is what I made with it:


Recipe
Stamp sets: Winter Post, Serene Snowflakes, Sparkling, Four the Holidays
Cardstock: Baja Breeze, Very Vanilla, Whisper White, Medium Window Sheet
Ink: Not Quite Navy, Baja Breeze, Soft Suede, Whisper White Craft
Other: Dazzling Diamonds

The card blank is Baja Breeze cut using the In Love With Stamping snowglobe template but leaving it whole. I cut the card front (only) again, this time with the aperture, to use for the shaker sandwich. Using the Baja Breeze and Soft Suede markers direct to stamp I coloured the skaters selectively and stamped onto Very Vanilla card and then added some Dazzling Diamonds with a two way glue pen. This layer was adhered direct to the card front. Using the Whisper White Craft ink and the Sparkling wheel I stamped the snowflakes onto the Medium Window Sheet and adhered it behind the front layer aperture. The front layer was stamped with the sentiment in Not Quite Navy and snowflakes in Baja Breeze. The outer edges of a dimensionals sheet was placed all the way round the aperture on the reverse of the front layer and the snow (waste from punched borders) was added into the aperture before sealing to the front of the card.

Now I'm off to catch up on some sleep. Heehee

Sara xx
Wednesday, 6 October 2010

Limited supplies take 2 - vellum christmas gift bag


You may remember that one of my challenges over at ILWS is a limited supplies one and I've opted to repeat this challenge for today's project.

The challenge is that no card is allowed! You can use acetate, vellum, DSP, candles, tiles coasters ... in fact anything just as long as it's not cardstock.

My stamping uses two very popular sets at the moment that luckily have made it through to the new catty (and no wonder, I think we'd have had some major complaints if these had retired so soon).


Recipe
Stamp sets: Dasher, Serene Snowflakes
Cardstock: Cardstock Vellum
Ink: Versamark
Satin Ribbon: Whisper White
Other: Silver EP, White EP, Dazzling Diamonds, Pewter Jumbo Eyelets

I created the gift bag from cardstock vellum and cut and scored it in preparation (just gently scoring with the bone folder in the paper cutter groove, deep scoring will tear the vellum). I then decorated the gift bag before assembling. Dasher was stamped in Versamark and heat embossed with Silver EP and the trio of small snowflakes from the Serene Snowflakes set were stamped in Versamark and heat embossed with White EP. A 2-way glue pen and Dazzling Diamonds add a little bling to the bag (just visible in the pic). To assemble the bag I used SNAIL on the base and for the vertical join, which I kept to one of the bag corners so that it doesn't show too obviously. Pewter Jumbo Eyelets were used to add a Satin Ribbon handle.

My first full order should be arriving today (we had a more limited range to choose from for the demo pre-order) and so I'll get new punches to play with, DSP, bling, the new spritzer tool (so you you can expect some more distressing soon). Oh and a brand new stamp set and several new to me stamp sets (ie. ones that have carried through from the old catty that I hadn't gotten around to ordering). Guess what I'm up to this evening?

Edited 16:37 That'll teach me to read all the parcel tracking info fully next time - today's parcel is all my customer's Serene Snowflakes sets that they've been waiting for. Tomorrow's parcel is my new toys.

:-)

Sara xx


Sunday, 3 October 2010

Acetate pouch for bath salts


My second challenge for you all this month over at In Love With Stamping is a limited supplies challenge. No card is allowed! You can use acetate, vellum, DSP, candles, tile coasters ... in fact anything, just so long as it's not cardstock.

Here I've used acetate to create a pouch for bath salts to create a gift.


Recipe
Stamp set: Serene Snowflakes
Cardstock: Medium Window Sheet
Ink: White Stazon
Striped Grosgrain Ribbon: Basic Black
Other: Silver Elastic Cord

I used a template to cut the pouch from the Medium Window Sheet and then used White Stazon to stamp the small snowflake before adding sticky strip to the acetate fold and assembling the pouch. I added some more sticky strip to the inside of the Striped Grosgrain Ribbon before wrapping it around the pouch, so that it doesn't slide down. Silver Elastic Cord was used to tie the ribbon at the side.

As a Christmas gift I'll add coloured bath salts so that the snowflakes show up better, but I only had plain ones in the house to demo with - sorry.

Hope to see your creations in the ILWS gallery soon.

Sara xx

Tuesday, 28 September 2010

A snowflake gatefold card for Christmas


As we're so close now to the launch of the new catty I've made sure that today's card is made from items that are carrying forward to the new catty.

This is a christmas card that I started making a while ago at one of the Saturday St Saviour's get togethers, to demonstrate the heat and stick powder. I only recently got around to finishing it off though (blushes).


Recipe
Stamp sets: Serene Snowflakes, Sincere Salutations
Cardstock: Rich Razzleberry, Very Vanilla
Ink: Versamark, Rich Razzleberry
Punch: Large Oval
Other: Gold EP, Gold Brads, Heat & Stick Powder, Fine Cosmo Glitter

I started with an A6 portrait gatefold blank of Rich Razzleberry and stamped with the two smaller stamps over the front in Versamark. I added Heat & Stick Powder and heated until it had just melted and then added my Rose Pink glitter from the Fine Cosmo set and heated (very briefly) again just to set the glitter. The second largest snowflake was stamped in Versamark on a Rich Razzleberry mat and heat embossed with Gold EP. A Large Oval was punched out below it and used as a template to pencil in the oval onto the Very Vanilla mat below before using the Stamp-a-ma-jig to place the sentiment in Rich Razzleberry ink (the pencil marks were then erased). Gold brads were added to the corners of the top mat and the centre of the snowflake before popping it up on dimensionals on the Very Vanilla layer and then the front of the card. You may just be able to see in the pic above that I also added a Very Vanilla insert with the snowflake trio stamped in Rick Razzleberry at the bottom.


I'm loving this stamp set and can't wait to show you some of the cards that I've made with it in the new colours.

Not many more sleeps now, lol!

Sara xx

Saturday, 31 July 2010

A quick snowflake card ideal for batch making


My last card was just a little time consuming with the heat embossing, painting and cutting out but here's a quick and simple (and very low cost) version that I'll be demonstrating to the ladies over at St Saviours today. It's ideal for Stamp-a-stack cardmaking - making batches of the same card, (or a set using the same design in different colourways) for giving or for selling at craft fairs etc.


Recipe
Stamp set: Serene Snowflakes
Cardstock: Very Vanilla, Not Quite Navy
Ink: Not Quite Navy
Other: Dazzling Diamonds

I started with a 4-1/4" square blank that I stamped with the small snowflake and the trio of snowflakes in Not Quite Navy ink. I stamped the large snowflake with Not Quite Navy ink onto a 2-3/4" square of Very Vanilla card and matted it onto Not Quite Navy card. This topper was popped up on dimensionals in the centre. Finally I added a little Tombow to the centres of the snowflakes on the base card (no wasting it on those covered by the centre panel this way) and to the large snowflake in the centre and sprinkled Dazzling Diamonds over the top. Stamp a sentiment inside and you're all done. Quick, easy and cheap.

Have a great weekend.

Sara xx

Wednesday, 28 July 2010

Shimmering snowflakes in shades of purple


I have my friend Alex to thank for today's card. She was asking on the ILWS forum which of the shimmer paints she should go for. Now my first thought was the champagne mist because I love the delicate golden sheen it gives but then I also use Platinum a lot because it's opaque and gives a great solid image with stamps ... but then I also like Frost White because I can blend it with my reinkers and create all sorts of new colours. So I really use all three but for different effects. Helpful, huh?

But I haven't really used Frost White on its own and so I figured I ought to give it a go and what better than with some shimmery winter snowflakes ... in July! Lol.


Recipe
Stamp set: Serene Snowflakes
Cardstock: Elegant Eggplant, Lovely Lilac
Ink: Elegant Eggplant, Versamark, Frost White Shimmer Paint
Other: White EP, Clear Rhinestone Brads

The largest snowflake from the Serene Snowflakes set was stamped in Elegant Eggplant ink in the centre of the Lovely Lilac square. Using the stamp-a-ma-jig for positioning I then used the next largest snowflake and stamped off in each corner, using Elegant Eggplant again. I painted the centre swirls of each flake with Frost White Shimmer Paint using an aqaupainter. If you catch the light in one direction you can see the swirls in dark ink below and then if you turn the card slightly, you just see solid white - a gorgeous effect. I stamped the large snowflake again in Versamark onto Elegant Eggplant card and heat embossed with White EP. This flake was cut out leaving a narrow margin and trimming off the corner arrows completely. The large centre cross was painted with the Shimmer Paint (as for the corner flakes) and left to dry. Medium clear rhinestone brads were added to the centres of each corner snowflake. This Lilac layer was popped up on dimensionals in the centre of the card front. A large clear rhinestone brad was added to the centre of the Elegant Eggplant large snowflake and then this layer was popped up on dimensionals, lined up over the top of the centre snowflake.

I think Frost White might just be my favourite ...

... (at least for today, lol).

Which is your favourite Shimmer Paint and why?

Sara xx

Saturday, 29 May 2010

Dazzling and spotlighted christmas cards in two different colourways


Here are the other two christmas cards that we made at the St Saviours craft group last Saturday. They only take a few minutes longer to make up than those I showed you on Thursday but you also need to allow a little extra "drying" time (or use a heat tool to set).


Recipe
Stamp sets: Silent Night, Serene Snowflakes, Occasional Greetings (sentiment)
Cardstock: Not Quite Navy, Whisper White
Ink: Craft Whisper White
Other: Dazzling Diamonds

A Not Quite Navy blank was stamped all around the edges with the trio of Serene Snowflakes in Craft Whisper White ink and set aside to dry. Next I stamped the church and sentiment with Craft Whisper White ink onto Not Quite Navy card cut just a little bigger all round than the church stamp. This ink is like a white Versamark and so needs to be left for about 10min to dry. I didn't leave mine long enough and so smudged it and had to cover up with some more snowflakes in top right hand corner. When the Whisper White ink is dry then draw with a 2-way glue pen anywhere you want the snow to appear (eg. church roof, trees) and add dazzling diamonds. Take care because if the Whisper White Craft ink isn't dry the diamonds will stick to it as well as the glue! The church was then added to a mat of Whisper White and popped up on dimensionals.


Recipe
Stamp sets: Silent Night, Serene Snowflakes, Occasional Greetings (sentiment)
Cardstock: Rich Razzleberry, Very Vanilla
Ink: Craft Whisper White
Other: Dazzling Diamonds

This card was made as above but swapping in Rich Razzleberry in place of Not Quite Navy and Very Vanilla in place of Whisper White cardstock.


Recipe
Stamp sets: Silent Night, Occasional Greetings (sentiment)
Cardstock: Not Quite Navy, Brocade Blue, Whisper White
Ink: Craft Whisper White, Not Quite Navy
Punches: 1-3/8" Circle, 1-1/4" Circle
Other: Silver Elastic Cord, Silver Brads

I stamped the church and sentiment with Craft Whisper White ink in the centre of a Not Quite Navy mat (allowing room around the image for the elastic cord). While the ink was drying, the church was stamped again in Not Quite Navy ink onto a scrap of Whisper White card and punched with the 1-1/4" Circle centred on the church door. This was matted onto Brocade Blue card punched with the 1-3/8" Circle. These circles were adhered to the full stamped church, lining up the roofline and path. Using the template from the mat pack for even placement I pierced holes in each corner of the stamped mat, pushed my elastic cord through from the front to the back of one of the holes and secured it behind. A brad was added to this first hole and then at each corner a brad added and the cord wrapped around. At the last corner the cord was pushed through the final hole and secured before the brad was added. The church layer was added to a Whisper White mat and then to the Not Quite Navy card blank.


Recipe
Stamp sets: Silent Night, Occasional Greetings (sentiment)
Cardstock: Rich Razzleberry, Perfect Plum, Pale Plum
Ink: Craft Whisper White, Rich Razzleberry
Punches: 1-3/8" Circle, 1-1/4" Circle
Other: Silver Elastic Cord, Silver Brads

Again made as the Not Quite Navy card above but swapping cardstock as follows:
Not Quite Navy = Rich Razzleberry
Brocade Blue = Perfect Plum
Whisper White = Pale Plum

And swapping ink as follows:
Not Quite Navy = Rich Razzleberry

Hope these ideas help to kick-start your own christmas cards.

Have a great bank holiday weekend.

Sara xx
Thursday, 27 May 2010

Easy edged christmas cards in two different colourways


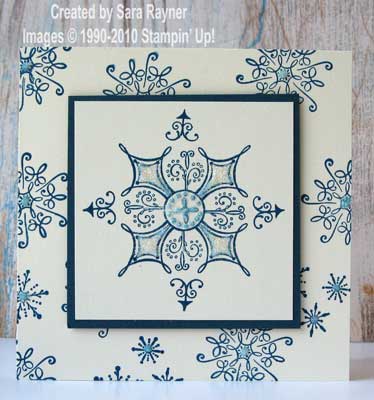
Here are a couple of the card designs that I demo'd to the St Saviour's group at the weekend. I prepared the Not Quite Navy samples beforehand and then made up the Rich Razzleberry versions on the day. I love this new colour and think I may be using a lot of it for my christmas cards this year.


Recipe
Stamp sets: Silent Night, Occasional Greetings (sentiment)
Cardstock: Not Quite Navy, Very Vanilla
Ink: Not Quite Navy
Taffeta Ribbon: Very Vanilla

A Very Vanilla A6 card front (14.9cm x 10.5cm piece) was stamped with the church in Not Quite Navy. I then cut the top third of an A4 sheet so I had a piece measuring 21cm x 10.5cm and scored at 14.8cm along the long edge to make an A6 wraparound. I tore the narrower side, using the stamped image to judge how much to tear off. The sentiment was then added above the church using the stamp-a-ma-jig for placement. Two pieces of ribbon were adhered behind the torn edge and tied at the front and trimmed. The torn edge was then adhered to the Vary Vanilla card front to hide the ribbon ends.


Recipe
Stamp sets: Silent Night, Tiny Tags, Occasional Greetings (sentiment)
Cardstock: Rich Razzleberry, Very Vanilla
Ink: Rich Razzleberry
Taffeta Ribbon: Very Vanilla
Punch: Medium Jewelry Tag
Other: Silver Elastic Cord

This version was made as for the Not Quite Navy card above but substituting Not Quite Navy with Rich Razzleberry. I also stamped and punched a couple of the Tiny Tag sentiments and tied them to the ribbon with the Silver Elastic Cord.


Recipe
Stamp sets: Silent Night, Serene Snowflakes, Occasional Greetings (sentiment)
Cardstock: Not Quite Navy, Very Vanilla
Ink: Not Quite Navy, Platinum Shimmer Paint
Punches: Eyelet Border, Scallop Oval, Large Oval

I cut the remainder of the coloured card (used for the torn edge version) in half lengthwise (to get 2 pieces measuring 19.2cm x 10.5cm) and scored one at 14.8cm along the long edge. This allows you to get 3 wraparounds (1 torn and 2 punched) from one A4 sheet. The narrower section was punched with the Eyelet Border and stamped with the trio of small snowflakes in Platinum shimmer paint. A Very Vanilla card front was stamped with the church in Not Quite Navy ink and adhered to the wrap. The sentiment was stamped in Not Quite Navy, punched and matted onto a scallop oval.


Recipe
Stamp sets: Silent Night, Serene Snowflakes, Occasional Greetings (sentiment)
Cardstock: Rich Razzleberry, Very Vanilla
Ink: Rich Razzleberry, Platinum Shimmer Paint
Punches: Eyelet Border, Scallop Oval, Large Oval

This version was made in exactly the same way as above just substituting the Not Quite Navy with Rich Razzleberry.

Great cards to stamp-a-stack in front of the TV over a couple of nights. You'll be ready for christmas in no time.

Sara xx

Saturday, 17 April 2010

Another xmas card and news that the full heart punch is available while stocks last


Back home and I slept so well last night. Bliss!

And I'm back to having all my crafting supplies to hand. My plan is a little light studying today just to finish up some of my notes from the last week, lots of crafting and then it's off out to the theatre tonight to see Calendar Girls.

I felt so well organised, making my xmas card for last week's Stamp With Us challenge (only another 70 or 80 to go, lol), that I couldn't resist making another one using the gorgeous Dasher stamp from the new Mini.

This is one of the new single stamps and he matches one of the images we have in the Christmas Jingle Simply Scrappin' kit. I used him as my focal point combined with some Serene Snowflakes.


Recipe
Stamp sets: Dasher, Serene Snowflakes
Cardstock: Not Quite Navy, Very Vanilla
Ink: Platinum Shimmer Paint
Punch: Eyelet Border

This is a very quick and easy card with just a little drying time for the shimmer paint. I daubed the shimmer paint direct to stamp using my sponge dauber and stamped the trio of snowflakes repeatedly down the sides of my card, rotating the stamp each time. This background was matted and layered onto a Not Quite Navy blank. Dasher was stamped in the same way and matted onto Very Vanilla that had been punched either side with the Eyelet Border. Super quick for stamping a stack of xmas cards.

We've just been advised today that there are still some Full Heart punches left in stock from our promotion last month and available at £12.50 (order no. 113693). This punch works great alone or teamed with stamps from I {Heart} Hearts, Simply Said and also last year's Sale-a-bration Polka Dot Punches set. I used it on the top heart on the card below.

It's available while stocks last but then you won't be able to get hold of it again until the new Idea Book and Catalogue comes out in October. Email me to order yours.


Have a great weekend.

Sara xx