Sunday, 1 August 2010

Helping Hudson -A Wheely Great Cause!

A short time ago I was contacted and asked if I would help with a fundraiser for a little boy in Australia. Due to the timescales involved I couldn't help out with designing any tutorials for them but I did agree to publicise the event. Why? Well for one: Hudson's story tugged at my heartstrings (you can read a little about him below) and two: as a Stampin' Up! demonstrator I'm part of a community that shares ideas and support for one another, freely and generously. I've had help from other demos in the UK, Europe and worldwide and this was an opportunity to give something back.

Today is the launch day of the event and it runs right through to 22 August. So what's it all about? Well, through the simple purchase of some fun -filled paper craft tutorials you can help give freedom to a little boy! Each bundle on sale has 10 fun-filled tutorials for just AU$10! And there are six themes to choose from: Bags & Boxes, Christmas, Kids’ Birthdays, Projects for Men & Boys, Punch Art & Scrapbooking. There’s even a FREE bonus bundle if you buy four or more! All proceeds go directly to help Hudson.

I bought mine through Paypal which makes exchange rate conversion and payment extremely easy. Paypal charged me £35.50 for all 6 bundles (that's 60 tutorials in total!), so that's less than £6 per bundle.

Now the Australian catalogue is a little different from ours and the tutorials won't be available for download until the middle of the week. Once I receive my tutorials I'll post an update on my blog to let you know how many of the tutorials per bundle use UK available products. I'm quite sure that you'll be able to substitute those that we do have but it may help you to choose between bundles.

You can buy the tutorials here.

The team are also running daily challenges and giveaways but please note that only Australian residents are eligible for prizes.

Hudson's Story

Hudson is 2 ½ but unlike most children his age, he has had a tough little life! Doctors realised he had an incomplete brain before he was born and as a newborn he was discovered to be legally blind.

Hudson has recently been diagnosed with both Cerebral Palsy and Epilepsy! His mobility has been hindered severely by his disabilities, however his family and friends wish nothing more than to give him the chance to get moving on his own. Hudson needs a special Wheelchair/Walker, called a Kid Walker. This device will help get him mobile, allow him to play with his brother and sister, interact with other children his own age and give him independence in his day today life!

If you'd like to know read more about the fundraiser or help spread the word, then please pop over to http://helpinghudson.blogspot.com

Sara xx

Saturday, 31 July 2010

Simply Stunning Summer Share

This post will remain at the top while I have shares available. Please scroll down to read my regular blog posts.

My regular ladies just lurve the Pretties Kit (they ooh and aah over them and like to stroke them, lol) but they usually put off buying it because there are always stamps, ink etc that they want more urgently. So I've decided to put together a Summer Share for them and I'm opening the offer up to my blog readers too.


The cost of the share is £8 including postage and it includes six 6" x 6" sheets of Bride DSP (3 of each design), plus 1m of Whisper White taffeta ribbon, plus 1/5 of the contents of the Pretties Kit (excluding the tin) as follows:

White flowers (10: 2 ea. in 5 sizes)
White halfback pearls (6 small, 4 medium, 2 large)
Cream halfback pearls (6 small, 4 medium, 2 large)
White round pearls w/holes (6 small, 3 large)
Cream round pearls w/holes (6 small, 3 large)
Clear round beads w/centre hole (2)
Clear round beads w/side hole (2)
Clear teardrops (4)
Clear round Rhinestone brads (4 small, 3 medium, 3 large)
Hat pins w/clutches (2)
Spacer beads (6)

This little bundle is perfect for creating wedding cards but most of the items can also be coloured with markers, ink pads or reinkers to match any project you have in mind. Please email me to order yours.

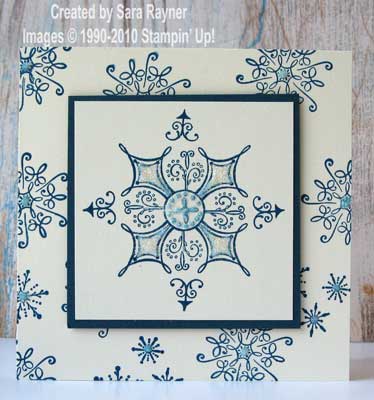
A quick snowflake card ideal for batch making


My last card was just a little time consuming with the heat embossing, painting and cutting out but here's a quick and simple (and very low cost) version that I'll be demonstrating to the ladies over at St Saviours today. It's ideal for Stamp-a-stack cardmaking - making batches of the same card, (or a set using the same design in different colourways) for giving or for selling at craft fairs etc.


Recipe
Stamp set: Serene Snowflakes
Cardstock: Very Vanilla, Not Quite Navy
Ink: Not Quite Navy
Other: Dazzling Diamonds

I started with a 4-1/4" square blank that I stamped with the small snowflake and the trio of snowflakes in Not Quite Navy ink. I stamped the large snowflake with Not Quite Navy ink onto a 2-3/4" square of Very Vanilla card and matted it onto Not Quite Navy card. This topper was popped up on dimensionals in the centre. Finally I added a little Tombow to the centres of the snowflakes on the base card (no wasting it on those covered by the centre panel this way) and to the large snowflake in the centre and sprinkled Dazzling Diamonds over the top. Stamp a sentiment inside and you're all done. Quick, easy and cheap.

Have a great weekend.

Sara xx

Wednesday, 28 July 2010

Shimmering snowflakes in shades of purple


I have my friend Alex to thank for today's card. She was asking on the ILWS forum which of the shimmer paints she should go for. Now my first thought was the champagne mist because I love the delicate golden sheen it gives but then I also use Platinum a lot because it's opaque and gives a great solid image with stamps ... but then I also like Frost White because I can blend it with my reinkers and create all sorts of new colours. So I really use all three but for different effects. Helpful, huh?

But I haven't really used Frost White on its own and so I figured I ought to give it a go and what better than with some shimmery winter snowflakes ... in July! Lol.


Recipe
Stamp set: Serene Snowflakes
Cardstock: Elegant Eggplant, Lovely Lilac
Ink: Elegant Eggplant, Versamark, Frost White Shimmer Paint
Other: White EP, Clear Rhinestone Brads

The largest snowflake from the Serene Snowflakes set was stamped in Elegant Eggplant ink in the centre of the Lovely Lilac square. Using the stamp-a-ma-jig for positioning I then used the next largest snowflake and stamped off in each corner, using Elegant Eggplant again. I painted the centre swirls of each flake with Frost White Shimmer Paint using an aqaupainter. If you catch the light in one direction you can see the swirls in dark ink below and then if you turn the card slightly, you just see solid white - a gorgeous effect. I stamped the large snowflake again in Versamark onto Elegant Eggplant card and heat embossed with White EP. This flake was cut out leaving a narrow margin and trimming off the corner arrows completely. The large centre cross was painted with the Shimmer Paint (as for the corner flakes) and left to dry. Medium clear rhinestone brads were added to the centres of each corner snowflake. This Lilac layer was popped up on dimensionals in the centre of the card front. A large clear rhinestone brad was added to the centre of the Elegant Eggplant large snowflake and then this layer was popped up on dimensionals, lined up over the top of the centre snowflake.

I think Frost White might just be my favourite ...

... (at least for today, lol).

Which is your favourite Shimmer Paint and why?

Sara xx

Tuesday, 27 July 2010

A summer flower for the Mojo Monday challenge


Well I hope that those of you that have broken up for the summer holidays are having a relaxing time. I'm still at work unfortunately, so please spare me a thought when you're enjoying a little extra crafting time. At least I get a few weeks free of study, to squeeze in a little extra crafting of my own.

Today's card is for the Mojo Monday challenge. As it's the last Monday of the month we have a choice of round or square:

I opted for the square version:


Recipe
Stamp sets: A Flower for all Seasons, Occasional Greetings (sentiment)
Cardstock: Real Red, Cameo Coral, Summer Sun, Whisper White
Ink: Black Stazon, Real Red, Watercolor Wonder Crayons
DSP: Pink Flamingo
Wide Grosgrain Ribbon: Old Olive

I stamped the main image with Black Stazon and then used an aquapainter with the watercolor wonder crayons to paint it. The background and ribbons were adhered direct and the coloured image was popped up on dimensionals. I applied dimensionals to each end of the back of the sentiment and pushed the ends in a little when adhering it to the front of the card so that it bows out a little.

Thanks for stopping by.

Sara xx

More pix from our Stamptacular

Jan's got her pix from our Summer Stamptacular up on her blog now. Please pop on over to see the lovely little altered notebooks she made for all the attendees.

Here are pix from her afternoon project - a scrapbook in a box:


Closed


And opened out

Isn't it sweet! I didn't get time to make it on the day but I've got the instructions and materials and I'm going to put it together for my Mum for her birthday next month.

Back in a jiffy.

Sara xx

Sunday, 25 July 2010

A spectacular Stamptacular

Finally catching up again. I took Bess to her socialisation class this morning, then went visiting my parents and then DH and I have been to the cinema to see Inception (fantastic film, lots of layers to it, if you enjoyed Memento (same Director) then I think you'll enjoy this one too though there's more action and special effects in it). The film was my little treat after all the preparation for yesterday's big event.

My amazing downline Jan and I held our full day Summer Stamptacular and it really was a fantastic day with such a lovely bunch of ladies.

We set everything out in advance for them with little nameplates and bottled water with choccie in the hanger. Then when they came in we gave them each a goodie bag that included the Tree for All Seasons stamp set and a decorated notebook.

Our first project was a boxed set of all occasion cards, with one for each season:


The boxed set


Spring


Summer


Autumn


Winter

After lunch they worked on Jan's project of a scrapbook in a box. I don't have pix of the finished project so I'll steal them from Jan's blog just as soon as she's posted them. Here are the ladies though, don't let the big smiles fool you - we worked them all very hard.


Our final project for the day was a matching card and gift bag


The bag's big enough to take a set of A6 cards and envelopes.

There was also a bonus waterfall card project that I'd prepared just in case we ran out of things to do, lol. We didn't get time to make it, but they all took the instructions and materials home to finish as homework ;-)


Jan and I so enjoyed the day that we're already talking about organising another, though I think we'll catch our breath first, lol. I'll post details when we decide on a date.

Sara xx

Thursday, 22 July 2010

A wedding card using the Bride papers and Pretties


Not much chat from me today as I'm still getting prepared for Saturday, so it's a quick post and then back to cutting card :-)

I figure the wedding season is into full swing now and so I thought I'd share a plain and simple wedding card that makes the most of the Bride DSP (there are still shares available that include the DSP, Pretties and ribbon if you'd like to order yours).

Recipe
Stamp Set: Mr & Mrs
Cardstock: Blush Blossom, Whisper White
Ink: Blush Blossom, Versamark
DSP: Bride
Punches: Full Heart, Scallop Oval, Large Oval
Ribbon: Whisper White Taffeta
Other: Halfback Pearls (Pretties Kit), Gold EP

The striped Bride DSP was matted onto a Blush Blossom card blank. I then punched the hearts from the other Bride paper with the Full Heart punch and sponged them with Blush Blossom ink. Three small halfback pearls were added to one heart with glue dots and a dinky ribbon to the other. The sentiment was stamped in Versamark and heat embossed with Gold EP. The hearts and sentiment were popped up on dimensionals.

Back soon.

Sara xx

Tuesday, 20 July 2010

A bit of sparkle


Wow, my internet is still working, can you believe it? For anyone who hasn't been following along - my broadband connection has been on again, off again (mainly off) for nearly a month and so I've been grabbing internet time here and there in coffee shops. So ... what have I missed sharing with you?

I went to see Laughter in the Rain at the Lyceum last week. It's the Neil Sedaka story and was absolutely excellent. I love musicals anyway but I was most impressed at the energy of the performers, especially the male lead, on what was a really hot and muggy night. Less impressive was the service at the restaurant we went to before the show. We tried Ego, next to the Winter Gardens. Despite having made reservations and explaining that we were going to the theatre, it took an hour to get served, then we waited ages for our puds and nearly missed the beginning of the show. The desserts were delicious but the main courses were rather bland. Won't be going there again.

Friday I had a stand at a local School Fayre and it was also DH's birthday. My mojo has been missing and so he got a Blue Peter card (here's one I made earlier), poor thing. In the evening we went to the Blanc Brasserie in Leeds. It's a Raymond Blanc chain of restaurants and not too badly priced ... until you have starter, main course, dessert, wine and after dinner drinks (and a bottle of french cider to take home for DH as well) and then it adds up a little bit. On the other hand the service couldn't have been better and the food was excellent. They even put a birthday candle on DH's Tarte au Citron, lol. This one we will be going back to again ... when we've saved up.

Well I think that's the fun things caught up now, so on to the cardmaking.

I started this card last night but had to wait for some elements to dry and so couldn't finish it and post until this evening.


Recipe
Stamp sets: Touch of Nature, All a Flutter
Textured Cardstock: Sage Shadow
Plain Cardstock: Whisper White
Ink: Sage Shadow, Regal Rose, Black Stazon
Punch: Boho Blossoms
Other: Flower and Rhinestone Brad (both Pretties Kit), Champagne Mist Shimmer Paint, Crystal Effects, Fine Galaxy Glitter, Medium Window Sheet


I started by dragging my Regal Rose ink pad across the large flower to colour it and then used an aquapainter dipped in Champagne Mist Shimmer Paint to paint it all over. This gives a lovely golden shimmer to the flower and it also changes the shade of pink quite considerably to a more orangey shade. The flower was then left to dry. I stamped the All a Flutter butterfly in Black Stazon onto Medium Window Sheet. (You could use the butterfly from the Touch of Nature set instead but at this stage I hadn't decided on my background and I think I prefer this size butterfly with the flower anyway). This was "coloured in" on the reverse of the stamped window sheet by adding Crystal Effects and Fine Galaxy Glitter in sections, letting each colour dry before adding the next. I used Black for the body and Champagne and Silver for the wings. Once completely dry, I cut out the butterfly leaving a margin all around and a strip at the top for the "dangle". To complete the card this evening I created a 4x4 card blank from textured Sage Shadow. A mat and a scrap of Whisper White were both stamped with the fern from the Touch of Nature set in Sage Shadow. I then punched a large flower from stamped scrap using the Boho Blossoms punch to create the flower centre. A large Rhinestone Brad completed it. The dangle strip for the butterfly was adhered behind the mat before popping up on dimensionals on the card front.

Thanks for stopping by.

Sara xx

Sunday, 18 July 2010

Last day for guaranteed bookings for our Summer Stamptacular

Yes, just a quick reminder that today is the last day for guaranteed bookings for our Summer Stamptacular event. This is a full day's crafting with all materials provided, together with full demonstrations and printed instructions to take away with you. On top of that there will be refreshments, a light lunch, free prize draws and a few surprises along the way - all of that for just £30 (£27 each when you bring a friend). It takes place next Saturday 24th July at Tankersley Welfare Hall (just a short way from J36, off the M1).

Not booked your place yet? Then pop over here and use the book now buttons to pay securely through Paypal or email me for additional payment options.

Here's a sneak peek at one of the projects we'll be doing (and if you're not a girlie pink person, don't worry, we do have a couple of alternate colourways).


Off now to finish cutting card and making up packs ready.

Hopefully now my internet's back up (I really shouldn't tempt fate by saying that should I?) I'll be able to get back to my regular crafting and blogging tomorrow.

Sara xx